
Getty Images/iStockphoto
How to create an EC2 instance using PowerShell
PowerShell has practical integrations that provide users with cross-platform capabilities. Get to know prerequisites and resources to create an EC2 instance using PowerShell.

While many IT teams use AWS Management Console or AWS Command Line Interface, or CLI, to manage AWS operations, others turn to PowerShell.
With AWS Management Console, admins use a GUI to control AWS resources. While a GUI is a good way to learn AWS, it requires a lot of manual work. This can be a challenge when admins start to automate AWS deployments.
With CLI, admins can control AWS resources from the command line and write automation scripts. PowerShell is also a command-line tool, but when compared to AWS CLI, it can provide some useful integrations and cross-platform capabilities.
Follow this tutorial to learn how to launch an Amazon EC2 instance using PowerShell, as well as prerequisites and needed dependencies.
Local prerequisites
AWS has several PowerShell packages you can use to manage your account, such as the following:
- AWS.Tools. A modularized version of AWS Tools for PowerShell. This can be installed on a Windows-based computer, as well as on a Linux or macOS computer.
- AWSPowerShell.NetCore. The single, large-module version of AWS Tools for PowerShell. This can be installed on a Windows-based computer, as well as on a Linux or macOS computer.
- AWSPowerShell. The legacy, single, large-module version of AWS Tools for PowerShell. This can only be installed on a Windows-based computer.
The following examples use the AWS.Tools module on Windows. The main advantage of AWS.Tools is that you don't have to install all the PowerShell modules to manage your AWS account. While users must deal with the complexity of anticipating the modules they'll need, it saves space and time. Be sure to also follow the prerequisite instructions for account, Identity and Access Management user and access key configuration.
Install the required modules with the following command:
Install-AWSToolsModule AWS.Tools.EC2,AWS.Tools.SimpleSystemsManagementIf an error displays stating the Install-AWSToolsModule command does not exist, ensure the AWS installer module is already installed with the following:
Install-Module -Name AWS.Tools.InstallerCreate the dependencies
Before users can create an EC2 instance, they need to have several resources already created. Reference the Get- commands to retrieve the appropriate IDs.
Creating the minimum setup to deploy and access an EC2 instance requires a VPC with a subnet, some other networking components and the EC2 instance itself.
How to launch a VPC
If there is an existing VPC, look up the VPC ID with the following command:
Get-EC2Vpc -Region us-west-2To create a new VPC, use the following steps.
Step 1. Define a subnet in Classless Inter-Domain Routing (CIDR) notation:
$vpcCidr = '10.0.0.0/16'Step 2. Create the VPC using the New-EC2Vpc command:
$vpc = New-EC2Vpc -CidrBlock $vpcCidrStep 3. Out of the box, an AWS VPC does not have DNS configured. Enable DNS on the VPC to pass it on to any EC2 instances inside of it:
Edit-EC2VpcAttribute -VpcId $vpc.VpcId -EnableDnsSupport $trueStep 4. To resolve your EC2 instance hostnames publicly, use the following:
Edit-EC2VpcAttribute -VpcId $vpc.VpcId -EnableDnsHostnames $trueHow to deploy network resources
Next, add a couple network resources to ensure the new EC2 instance has access to the internet. These resources include an internet gateway, a route to the route table and a subnet inside of the VPC subnet.
To deploy network resources, use the following steps.
Step 1. Create an internet gateway
An internet gateway enables a VPC to communicate with the internet. First, create one:
$internetGateway = New-EC2InternetGatewayThen, associate it to the VPC:
Add-EC2InternetGateway -InternetGatewayId $internetGateway.InternetGatewayId –VpcId $vpc.VpcIdStep 2. Create the route table
To enable the nodes on the network, including the EC2 instance, to know how to route to the internet, there must be a route table and route. Create the route table, and associate it with the VPC:
$routeTable = New-EC2RouteTable -VpcId $vpc.VpcIdThen, add a default route to it:
New-EC2Route -GatewayId $internetGateway.InternetGatewayId -RouteTableId $routeTable.RouteTableId -DestinationCidrBlock '0.0.0.0/0'Since the default route is the only route added to the route table, all traffic goes through the internet gateway. Modify this rule, or add further rules as needed. Modifications are a better option to control what traffic is sent over the internet gateway or to route other traffic elsewhere.
Step 3. Create a subnet
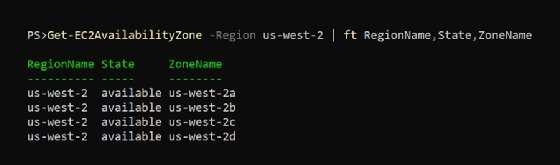
To create a subnet inside of the VPC's subnet, first, find an Availability Zone to create it inside of:
Get-EC2AvailabilityZone -Region us-west-2 | ft RegionName,State,ZoneNameThis displays all the zones in a Region. In this case, it references the Region us-west-2 as seen in Figure 1:
Create the subnet:
$subnet = New-EC2Subnet -VpcId $vpc.VpcId -CidrBlock '10.0.1.0/24' AvailabilityZone 'us-west-2a'Then, register the subnet with the routing table:
Register-EC2RouteTable -RouteTableId $routeTable.RouteTableId -SubnetId $subnet.SubnetIdHow to create and delete an Amazon EC2 instance
The easiest way to create an EC2 instance is with Amazon Machine Images (AMIs). These enable VMs to get up and running quickly.
Step 1. Select an AMI
To see the AMIs that the Region supports, use Get-SSMLatestEc2Image.
To find Windows images, use the following:
Get-SSMLatestEC2Image -Path ami-windows-latest -Region us-west-2To look at Linux images, use the following:
Get-SSMLatestEC2Image -Path ami-amazon-linux-latest -Region us-west-2From the list, select the appropriate image -- in this example, Amazon Linux 2023:
$ami = Get-SSMLatestEC2Image -Path ami-amazon-linux-latest -Region us-west-2 -ImageName 'al2022-ami-minimal-kernel-5.15-x86_64'Step 2. Select an EC2 instance type
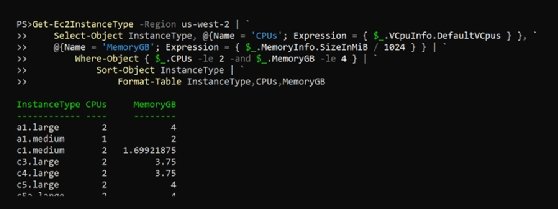
To select an EC2 instance type, use the Get-Ec2InstanceType command. This provides a lot of output. For example, in Figure 2, the us-west-2 Region has 506 instance types.

Filter results by memory and CPUs. As an example, here's how to find every instance type with at most 4 GB of memory and two CPUs:
Get-Ec2InstanceType -Region us-west-2 | `
    Select-Object InstanceType, @{Name = 'CPUs'; Expression = { $_.VCpuInfo.DefaultVCpus } } `
    @{Name = 'MemoryGB'; Expression = { $_.MemoryInfo.SizeInMiB / 1024 } } | `
        Where-Object { $_.CPUs -le 2 -and $_.MemoryGB -le 4 } | `
            Sort-Object InstanceType | `
                Format-Table InstanceType,CPUs,MemoryGB
To adjust that command to specific resource needs, change the Where-Object expression. The command has simplified output that looks similar to Figure 3.
From the list, select t2.micro, which is in the AWS free tier. With the selected EC2 instance type, create the EC2 instance:
$newEC2Splat = @{
    Region            = 'us-west-2'
    ImageId           = $ami
    AssociatePublicIp = $false
    InstanceType      = 't2.micro'
    SubnetId          = $subnet.SubnetId
}
New-Ec2Instance @newEC2Splat
The output looks similar to Figure 4.

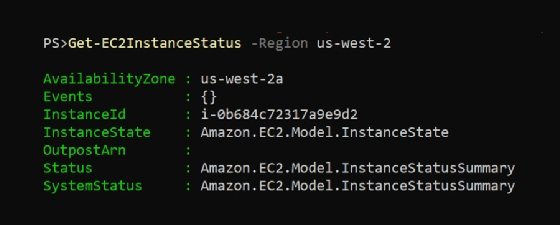
Now, you can find the instance with Get-Ec2InstanceStatus, pictured in Figure 5.
Step 3. Delete an EC2 instance
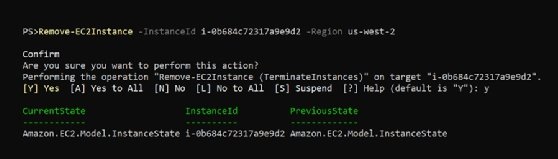
To delete that instance, retrieve the instance ID with the previous command, and then use Remove-EC2Instance:
Remove-EC2Instance -InstanceId i-0b684c72317a9e9d2 -Region us-west-2Confirm the action, and see an object summarizing the changed states, as in Figure 6.
Editor's note: This article was updated to improve the reader experience.
Anthony Howell is an IT strategist with extensive experience in infrastructure and automation technologies. His expertise includes PowerShell, DevOps, cloud computing, and working in both Windows and Linux environments.


