Work from the ground up with a data center raised floor
A raised-floor design is costly, so proper planning and installation is the key to maximize your investment.

There are many considerations surrounding the selection and use of raised floors in a data center and plenty of information is available on the subject. Once you’ve decided to use a raised floor, you’re mostly on your own when it comes to layout and maintenance. The steps below will help you make the most of your investment.
Keep raised-floor tile layout in mind
Raised access flooring won’t do much good if you can’t access the electrical, mechanical and other infrastructure beneath, so align racks and cabinets with tile cut lines – the edges where tiles meet.
Anything that overlaps will trap the tile so it can’t be removed. This would be fine if there was nothing important underneath, but that’s rarely the case. The National Electrical Code (Article 314.29) requires electrical outlets and boxes to remain accessible. As a best practice, cable trays and coolant piping should also be accessible. You don’t want to move cabinets full of working servers, switches, disk storage and other IT equipment to inspect cabling, access a valve or repair a leak.
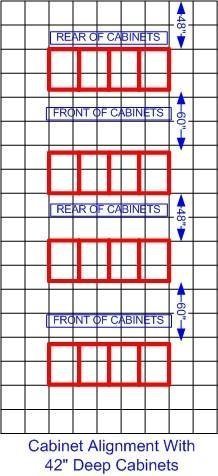
Figure 1: Aligning the rear of the cabinets with the tile lines provides more space for front-loading equipment
Uniform cabinets or racks are usually aligned with the rear edge of the tile cut line. If the cabinet is 24 or 48 inches deep it will align with U.S. standard 24-inch square tiles. Metric cabinets usually fit the same way on 600mm square tiles. However, when cabinets are nominally 36 or 42 inches deep, aligning the rear of the cabinets with the tile lines provides more space for front-loading equipment as in Figure 1. Since many modern servers and switches are deep and heavy, extra wiggle room is not only useful but necessary for server-lifting devices and can be gained without sacrificing any extra floor area.
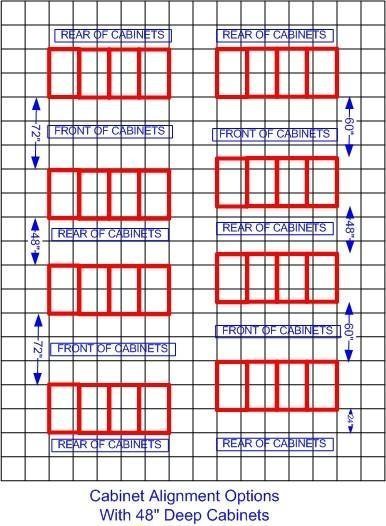
Figure 2: Cabinets that are 48-inches deep can be placed in a configuration to overlap tiles in alternate rows.
On the other hand, 48-inch deep cabinets are increasingly popular because of growing equipment size and cable volume. They’re designed for very deep hardware and will need the most room in front. The best practice is to create three-tile (or 6-foot wide) cold aisles. This also provides space for more air-flow tiles for cooling. You could use a layout that overlaps tiles in alternate rows as shown in Figure 2, but this only saves 2 feet in every 38, so it’s probably not worth the effort unless you have a very large data center.
An important aspect of tile layout is finding the best placement of the floor grid in the room. The data center architect usually calls out a raised floor starting point on the construction drawings, referenced to some immovable point in the room like a column centerline, but this may not result in the most efficient use of space. Instead, create a floor grid-based on planned cabinet depths and aisle widths, impose a logical equipment layout on the grid and adjust the entire plan and tile grid within the space to achieve the best aisle spacing at the extremes of the room. Doing so will avoid ending up with either a very narrow aisle or a wide one that wastes space at one end of the room. You may even gain another full row of equipment cabinets.
It’s vital that everything in the room — cabinets, cable trays, lighting, air conditioner locations and ducts, power busways or wireways, etc. — be either dimensioned from the raised floor starting point or specified in relation to the raised floor grid (aligned with tile cuts, centered on a tile row, etc.). The raised floor grid should govern where everything goes so any differences in actual constructed dimensions — known in the construction industry as “field conditions” — won’t cause related elements to be misaligned. For example, if a wall moves a few inches, everything in the room moves with it and remains in alignment.
Selecting the best raised-floor tile covering
Another important decision is the floor surface and its anti-static characteristics. Don’t bother yourself about the style of your data center, because the facility should be off-limits to anyone who doesn’t really need to be there. Make it a neutral color just to be safe. Regardless of how your data center looks, the choice of floor material is incredibly important.
Carpet should never be used in a data center because it accumulates dirt that can’t be completely removed and eventually contributes to static generation. Even “anti-static” carpeting loses its electrical qualities over time and could actually contribute to rather than prevent electrostatic discharge (ESD) events that damage circuits.
Vinyl Composite Tile — usually abbreviated “VCT” by architects — is the flooring most commonly used for utility floors, such as corridors and lunch rooms. It comes in many patterns and colors but is subject to cracking and chipping and does little to dissipate static charges. VCT needs to be washed, buffed and waxed regularly, and you absolutely do not want the extra foot traffic in your data center. That’s on top of the dust from buffing, the accumulation of grime in the wax and thorough washing with harsh chemicals for wax removal. Pure vinyl tile offers nice aesthetic choices and doesn’t need waxing but does need regular buffing and will still create dust. Vinyl is also a soft material that damages easily when moving heavy equipment.
High Pressure Laminate (HPL) is the best surface for raised floor panels. The HPL surface is hard and can be cleaned with a damp mop. HPL minimizes static generation and has excellent static reduction when laminated to a properly grounded metal surface — such as a cement-filled all-metal tile. Some raised-floor manufacturers have introduced confusion by calling HPL a “low-static-generation floor tile” and giving “static dissipative floors” the same definition as “static conductive floors.”
The best way to avoid confusion, invalid comparisons and competing product claims is to specify the resistance characteristics you want.. The generally accepted resistance range for data centers is 1.0 x 10⁶ to 2.0 x 10¹⁰ Ohms (1,000,000 to 20,000,000 Ohms) which must be specified for the assembled tile and measured from any point on the surface to a properly grounded under-structure. Without the under-structure, the surface material is useless.
This might sound like a very high resistance range. You might think a very low resistance or conductive floor would be better, but conductive floors are meant for clean rooms used in the manufacture of sensitive electronics components. Using them in data centers is a bad idea because conductive floors create a dangerous direct path to ground. If an energized wire touches a metal cabinet or a fault condition occurs, someone could be electrocuted. Some level of resistance from the floor to ground will bleed off static charges safely without allowing the floor to ground you directly.
Unfortunately, HPL material is brittle, so it isn’t suitable for surfaces that aren’t absolutely flat, such as in data centers without raised floors. Also, manufacturers of the HPL material don’t guarantee that it can be laminated to cement surfaces. Without a metal underlayer, it won’t have the grounding characteristics we want in a data center floor either. After carefully considering your options and buying your floor tiles, it’s time to deal with installation.
Installing and maintaining your raised-access floor
Raised floor tiles should fit tightly, especially if they are used to convey air, because leakage can waste expensive air conditioning. When replaced, they are often kicked into position until they seat. Take great care if you do this; it can cause edges that are not integral to the tile surface to delaminate and peel off and cause edges that are not properly manufactured to chip and crack. Let’s look at air plenum floors and make sure we don’t overlook the importance of proper installation. This is not something most architects are familiar with, so it’s important to let them know you need your floor installed to ensure minimal air leakage. Tight, accurate installation is required.
The tiles aren’t your only worry. Every edge around walls, air conditioners, power distribution units (PDUs) and any holes cut for pipes or cables is another chance for air to leak. You can pick from several different types of cable seals including “brush strips,” “gland type” and pillows. Permanent seals ensure holes will always be reasonably well closed, but temporary pillows can certainly be used if people are trained to replace them. In retrofits where cables already run through holes, pillows are certainly easiest and can make a big difference in cooling effectiveness, but some brush seals can also be installed in two pieces around existing cables.
For new data centers, specifications should require the floor installer to return and re-level the floor after all under-floor work is done, but before cabinets are installed. It’s a good idea to also have the floor leveled again after several years, or whenever the tiles are showing signs of unevenness. This can only be done in the aisles once cabinets are in place, but since that’s where all the work and movement will occur, that’s where good maintenance counts. It would be a good idea to have the under-floor cleaned right before re-leveling as well.
Now that you’ve got your floor installed in the best possible way, don’t forget about maintenance. To maintain floor stability, leave at least four tiles between open ones, and don’t remove more than two adjacent tiles. Doing this also keeps at least some air pressure in the floor plenum to preserve adequate cooling. After tiles have been removed and replaced a number of times they tend to lose their tightness, which means tripping hazards, uneven surfaces for moving equipment and greatly increased air leakage.
Finally, we need to consider ramps, the nemesis of raised floors. A ramp may be required for adequate access by disabled employees and might even seem like a good idea for rolling equipment into place. But with a minimum required slope of 1:12, there are 12 feet of ramp for every 1 foot of height change and that doesn’t include “turn-around landings” at the top and bottom. Those are generally about 5 feet each. In addition, moving ponderous, expensive and possibly top-heavy computing hardware up a 1:12 grade is not particularly easy – or even safe – so a 1:15 slope is preferable for a data center if space permits. Ideally, the building can be constructed with a “depressed slab,” which is like a large bathtub in which the raised floor is built so its finished height is even with the surrounding building floors. In other words, ramps take up a lot of floor space; if you have a choice, use a depressed slab.
In short, there’s much more to an effective raised access floor installation than simply deciding that you want one and determining its height. Raised floors are expensive, so it’s wise to put the effort in at the beginning to ensure you get the most from your investment and have less trouble down the road.
ABOUT THE AUTHOR: Robert McFarlane is a principal in charge of data center design for the international consulting firm Shen Milsom and Wilke LLC. McFarlane has spent more than 35 years in communications consulting, has experience in every segment of the data center industry and was a pioneer in developing the field of building cable design. McFarlane also teaches the data center facilities course in the Marist College Institute for Data Center Professional program, is a data center power and cooling expert, is widely published, speaks at many industry seminars and is a corresponding member of ASHRAE TC9.9 which publishes a wide range of industry guidelines.