DevOps lab: Build Vagrant VMs to learn immutable infrastructure
This article is part of a series to help IT ops professionals learn DevOps by building a home lab. In this first step, a cluster of Vagrant VMs represents immutable infrastructure.

In a DevOps lab, use VMs on a laptop to learn how to build the server deployment side of an immutable environment. In production, stable operations usually means network-booting servers into scripted builds.
DevOps adherents strive for stable operations, founded on consistent OS deployment -- no matter what development throws at them. Immutable infrastructure is a key tenet to maintain stable deployments with rapid code releases.
HashiCorp Vagrant provides a simple way to bypass the Preboot Execution Environment and operating system installs for a DevOps lab. Vagrant downloads OS images and allows the administrator to automatically create Vagrant VMs to run them with some basic configuration.
Follow this Vagrant tutorial in the DevOps lab to deploy a Linux VM and then extend the configuration to three.
Set up Vagrant
To install Vagrant, download the proper installer for your OS from http://vagrantup.com/. The installer will use Oracle VirtualBox as the default Vagrant VM platform, though the tool also works with other virtualization options.
Author's note: There is an issue with some recent Vagrant boxes and older VirtualBox releases. The initial, automated secure shell (SSH) connection fails. One solution is to install the latest version of VirtualBox from https://www.virtualbox.org/ after installing Vagrant.
With Vagrant and VirtualBox installed, open a command prompt and create a new directory. For this tutorial, the directory is called DevOpsHomeLab. Change into the directory and run vagrant init to set up a basic Ubuntu 16.04 VM:
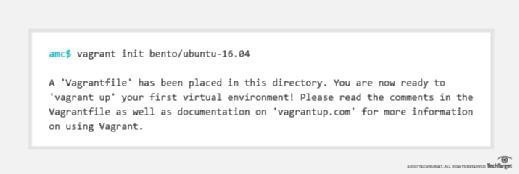
This sets up the Vagrantfile -- basically a machine description -- for an Ubuntu image. Run vagrant up to download an image of Ubuntu from the Bento repository; this step might take a few minutes. This download only happens when you do not already have the up-to-date image downloaded. The VirtualBox VM will then show its start-up configuration:
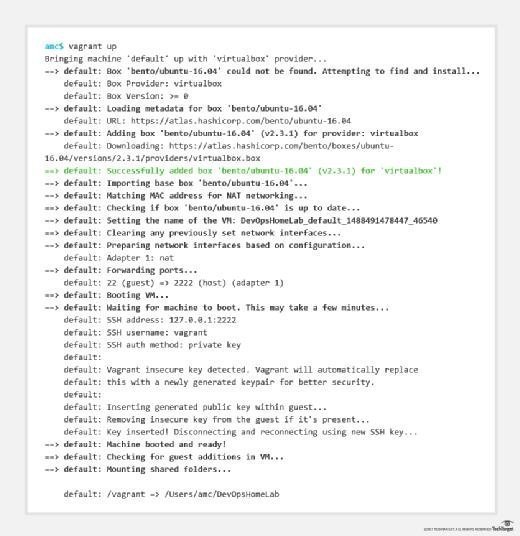
In the code listing above, the machine with the blue amc$ prompt is the physical media access control (MAC) address that's in use. The green vagrant@vagrant:~$ prompt is inside the Vagrant VMs. The color difference should make it clear where the commands run throughout this Vagrant tutorial.
To open a console on the VM, type vagrant ssh and get started with the immutable infrastructure setup. Immutable infrastructure destroys and recreates VMs rather than changing them. At this point, you're inside an Ubuntu 16.04 VM. The SSH connection is secured with preshared RSA keys:
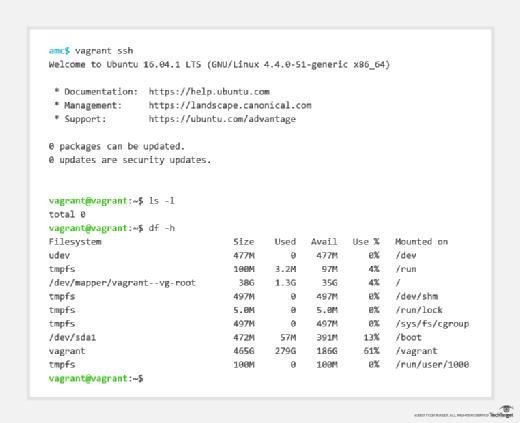
Take a look around the Linux VM; it is a full Ubuntu server in a small install.
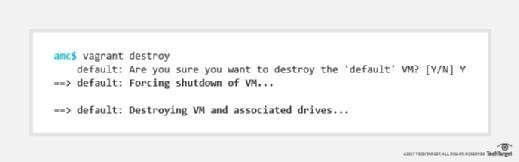
One Vagrant VM is fine, but we need a few VMs to represent a data center in the DevOps lab. Exit the SSH session and get rid of this one VM with the command vagrant destroy. When prompted, confirm that you want to destroy the VM:
To learn DevOps tools and tasks in a real-world, plan for three VMs -- a master and two worker nodes -- that share a private network. Edit the Vagrantfile in your preferred text editor. The file is mostly comments. Replace the contents of the file with the following and run vagrant up again:
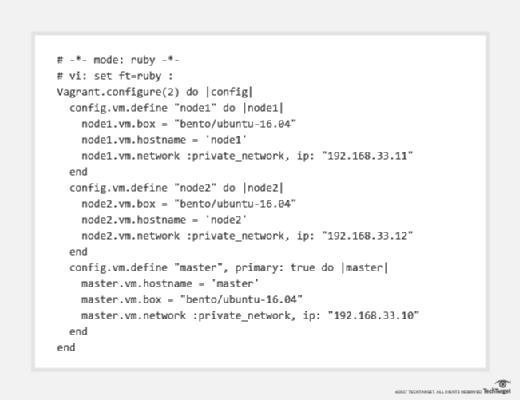
Three Vagrant VMs will start up and configure. Then, use vagrant ssh to connect to the master VM. This will enable you to ping the two nodes using their IP addresses.
With this Vagrant tutorial, you've built the beginnings of a DevOps lab and are ready to design immutable infrastructure. Use vagrant halt to shut down VMs or vagrant destroy to also delete the VMs and reclaim disk space. Type vagrant up to start VMs again.
The folder containing the Vagrantfile is mounted into the VMs as /vagrant. As we walk through other steps to learn DevOps, we'll use this mapping to keep various configuration files and scripts safe from vagrant destroy, yet make them available inside the VMs at vagrant up.
Continue building this DevOps lab ⇉
Now that Vagrant VMs are running on the lab computer, move on to version control, learning Git and GitHub. This will allow you to create the lab over and over again for different experiments. Or start here to plan the lab.
Dig Deeper on Systems automation and orchestration
-
![]()
Ansible vs. Terraform vs. Vagrant: What's the difference?
By: Terry Slattery
-
![]()
What's the difference between Type 1 vs. Type 2 hypervisor?
By: Stephen Bigelow
-
![]()
Docker versus Virtual Machines: Which DevOps tool is best?
By: Bob Reselman
-
![]()
Vagrant vs. Docker: How these cloud-native tools differ
By: Bob Reselman