
Rawpixel - Fotolia
Hyper-V cmdlets for daily operational tasks
With simple scripts, enable or disable VM Integration Services and Live Migration on Hyper-V hosts, reset VM replication stats, grant or revoke VM access, and optimize VHD files.

Organizations that can't afford System Center Virtual Machine Manager rely on PowerShell commands to perform Hyper-V and VM-related operational tasks. Here are some of the most useful Hyper-V cmdlets to help you complete daily tasks.
Enable or disable VM Integration Services
By default, when you install a Hyper-V VM, all of the Integration Services are enabled, except guest services. Integration Services help you interact with most VM OS components directly from the Hyper-V host.
There are situations when you might want to disable Integration Services -- for example, when moving a VM to another virtualization host, like VMware, or when moving a VM to Azure cloud. To disable Integration Services for a particular VM, navigate to Hyper-V Manager, right-click on the VM, select settings and then navigate to Integration Services, as shown in Figure A below.
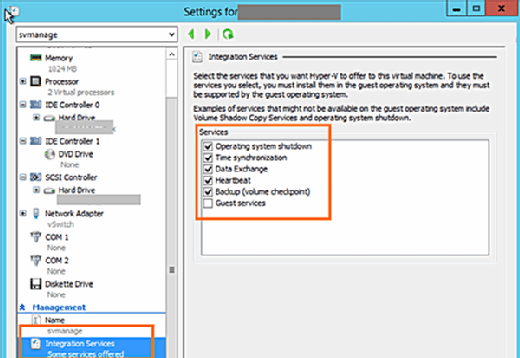
Next, enable or disable Integration Services by checking or unchecking the specific Integration Services boxes. If you want to disable Integration Services for multiple VMs, use the Disable-VMIntegrationService Hyper-V cmdlets, as shown in the script below:
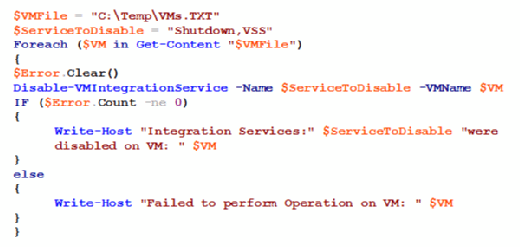
In these Hyper-V cmdlets, we're disabling shutdown and Volume Shadow Copy Service on the VMs mentioned in the C:\Temp\VMs.TXT file. The C:\Temp\VMs.TXT file contains one VM name on each line.
If you want to disable any other Integration Services on VMs, just modify the $ServiceToDisable variable in the script above to include the service name. To enable Integration Services, use the Enable-VMIntegrationService PowerShell command in place of Disable-VMIntegrationService in the above PowerShell script.
Enable or disable Live Migration on Hyper-V hosts
There are situations when you may want to enable or disable Live Migration on multiple Hyper-V hosts. For example, when you're performing maintenance activities on Hyper-V hosts, you should disable Live Migration to ensure VMs aren't moved to another Hyper-V host in a Hyper-V failover cluster in the event of a reboot operation.
To disable Live Migration, use Disable-VMMigration, and to enable Live Migration, use Enable-VMMigration. Both Hyper-V cmdlets support specifying multiple Hyper-V host names, which helps you to enable or disable Live Migration on multiple Hyper-V hosts. The PowerShell command below shows how to disable Live Migration on multiple Hyper-V hosts:
Disable-VMMigration -ComputerName HyperVHost1,HyperVHost2,HyperVHost3
You don't have to use a ForEach loop to process the command for each Hyper-V host because the Disable-VMMigration PowerShell command supports specifying multiple Hyper-V host names. To enable Live Migration, use Enable-VMMigration as shown below:
Enable-VMMigration -ComputerName HyperVHost1,HyperVHost2,HyperVHost3
Reset VM replication statistics
If you're troubleshooting Hyper-V replication failures for VMs, you might need to reset the replication statistics several times. The easiest way to reset the replication statistics for all VMs is to use the Reset-VMReplicationStatistics PowerShell command, as shown below:
Get-VMReplication | Reset-VMReplicationStatistics
The first command, Get-VMReplication, gets the VMs that have VM replication enabled, and the second command after the pipe operator, Reset-VMReplicationStatistics, resets the replication statistics for the VM. Resetting VM replication statistics via Hyper-V manager is possible, but it could take a considerable amount of time.
Grant or revoke VM access
In a production environment, you might have hosted a few VMs for use by third-party vendors or suppliers. These vendors generally use the VM Connect Tool to connect to the Hyper-V VM, and then perform the required tasks.
You might not know that Hyper-V provides the ability to grant or revoke access to a VM for specific users. To grant or revoke user access, use the Grant-VMConnectAccess and RevokeVMConnectAccess Hyper-V cmdlets, respectively.
To grant permission to a user named Peter, use the PowerShell command below:
Grant-VMConnectAccess -ComputerName HyperVHost1 -VMName ProdVendorVM -UserName TechTarget\Peter
And to revoke the access of the same user, use this PowerShell command:
Revoke-VMConnectAccess -ComputerName HyperVHost1 -VMName ProdVendorVM -UserName TechTarget\Peter
Optimize VHD files
Virtual hard drive (VHD) files need to be optimized for all Hyper-V VMs to ensure unused blocks are reclaimed and that blocks in the VHDs are rearranged, which actually helps in reducing VHD file size. To optimize VHD files, use the Optimize-VHD PowerShell command, as shown below:
Optimize-VHD –Path C:\ProductionVMs\SQLVM\SQLVM.VHDX –Mode Full
This command runs optimization in full mode for the SQLVM.VHDX file, but note that the command only runs for one VHDX file. If you need to run optimization activity for all the VHDX files, you need to use the Hyper-V PowerShell command shown below:
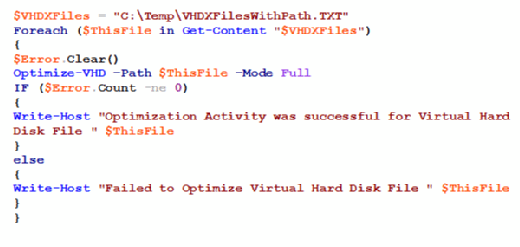
The Optimize-VHD PowerShell command only works for dynamic VHD files, and those files must not be attached to a VM.