
Victoria - Fotolia
Try this Chocolatey tutorial to pick up Vagrant provisioning for Windows
To install a Linux-based tool on a non-Linux machine, at least one intermediary tool is necessary. On Windows, use the Chocolatey package manager for a smooth process.

HashiCorp Vagrant brings up and destroys virtual environments quickly. It is a great fit for creating infrastructure for tests, especially in a DevOps environment. For example, a systems administrator can bring up a Vagrant box, test a configuration script on it and then destroy the setup. Vagrant is available as open source software or integrated with HashiCorp's enterprise suite.
Vagrant was first built and intended for Linux, but has increased its Windows support. On Linux, users install software with package managers. But, with Windows, the task has been a bit of a burden. Try Chocolatey, a package management tool for Windows users. Chocolatey enables a Windows user to manage software in a similar fashion to yum and apt-get on Linux, using a universal command-line interface (CLI) to install, upgrade and uninstall software. Chocolatey is available as open source or with enterprise features.
This Chocolatey tutorial installs software on a Windows Vagrant box.
Add a Vagrant box
If you are just starting out with Vagrant, the Vagrant Cloud is the best place to go obtain boxes. Most Vagrant boxes on Vagrant Cloud are created with Packer, another open source HashiCorp tool. Users create a machine image with Packer, and then process it into a Vagrant box for consumption.
This Chocolatey tutorial uses a Windows 10 Vagrant box created by contributor Stefan Scherer.
In PowerShell, create a new directory to house the Vagrant environment. Here, it is named win-test.
PS C:\vagrant> mkdir win-test
Directory: C:\vagrant
Mode LastWriteTime Length Name
---- ------------- ------ ----
d----- 10/12/2018 8:14 AM win-test
PS C:\vagrant> cd .\win-test\
Now, add a Vagrant box with the vagrant init command:
PS C:\vagrant\win-test> vagrant init StefanScherer/windows_10
==> vagrant: A new version of Vagrant is available: 2.1.5!
==> vagrant: To upgrade visit: https://www.vagrantup.com/downloads.html
A `Vagrantfile` has been placed in this directory. You are now
ready to `vagrant up` your first virtual environment! Please read
the comments in the Vagrantfile as well as documentation on
`vagrantup.com` for more information on using Vagrant.
The Vagrant box is initialized and ready to provision. But, first, follow along to install some software.
A Vagrant inline script
The Vagrantfile is the key to the kingdom to configure a Vagrant box. In the Vagrantfile, the administrator configures the environment to their specifications: network settings, host names, configuration management information and software installation.
To integrate software installs into Vagrant via Chocolatey, use a shell script -- PowerShell -- or a configuration management provisioner, such as Puppet. Puppet's provisioner does not support Windows over Windows Remote Management, so this Chocolatey tutorial opts for the shell script. Similarly, organizations that don't use Configuration management tools should learn how to do the install with a shell script.
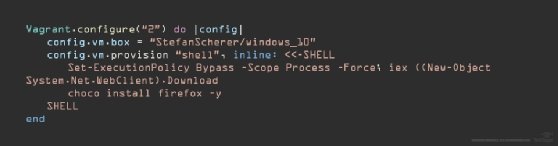
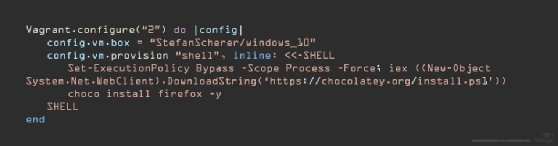
Add a shell provisioner to install Firefox with Chocolatey. First, install the Chocolatey client itself, which can be done with one line of PowerShell (see Figure 2). The Vagrant provision code in Figure 2 is an example of an inline shell script, where the code is directly in the configuration.
Now, bring up this Vagrant box to see if Firefox installs (see Figure 3).

A Vagrant external script
Instead of an inline shell script with PowerShell, try an external script with added conditional logic. To use this approach, change the Vagrantfile to call the script in the Vagrant configuration. An external script is especially useful if the exact same script is in production elsewhere, and you want to test it on a Vagrant box.
Change the Vagrantfile from an inline script to the InstallFirefox.ps1 PowerShell script, which is located in the Vagrant directory (see Figure 4).
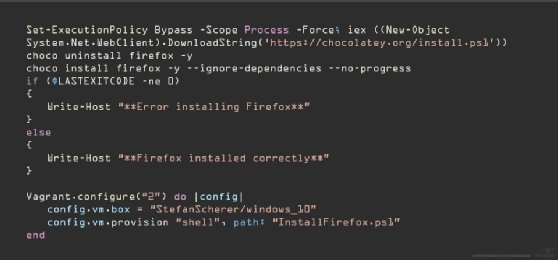
The InstallFirefox.ps1 PowerShell script will attempt to install Firefox with Chocolatey. If it fails, checking the $LASTEXITCODE variable for anything other than a 0, the script will print that information in the Vagrant output from the Write-Host command. For example, if Firefox failed to install, the output would look like this:
default: Failures
default: - firefox - firefox not installed. The package was not found with the source(s) listed.
default: Source(s): 'https://chocolatey.org/api/v2/'
default: NOTE: When you specify explicit sources, it overrides default sources.
default: If the package version is a prerelease and you didn't specify `--pre`,
default: the package may not be found.
default: Please see https://chocolatey.org/docs/troubleshooting for more
default: assistance.
default: **Error installing Firefox**
Install Chocolatey packages from a synced folder
Another nifty Vagrant feature is the ability to synchronize files from a host machine to guest VMs by means of a synced folder. Place files in a specified local folder, and they will automatically synchronize to the Vagrant machines. This is especially useful if you have local Chocolatey packages to test in Vagrant, but do not have the network connectivity to download them.
For this Chocolatey tutorial, we place the local Firefox Chocolatey package in a local directory C:/vagrant/packages, which synchronizes to the same directory on the Vagrant box. This example has the PowerShell script embedded outside of the namespace in a variable, $script, and then called in the Vagrant provisioner (see Figure 5).
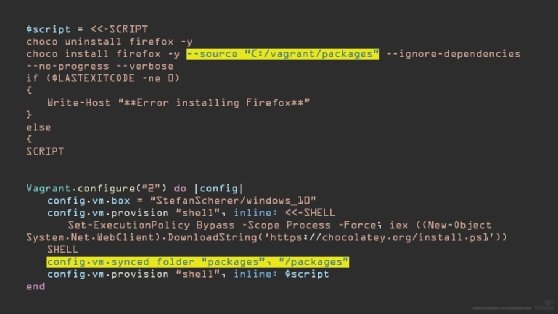
To have Chocolatey install from a local directory, change the --source parameter in the choco install command to point to the C:/vagrant/packages directory. Rather than attempt to install a package from the default repository -- which, in this author's case, is usually the Chocolatey community repository -- it will attempt to use this folder. The other change in this Vagrantfile is adding the synced_folder configuration:
config.vm.synced_folder "packages", "/packages"
Vagrant has consistently increased support for Windows, which makes it a viable option to test infrastructure changes in traditional and Windows DevOps organizations. Chocolatey enables a universal approach to install software on Windows with its CLI, removing the complexity of different installer types.
This tutorial combines Vagrant and Chocolatey to show Windows users how to take advantage of Vagrant's provisioning and teardown capabilities with the same features as Linux when it comes to software installs.