
Getty Images/iStockphoto
How to use PuTTY for SSH key-based authentication
This tutorial on the open source PuTTY SSH client covers how to install it, its basic use and step-by-step instructions for configuring key-based authentication.

Running multiple OSes is a common reality in today's business environments. Take workstations and servers, for example. A Windows workstation might need to connect to Linux servers, IoT systems and network devices. The challenge faced, however, is connecting these environments securely and keeping data protected.
PuTTY is one tool that can help with this.
What is SSH? What is PuTTY?
SSH is a networking protocol that enables secure access to a computer or device over an unsecure network. Many Linux servers and network devices accept inbound SSH connections for remote configuration. Sysadmins use SSH to connect to remote devices and do the following:
- Audit log files in var/log.
- Edit configuration files in /etc.
- Update software using DNF (Dandified Yum) or APT (Advanced Package Tool).
- Connect to network devices, such as routers and managed switches to do the following:
- Enable or disable switch ports.
- Manage routing tables.
- Configure routing protocols remotely using SSH.
PuTTY is an open source GUI implementation of the Secure Shell protocol that has long been used to run secure SSH tunnels to and from Windows computers. Initially released in 1999, PuTTY grew in popularity because Windows did not include the OpenSSH command line client and server until Windows 10 and later.
PuTTY remains a viable alternative to OpenSSH today because its GUI might be easier for admins to customize. Managing multiple SSH profiles is also simpler in PuTTY, as are other customizations, such as selecting encryption keys.
How to install PuTTY
PuTTY can be downloaded here. Follow these steps to install it:
- Select the appropriate package file and download the installation executable. Supported Windows systems include 64-bit x86, 64-bit Arm and 32-bit x86. The general PuTTY installation includes all protocol client types. Downloadable clients that support a single protocol, such as Telnet, SCP and SFTP, are also available.
- Run the installer when the download completes.

- When the file has downloaded, double-click on the MSI package to launch the installer.
- Select Next on the Welcome page.
- Choose the destination location. The default is C:\Program Files\PuTTY\. Click Next.
- On the Products Features page, browse and select any additional nondefault options if desired. Click Install.
- If the Windows User Account Control asks to allow the app to make changes on your computer, select Yes.
Once complete, you can view the README file for basic guidance or exit. PuTTY is ready for use.
How to use PuTTY for a basic connection
Assume the targeted Linux system is configured for inbound SSH connections with no special settings. For example, root is allowed over SSH, the firewall permits TCP port 22, default password-based authentication is set, etc.
Launch PuTTY on a Windows workstation and type the destination IP address in the HOST Name (or IP address) box. Ensure SSH is selected from the Connection type radio options. Click Open.
The remote Linux system will prompt you for the name and password of a local user account. A new window will open and display your SSH session.
The first time you establish a connection, you will receive a PuTTY Security Alert informing you the remote server's host key is not cached. It's verifying the destination server is the device you believe it is. Click Accept if you're confident of the identity of the remote system.
Save multiple connections
Saving connection specifications lets you quickly connect to frequently accessed remote servers. Type the remote system's hostname or IP address, select the Saved Sessions box, and enter a name for the connection. You can use whatever descriptive name you want. Select Save, and the session name appears in the box. This can be done for multiple destinations. Select one and click Open to connect to it.

If you connect to many servers via PuTTY and must manage their keys, consider using Pageant, PuTTY's authentication agent application.
How to configure SSH key-based authentication
Key-based authentication is strongly recommended. It's a common requirement on Linux certification exams, a standard step in enterprise Linux configurations, and an industry best practice. Key-based authentication also makes automated tasks via scripting and Ansible easier.
Follow these three steps to configure key-based authentication in PuTTY:
1. Generate the key pair
PuTTY includes an application called PuTTYgen to create key pairs. Do the following on the Windows SSH client that will connect to the remote Linux SSH server:
- Run the PuTTY key generation tool from C:\Program Files\PuTTY\puttygen or using the puttygen command from the command line.
- Select Generate in the PuTTY Key Generator window. Move the mouse to create the random values used to develop the key.
- Select specific key types and bit lengths. Options include RSA, Digital Signature Algorithm, Elliptic Curve Digital Signature Algorithm and more.
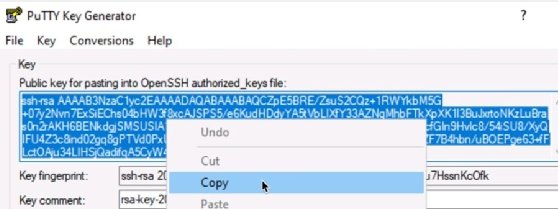
- Select the entire contents of the "Public key for pasting into OpenSSH authorized_keys file" from the Key window. This is the public key. Copy it to the clipboard to paste into a file later.

- Select Save private key. Select Yes in the PuTTYgen Warning window regarding passphrases.
- Close the PuTTYgen application.
2. Copy the public key to the remote device
On the Linux server, accessed from the local Windows client, do the following:
- Connect to the remote Linux server via a standard password-protected SSH/PuTTY session and log in.
- Use the command $ mkdir ~/.ssh to create a directory named ~/.ssh.
- Enter the command $ chmod 700 ~/.ssh. This gives users (owners) read, write and execute permissions.
- Use the command $ nano ~/.ssh/authorized_keys to create an empty text file named authorized_keys.
- Paste the contents of the "Public key for pasting into OpenSSH authorized_keys file" into the text file. Confirm you have pasted the key. Save and close the file.
- Enter the command $ chmod 600 ~/.ssh/authorized_keys. This setting provides the user with read and write permissions on the authorized_keys file.
- Type exit to close the SSH connection.
3. Configure the PuTTY client
Use the main PuTTY application to configure the PuTTY client to use key-based authentication.
- Launch PuTTY but do not connect to a remote system.
- In the Category window, browse to Connection>Data.
- Set the Auto-login username to the remote SSH username. This is the user for whom you created the ~/.ssh/authorized_keys file on the remote Linux system.
- Browse to Connection>SSH>Auth. Select Browse. Find the saved private key created with the PuTTYgen application.
Test key-based authentication
You are now ready to test the connection. Expect the connection to be established without a password challenge.
- At the top of the Category window, select Session to return to the main connection window. In the Host Name (or IP address) box, enter the destination hostname or IP address.
- Select Open to test the session. A message indicating "Authenticating with public key" will appear in the SSH connection window if key-based authentication was configured correctly.
You've successfully configured PuTTY to use key-based authentication.
Note that the private key can be protected with a passphrase, which will need to be entered each time the connection is made.
Other key authentication settings for SSH and PuTTY include the following:
- Consider editing the sshd configuration file on the remote Linux system to accept only key-based authentication and to deny password-based authentication.
- Do not permit root logins over SSH.
- Configure a nonstandard port number and block root authentication over SSH.
Damon Garn owns Cogspinner Coaction and provides freelance IT writing and editing services. He has written multiple CompTIA study guides, including the Linux+, Cloud Essentials+ and Server+ guides, and contributes extensively to TechTarget Editorial and CompTIA Blogs.