
peshkov - stock.adobe.com
Use ssh-keygen to generate new key pairs: A full tutorial
Use ssh-keygen to create new key pairs, copy host keys, use a single login key pair for multiple hosts, retrieve key fingerprints and more.

SSH is a secure way to log into remote systems, but you can improve its security by using it to authenticate communicating hosts through the exchange of public keys -- that is, generating a key pair using the ssh-keygen command.
This tutorial demonstrates how to use the ssh-keygen command to create a new public key and its related private key. Once you generate the keys, you can do the following:
- Upload the public key to a remote server to enable automated and authenticated passwordless logins.
- Use the same public key on multiple remote servers.
- Use numerous public keys for different functions on the same server.
GUI versions of SSH usually include the same functionality as the command-line versions. For example, PuTTYgen is a GUI version of ssh-keygen for use with PuTTY, a GUI implementation of SSH for Windows. Modern OSes, such as Linux, macOS and Windows Server, as well as Windows 11, include command-line versions of OpenSSH. Remember that SSH is cross-platform, enabling you to access Linux, macOS and Windows devices from each of the other OSes. For example, you might rely on a Windows 11 workstation for daily use and connect to several Linux servers using SSH.
This tutorial uses OpenSSH examples from the Windows PowerShell and Linux Bash (Bourne Again Shell) command-line interfaces (CLIs). The examples also apply to the macOS version of OpenSSH. The advantage of using SSH at the CLI is that commands are consistent across OSes, unlike with GUI versions that might implement commands using various GUI techniques.
Why generate SSH keys?
You can use SSH without key pairs by authenticating with a password, which is reasonably secure. However, authenticating using a public-private key pair is a more secure approach.
The process is straightforward. First, create a public-private key pair for the local computer. Next, copy the public key file to the remote SSH server. The private key always remains on your local workstation. Only a user with authenticated permission can copy the public key file to the remote server. If local users do not have sufficient permission, they can request a sysadmin of the remote host to copy the files for them.
Each key in the pair has various attributes, including the following:
- Public key. Mathematically related to the private key, it can be sent across the network or distributed to remote users and workstations.
- Private key. Mathematically related to the public key, it is never shared with remote users and workstations.
During the key-based authentication process, SSH verifies the relationship between the two keys to ensure they are related, thereby providing a more secure means of proving your identity than a password. The process is also transparent and automatic.
Copying your public key file to a remote SSH server enables you to log in to the system securely. By logging into the local system, you demonstrate that you control the private key of the public key pair.
This tutorial addresses three use cases:
- Configuring an SSH server to recognize the SSH client by copying the public key file from your local computer to the remote SSH server.
- Copying your public key file to remote servers, enabling you to remotely access multiple systems via SSH using the same login ID. This approach is particularly useful for admins performing remote system maintenance. It is also crucial to unattended automation processes, such as configuration management or scripting.
- Copying multiple public keys associated with different user accounts, each with varying levels of permission to a remote server. In this case, you employ one public key to authenticate when logging in to terminal emulation sessions with the remote server and another public key with higher permissions for doing system administration.
The procedures in this tutorial are best applied to individual clients and servers to demonstrate how to generate and use SSH keys. Most admins prefer centralized key management systems in larger organizations where many users need to authenticate to different servers. Those key management systems can automate the processes explained here, however.
How SSH works
SSH uses public key authentication to negotiate a secure connection between an SSH client and an SSH server. You can use SSH to make an ad hoc connection between the client and the remote server. You then use a password to authenticate, for example, with a command such as:
PS C:\Users\alice\.ssh> ssh 192.0.2.44 -l alice
In this PowerShell example, the ssh command includes the IP address of the remote server and the -l option, which specifies a valid user account on the remote server. The remote system prompts you to enter your password. In the above example, the system prompts for the password for user alice.
Next, SSH displays the following message:
The authenticity of host '192.0.2.44' can't be established.
This prompt is followed by the server's fingerprint and another prompt to continue the connection. The fingerprint is a secure hash of the server's public key, which resides in a file in the SSH directory. On Linux systems, the default location for SSH keys is in your home directory in the file ~/.ssh/known_hosts. On Windows systems, the default file location is your user directory in the file C:\Users\username\.ssh\known_hosts.
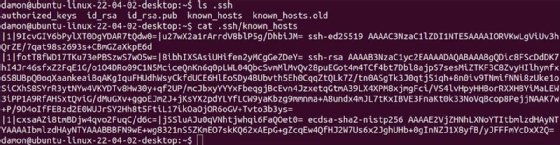
The following example illustrates an SSH connection initiated between the SSH client and the SSH server on the same host using the loopback address, 127.0.0.1. This address is often used for testing purposes and directs all network traffic to client and server software running on the local computer. The default client connection in this example uses an Elliptic Curve Digital Signature Algorithm (ECDSA) key.
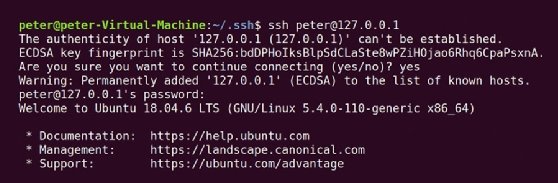
The best security practice for SSH is to copy that fingerprint and authenticate it against the public key of the remote server. In practice, you can often skip this step if you trust the remote server. Once you accept the authenticity of the remote server, your system adds that server and its fingerprint to the known_hosts file. SSH makes subsequent connections directly.
This ad hoc approach can be adequately secure when connecting to a server inside a protected network, but it can be riskier when connecting to external remote servers. SSH key-based authentication can streamline and strengthen this login process.
The manual, password-based approach also prevents automation from working correctly. Tools such as Ansible generate SSH connections from the control node to the managed nodes, necessitating authentication that does not require human intervention. Key-based authentication is perfect for these scenarios.
How to generate a new SSH key
The ssh-keygen command generates a public-private key pair for use when authenticating to a remote server. Most SSH implementations include it. You will typically generate new public and private keys and then copy the public key to the remote server using SSH and your password-based login credentials.
By default, ssh-keygen creates an RSA key pair. It stores the public key in a file named .ssh/id_rsa.pub and a private key file named .ssh/id_rsa.
Key generation begins with the following command:
$ ssh-keygen -t rsa
In this example, ssh-keygen generates a new SSH key pair using the RSA public key algorithm.
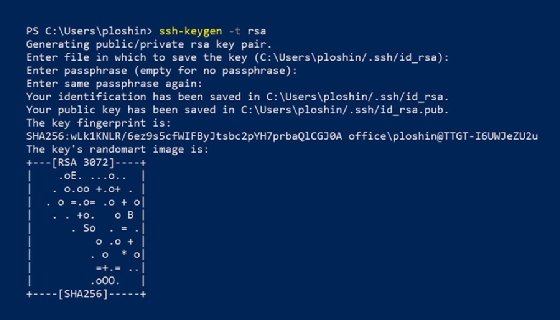
This screenshot shows what happens when the ssh-keygen command runs with the -t option to specify an RSA key. The ssh-keygen command does the following:
- Generates a public key pair.
- In response to the prompt "Enter passphrase," you can enter a key passphrase to protect access to your private key. Using a passphrase enhances security and is recommended for sensitive applications. If a key is not passphrase-protected, an attacker who gains access to your system would also gain direct access to possibly sensitive remote systems. In some cases, it could be acceptable to press Enter without entering a passphrase.
- The private key, also known as identification, is stored in a file named id_rsa in the .ssh directory of your home directory. This directory is the HOME$/ in Windows and ~/ in Linux and other Unix-based OSes.
- The public key exists in the same directory in a file with the same name as the private key but with the extension .pub.
- SSH creates and displays the key fingerprint. The fingerprint is a short sequence of bytes generated by applying a cryptographic hash function to the generated key. SSH implementations can use fingerprints to authenticate the public key. The fingerprint includes any comments applied to the key pair. The fingerprint also identifies the hashing algorithm used to create the public key. In this case, the algorithm is Secure Hash Algorithm 256, or SHA-256, with a digest composed of 256 bits.
- SSH displays a randomart image consisting of ASCII characters based on the data in the key fingerprint. The key's randomart image enables humans to visually determine whether fingerprints for different servers are identical or not. The bits in the fingerprint are treated like instructions for an algorithm that outputs the randomart image.
File type and naming specifications
The ssh-keygen command creates two files, one public and one private, for the local computer. In this case, the two files are:
- id-rsa contains the private key. You should never share this file or copy it to any remote system unless it is under your control.
- id-rsa.pub contains the public key. You can share and copy this file to other systems, especially when you plan to log in to those systems using SSH.
The file name for other key types uses the form ~/.ssh/id_[key type] by default. These files are stored in your home directory in a subdirectory named .ssh.
For example, the names for DSA keys are:
- Public key name: ~/.ssh/id_dsa.pub
- Private key name: ~/.ssh/id_dsa
Other key types use a similar naming convention, with the ID and key type included in the file name. Public keys have a .pub file extension.

The next step to getting automatic strong authentication when connecting to remote SSH servers is copying the public key to one or more remote servers.
How to add a key to the ssh-agent
The ssh-agent application stores private key information in memory, making the keys available for use without entering your passphrase for each connection. Manually launch the agent application before beginning a series of remote SSH connections.
After generating your key pair, you can add the private key to the agent on a Linux system using the ssh-add command. Use the key file as the argument.
ssh-add ~/.ssh/{key-file-name}
View the keys available in the SSH agent by using the ssh-add -l command.

The ssh-agent stores an unencrypted version of the private key passphrase in memory, making it potentially vulnerable to malware that can access RAM. The application does not write the keys to disk -- they are already stored on the disk in the user's home directory.
Because ssh-agent is an application, not a service or daemon, it does not persist through reboots. You must start ssh-agent after any system reboot before accessing remote SSH resources as a security precaution.
There are three ways to streamline the use of ssh-agent. Each involves starting the application automatically when the system boots, as opposed to starting it manually before use.
- Add or uncomment the following line in the SSH configuration file (usually found at /etc/ssh/sshd_config on Linux systems): AddKeysToAgent yes
- Add the private key to a keyring service that starts automatically, such as the Gnome Keyring, KWallet or Apple Keyring on macOS.
- Add the following command to your Bash shell profile at ~/.bashrc or ~/.bash_profile: ssh-add ~/.ssh/(key-file-name}
Not every environment requires the ssh-agent, but it is useful in some cases.
How to copy a public key to a server
The next step is copying your newly generated public key from the local system to the remote SSH server. When both systems use OpenSSH on a Unix-based OS, including Linux or macOS, you can use the ssh-copy-id command to install the key. OpenSSH adds the new public key to the authorized_keys file. The remote server's SSH service checks the file when your local computer requests a connection. Here is an example:
$ ssh-copy-id -i ~/.ssh/id_rsa.pub [email protected]/home/alice/.ssh/authorized_keys
In this example, OpenSSH copies your public key file into the authorized_keys file.
However, the ssh-copy-id command might not always be available. For example, Windows systems use a different process. To copy a public key to a server from a Windows command line, use the following command:
PS c:> type $env:USERPROFILE\.ssh\id_rsa.pub | ssh [email protected] "cat >> .ssh/authorized_keys"
This compound command uses the Windows type command to output the contents of the public key file. Next, pipe the contents using the | symbol to a new SSH connection. The final quoted section of this command uses the cat command on the remote server to append the new public key file to the end of the authorized_keys file. This part of the command is necessary to avoid overwriting the authorized_keys file, which would overwrite any existing keys previously added to that file.

The public key now resides in the .ssh/authorized_keys file on the remote server. The next time you or an automated process attempts an SSH connection from the local computer, SSH initiates the session without the need to enter your username and password manually.

Logging in to a remote SSH server without entering a password every time is convenient, but it is not the primary reason to use SSH key-based authentication. Authenticating SSH connections without a passphrase enables automated actions on the remote server without human intervention. Consider the following examples:
- Incorporate SSH connections into batch files or shell scripts to automate repetitive actions, such as copying log files or accessing remote email servers.
- Integrate SSH authentication into configuration management systems, such as Ansible. This approach enables the fundamental connectivity required for infrastructure as code management.
- Schedule repetitive actions that require authentication but occur when the local computer is unattended.
Properly implemented SSH key-based authentication is typically more secure than forcing users to rely on complicated passwords for systems they might access infrequently. Don't discount the convenience to users, and the ability to automate connections is crucial.
Note that SSH key-based authentication is not sufficient for securing access to sensitive systems. While it can improve security, users and enterprises must take even more care to prevent unauthorized access to the local computers used to access remote SSH servers.
How to copy a public key to multiple servers
Sysadmins, network managers and network security professionals often need to connect to many different remote servers using the same login ID. Large organizations can use SSH key management systems to distribute public keys to the remote servers and manage public key pairs for individuals who need them.
You can also manually copy your public key to all of the servers you access. You would issue the same command explained above to copy your public key for each remote server, as seen in this example:
PS c:> type $env:USERPROFILE\.ssh\id_rsa.pub | ssh [email protected] "cat >> .ssh/authorized_keys"
This Windows command sends the public key file id_rsa.pub to the remote server to associate it with the user ID alice on the remote server named ssh.example.org.
How to copy multiple public keys to a server
Network and security professionals might need to use different identities, each with different permissions, on the same remote server. This approach compartmentalizes access and is useful for the following reasons:
- You can assign multiple public key pairs to identities with various levels of privilege on a system for different functions to comply with the principle of least privilege. One key pair might provide limited access for testing, while another key pair could give administrative access to the system for managing user accounts. The same can occur for automation tools.
- An administrator might use different public keys when working with several internal clients to enable auditing for various functions performed by the same user.
When adding multiple public keys to the same remote server, the public key file names are different and must be specified when running the ssh command. Consider this example:
$ ssh -i ~/.ssh/id_Alice [email protected]
This command uses the -i option to specify the ~/.ssh/id_Alice identity file for the remote host to use to authenticate the connection.
SSH key management best practices
Use the following SSH key management best practices to streamline your existing SSH infrastructure and improve it as part of a broader automation initiative:
- Discover, inventory and document all keys. You could be unaware of many keys or existing credentials for former employees.
- Revoke unnecessary keys.
- Select stronger cryptographic algorithms for better security.
- Only enable key-based authentication for those who need it. Most users will never work with SSH.
- Rotate and change SSH keys periodically.
- Protect private keys using passphrases.
- Disable password-based authentication in the SSH configuration file (/etc/sshd/sshd_config on Linux systems).
- Disable root authentication in the SSH configuration file.
- Manage key-based authentication for Linux, macOS and Windows systems.
- Document and configure key-based authentication for automated configuration processes, such as Ansible.
Implementing SSH key-based authentication and following these best practices helps ensure a secure and functional SSH deployment for manual and automated tasks, even in cross-platform environments.
Editor's note: This article was originally written by Peter Loshin in 2022. It was updated by Damon Garn in 2025.
Damon Garn owns Cogspinner Coaction and provides freelance IT writing and editing services. He has written multiple CompTIA study guides, including the Linux+, Cloud Essentials+ and Server+ guides, and contributes extensively to Informa TechTarget, The New Stack and CompTIA Blogs.