Getty Images
How Ansible's Python framework enables network automation
Ansible's use of Python scripts creates a powerful network automation tool. This guide shows how to automate router tasks with Ansible in a GNS3 lab, such as VLAN setup and backup.

Today's IT landscape has grown so much that network engineers are no longer tasked with overseeing the network within a single data center. They are now responsible for managing all virtual and physical networking devices in multiple data centers across regions and environments.
This added complexity can quickly become challenging in enterprises, especially when it comes to keeping track of the current state of the networks, integrating with existing IT service management and network monitoring tools, and making necessary changes on the fly to keep all operations running smoothly.
Ansible and Python are two key tools for a comprehensive and efficient network automation strategy. They enable network professionals to automate complex and repetitive tasks. This article focuses on how Ansible and Python work together to help automate networks.
Ansible enables simplicity and accessibility
Ansible is an agentless open source automation tool that simplifies networking workflows. It uses YAML-based playbooks, a declarative method that enables engineers to define tasks in a human-readable format.
Unlike other tools that require extensive configuration, Ansible uses Secure Shell (SSH) or API connections to manage devices. It also supports a range of hardware device vendors through its network modules. The following are some module examples:
- arista.eos.eos_config for Arista.
- cisco.ios.ios_config for Cisco Internetworking Operating System (IOS).
- junipernetworks.junos.junos_config for Juniper.
With this compatibility, network administrators don't need to remember the CLI syntax of multiple vendors when troubleshooting, provisioning devices or carrying out other configuration management tasks, creating a unified experience.
Ansible employs an inventory management system that groups devices, which makes it easier to apply configurations and retrieve data from specific sets of devices.
Finally, Ansible follows the principle of idempotency, which means that, when Ansible executes a playbook, it can quickly detect if the target devices are already in the desired state and make no changes.
Python adds flexibility and scale
Python is known for its ability to handle complex scenarios, often beyond the capabilities of Ansible's built-in modules. Python has an active community of members with an extensive library, providing endless customization possibilities.
Because Ansible is written in Python, network administrators can use Python libraries, such as NAPALM, Netmiko and Paramiko, to extend its functionality by writing custom scripts that perform advanced tasks, such as parsing device outputs and network discovery. Python is better suited for scaling large networks, which must often process vast data sets.
Combine Ansible and Python for network automation
While Python and Ansible can be used independently, they're not competing tools. Network administrators can apply both Ansible and Python to different layers of a network automation stack. The integration of Ansible and Python can be beneficial in several ways, such as the following:
- Data collection and documentation. With the built-in Ansible modules, you can obtain operational data, such as device uptime, and Python can transform it into a structured format for documentation or reporting. If needed, the data can also be exported into network monitoring tools or translated into HTML using Jinja2 templates.
- Custom Ansible modules in Python. Although Ansible has a library of modules, organizations sometimes have specific requirements that might entail custom functionality. Also, because Ansible is written in Python, its modules can be developed in Python as well.
- Compliance and audit checking. Ansible playbooks can audit network devices against internal or regulatory standards. Python supports this by providing advanced parsing and validation logic for complex compliance rules.
- Network device backup. With Ansible, network administrators can automate the periodic retrieval of configuration files from network devices. Python scripts can perform backups efficiently, with the option to include timestamps.
- Zero-touch provisioning. When a new device is connected to the network, network administrators can use Ansible and Python to automate provisioning with base configurations, accelerating deployment.
- Inventory generation. Python scripts can dynamically generate inventories for Ansible, based on real-time data, ensuring that Ansible only operates on up-to-date network data.
- Python script integration. Network administrators can execute Python scripts directly from an Ansible playbook.
Automate Cisco router configuration backup with Ansible and Python
Imagine you are a network administrator for a small company whose network is set up with a Cisco IOS 7200 router. Your company decides to expand by opening a new branch and now requires new virtual LANs (VLANs) for two departments -- sales and IT -- plus regular network health monitoring.
Your manager tasks you with the following:
- Automate VLAN and interface configuration using Ansible.
- Monitor device health by retrieving and validating device and operational facts with Python.
- Automate the entire configuration backups workflow using a cron job.
Prerequisites and virtual lab setup
To follow along with this tutorial, you need the following:
- Basic networking knowledge and some familiarity with VLANs and CLI configuration.
- A Windows PC or macOS computer that meets the requirements of Graphical Network Simulator-3 (GNS3). I used an Apple Silicon Mac for this tutorial.
- The GNS3 VM of your choice installed. I recommend using VMware Fusion or Workstation. Note: For Apple silicon users, the default GNS3 VM download is not built for Intel x86 architecture Macs and throws a compatibility error during startup. To fix this, download the Arm version from its GitHub repo. Once extracted, you see two VMDK files and no OVA file. Also, not all versions were released with this support, so check carefully before downloading.
- You need to use the GNS3 client. Create a free GNS3 account, and select the Other users option during registration. For Apple silicon Mac users, download the DMG file that matches the GNS3 VM you downloaded.
- You need an Ubuntu Server VM. Download the latest long-term support version of the Ubuntu Server ISO image, which is an ISO file. Then, install it in VMware. This serves as the automation control node where Ansible and Python are installed. Note: During installation, install the OpenSSH server when prompted, and set up a username and password. Remember this password, as this is what you use to SSH into the Ubuntu control node VM from Visual Studio (VS) Code later.
- A modern terminal, such as Zsh, iTerm2 with Oh My Zsh for Mac, or Hyper for Windows.
- A licensed Cisco IOS 7200 router file downloaded.
- An integrated development environment (IDE), such as VS Code with the Remote - SSH extension installed.
Now, you can get started on the automation process.
1. Configure VMs in VMware Fusion
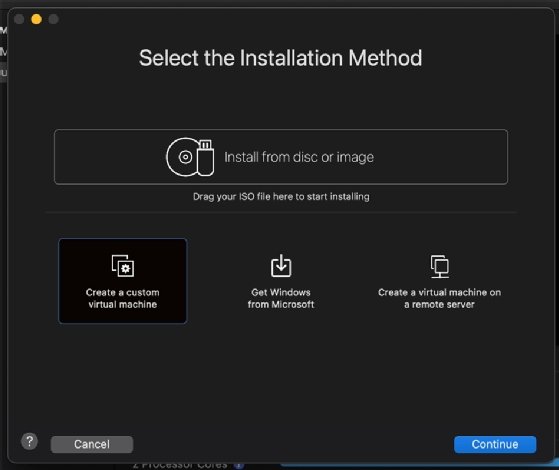
To set up the GNS3 VM in VMware, open the VMware application, and click on Create a custom virtual machine.
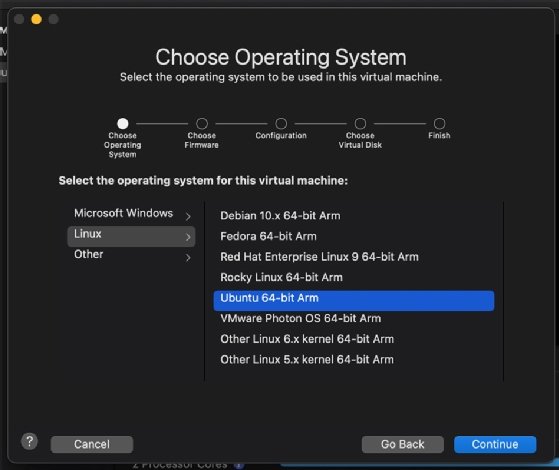
Select Linux, and choose the Ubuntu 64-bit Arm option. Then, click Continue.
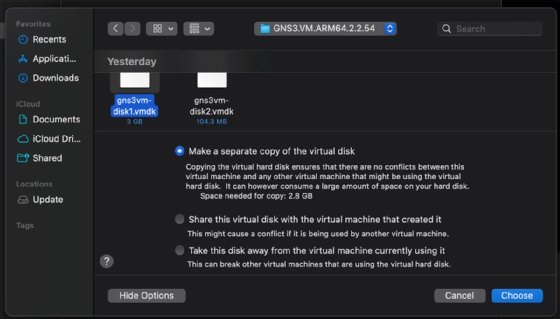
Choose Use an existing virtual disk.

Select the larger file between the two. In this example, it's gns3vm-disk1.vmdk. Click Choose.
Click Continue and then Finish. You can also modify the file name. The VM starts after a few seconds.
Add the second file gns3vm-disk2.vmdk file by navigating to Settings and clicking on Hard Disk (NVMe).

Once the modal appears, click Add Device.
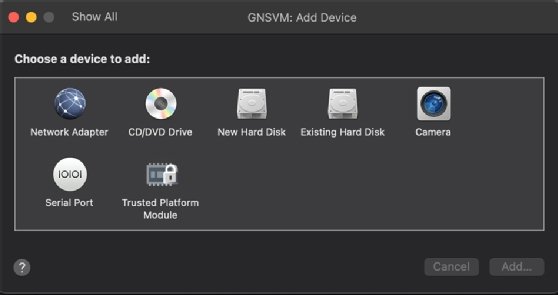
Click Existing Hard Disk and then Add.... Browse and select the second file, and click Open.
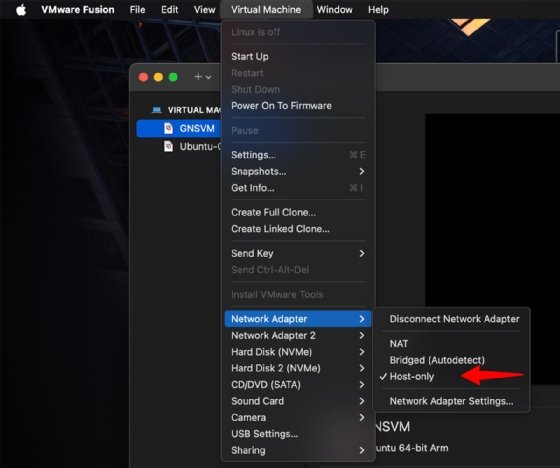
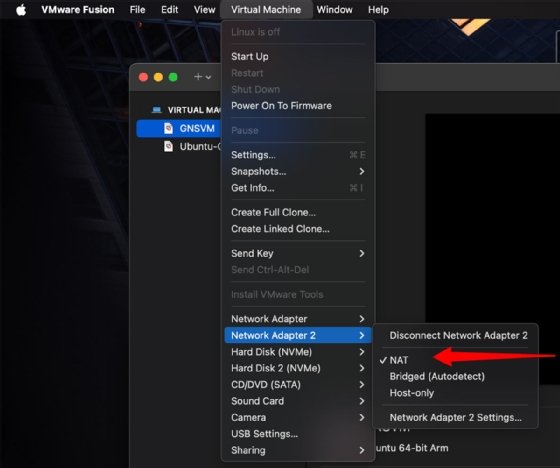
Next, for both the GNS3 VM and your Ubuntu control node, go to the settings for each, and add another adapter. Check which has been set by default, and add the missing one.
One should be Host-only and the other NAT. The latter appears as Share with my Mac.
Once booted, open a terminal in the Ubuntu control node, and verify the IP address inside Ubuntu. Run the ip a command.
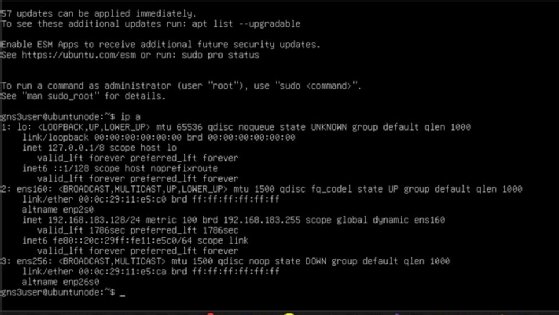
From the output, you can see that the ens256 interface -- a newly added adapter -- is currently DOWN and without an IP address. To configure this, open the terminal in the Ubuntu control node, and edit the Netplan configuration file.
Navigate to /etc/netplan/, and type ls. You should see a YAML file, like 50-cloud-init.yaml. Run sudo nano /etc/netplan/50-cloud-init.yaml, and edit as follows.
network:
    ethernets:
        ens160:
            dhcp4: true
        ens256:
            dhcp4: true
    version: 2
Save the file, and apply the Netplan configuration.
sudo netplan apply
2. Set up the GNS3 client
Next, run the GNS3 VM.
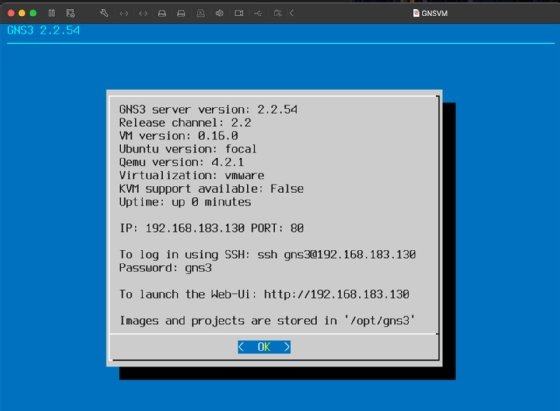
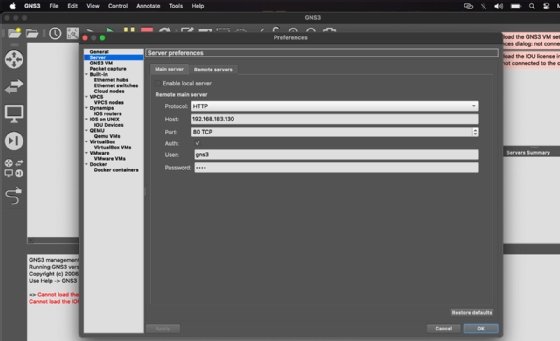
Navigate to GNS3 > Preferences > Server. Under the Main server tab, include the IP address, port, user and password as seen above. Apply and click OK.
Your GNS3 VM should be running now. It shows a green color in the Servers Summary pane.
Add the c7200 router image to GNS3. To import the image, use Dynamips by navigating to GNS3 > Preferences. Under Dynamips, click on IOS Routers, click New and select it. It will likely be named R1.
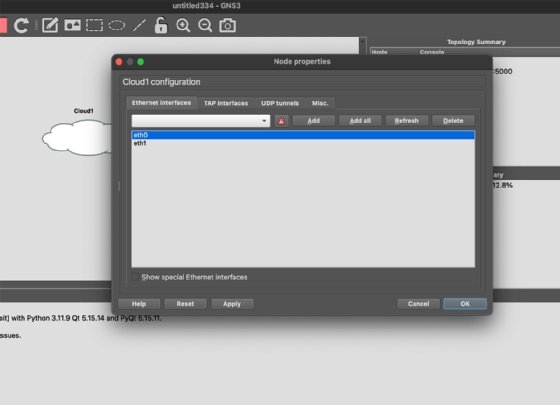
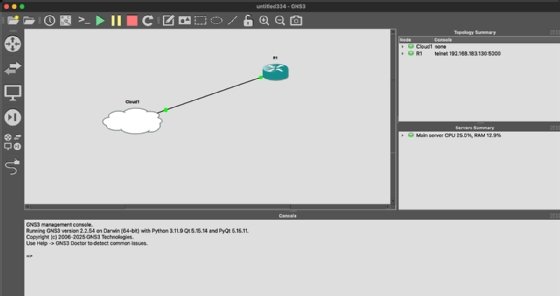
Create a project and network topology. Drag and drop a cloud node -- it will likely be named Cloud1 -- and the imported router -- named R1 -- onto the topology workspace.
Right-click on the cloud node, select the Configure option and add an adapter eth0. This is the GNS3 VM interface, which uses IP address 192.168.183.130.
Connect R1 to Cloud1. Use a link to connect them. For the router, choose an available Ethernet interface, such as FastEthernet0/0. Now, start the router.
3. Configure R1's interface and verify connectivity
To configure R1's interface, double-click and open the console. Run each command one after the other.
R1#>enable
R1#configure terminal
R1(config)#hostname R1
R1(config)#ip domain-name mylab.local
R1(config)#interface FastEthernet0/0
R1(config-if)#ip address 192.168.183.1 255.255.255.0
R1(config-if)#no shutdown
R1(config-if)#exit
These commands complete the following:
- Enter Global Configuration mode.
- Set the hostname to R1, and define a domain name, both of which are necessary for Rivest-Shamir-Adleman (RSA) key generation.
- Configure the interface connected to the cloud node, known as FastEthernet0/0.
- Assign an IP address in the 192.168.183.x range.
- Bring up the interface.
- Exit configuration mode.
Some commands might vary when using different routers.
Next, configure SSH access, and create a local user. Run the following command.
R1(config)# crypto key generate rsa general-keys modulus 2048
Then, type this line to generate the RSA cryptographic keys used for SSH encryption.
R1(config)#username admin privilege 15 secret yourdesiredpassword
This creates a local user named admin with full level 15 administrative privileges and sets the password to yourdesiredpassword. Using secret encrypts it.
Now, replace admin and yourdesiredpassword with your desired username and password.
Moving on, run this set of commands one by one to configure secure remote access to the router via SSH.
R1(config)#line vty 0 4
R1(config-line)#login local
R1(config-line)#transport input ssh
R1(config-line)#exit
If SSH fails, confirm the RSA keys exist, and ensure the interface has an IP address and is no shutdown.
Commands that configure SSH connections to routers include the following:
- line vty 0 4. Configures the virtual terminal lines 0 through 4, which enables five simultaneous SSH sessions.
- transport input ssh. Specifies that only SSH connections are allowed on these Virtual Teletype (VTY) lines and disables Telnet to improve security.
- login local. Tells the router to use its local database -- the username you just created -- for authentication.
Save the current active configuration -- known as running-config -- to non-volatile RAM so it persists across reboots. Use the following commands.
R1#copy running-config startup-config
Destination filename [startup-config]? (Press Enter)
Then, test connectivity with ping.
From your Ubuntu control node terminal in VMware Fusion, test the connection to your router by typing ping 192.168.183.1. Replace the IP address with your router's IP address. You should receive replies from your router.
From your c7200 router console, type the following command.
R1#ping 192.168.183.129
You should receive replies from your Ubuntu VM with a success rate of 100%.
4. Connect to Ubuntu VM via VS Code Remote - SSH
- Open VS Code.
- Click the Remote Explorer icon in the left sidebar. The icon is usually a monitor with arrows.
- Click the + icon in the SSH TARGETS section.
- Enter the SSH command: ssh [email protected]. Replace your_ubuntu_username with your actual username and 192.168.183.129 with your actual Ubuntu VM's IP address.
- Select the/Users/… option.
![Screenshot that shows how to select the /Users/… option]()
Select the /Users/… option. - Enter your Ubuntu password when prompted.

You are now connected to your Ubuntu VM directly from VS Code.
Next, update the packages. In the VS Code terminal, connected to the Ubuntu VM, run the following.
sudo apt update && sudo apt upgrade -y
Install Python systemwide, and use pip to install packages. Note that the following command is specific to Python 3.12. Use python3-venv for older versions.
sudo apt install python3 python3-pip python3.12-venv -y
Install Ansible systemwide using the following prompt.
sudo apt install ansible -y
ansible --version # Verify installation
Next, create a project directory and virtual environment. In your VS Code terminal, connected to Ubuntu, create a directory for your project.
mkdir network_automation
cd network_automation
As standard practice, make sure you set up a Python virtual environment to manage dependencies. Run the following command to do so.
python3 -m venv venv
Type the following to activate the virtual environment.
source venv/bin/activate
You need to run source venv/bin/activate every time you open a new terminal session to work in this environment.
Netmiko and NAPALM are Python libraries for network automation. To install the libraries, type the following.
pip3 install netmiko napalm
Ensure the python-dotenv package is installed.
pip3 install python-dotenv
Then, configure environment variables. Create an ENV file, and add your credentials.
# .env
ROUTER_IP=192.168.1.1
ROUTER_USERNAME=admin
ROUTER_PASSWORD=yourdesiredpassword
ROUTER_ENABLE_PASSWORD=yourdesiredpassword
Next, install the Ansible Cisco IOS collection.
ansible-galaxy collection install cisco.ios
Create an Ansible inventory.yml file in your project directory, and define the network devices. Type the following.
# inventory.yml
all:
  vars:
    ansible_user: "{{ lookup('env', 'ROUTER_USERNAME') }}"
    ansible_password: "{{ lookup('env', 'ROUTER_PASSWORD') }}"
    ansible_become: yes
    ansible_become_method: enable
    ansible_become_password: "{{ lookup('env', 'ROUTER_ENABLE_PASSWORD') }}"
    ansible_network_os: cisco.ios.ios
    ansible_connection: ansible.netcommon.network_cli
  hosts:
    R1:
      ansible_host: "{{ lookup('env', 'ROUTER_IP') }}" # Replace with your R1's management IP
Here is a breakdown of the configuration:
- ansible_host. The IP address of your router.
- ansible_user. The username for VTY login -- I configured admin.
- ansible_password. The password for VTY login -- yourdesiredpassword.
- ansible_network_os. Specifies it's a Cisco IOS device.
- ansible_become=yes. Tells Ansible to escalate privileges.
- ansible_become_method=enable. Tells Ansible to use enable mode.
- ansible_network_os. Specifies the device type.
- ansible_connection. Uses the network_cli plugin for SSH communication.
Now, you can configure Ansible. In your network_automation file, create an ansible.cfg file with the code here to disable host key checking for simplicity, using the following.
# ansible.cfg
[defaults]
host_key_checking = False
Automate VLAN and interface configuration on the router
Imagine the branch office needs VLAN 10 for sales and VLAN 20 for IT configured on the router, with FastEthernet0/0 assigned to VLAN 10 and FastEthernet0/1 to VLAN 20. Complete the configuration with the following steps.
1. Create an Ansible playbook
In the same directory, create a new file named configure_branch_vlans.yml.
Add the following content.
# configure_branch_vlans.yml
---
- name: Configure VLANs and Interfaces for Branch Office
  hosts: all
  gather_facts: no
  tasks:
    - name: Configure VLANs for Sales and IT
      cisco.ios.ios_vlans:
        config:
          - name: Sales
            vlan_id: 10
          - name: IT
            vlan_id: 20
        state: merged
      register: vlan_result
      failed_when: vlan_result.failed

    - name: Ensure FastEthernet0/0 is enabled
      cisco.ios.ios_interfaces:
        config:
          - name: FastEthernet0/0
            enabled: true
        state: merged
      register: interface_enable_result1
      failed_when: interface_enable_result1.failed

    - name: Ensure FastEthernet0/1 is enabled
      cisco.ios.ios_interfaces:
        config:
          - name: FastEthernet0/1
            enabled: true
        state: merged
      register: interface_enable_result2
      failed_when: interface_enable_result2.failed

    - name: Configure FastEthernet0/0 for Sales
      cisco.ios.ios_l2_interfaces:
        config:
          - name: FastEthernet0/0
            access:
              vlan: 10
            mode: access
            description: Sales_Department
        state: merged
      register: interface_result1
      failed_when: interface_result1.failed

    - name: Configure FastEthernet0/1 for IT
      cisco.ios.ios_l2_interfaces:
        config:
          - name: FastEthernet0/1
            access:
              vlan: 20
            mode: access
            description: IT_Department
        state: merged
      register: interface_result2
      failed_when: interface_result2.failed

    - name: Save running configuration
      cisco.ios.ios_config:
        save_when: modified
      when: vlan_result.changed or interface_enable_result1.changed or interface_enable_result2.changed or interface_result1.changed or interface_result2.changed
      register: save_result
      failed_when: save_result.failed
2. Run the playbook
Use the following command to run the playbook.
ansible-playbook -i inventory.yml configure_branch_vlans.yml
This connects to R1 via SSH and applies the configurations. Verify the status has been marked as changed, which indicates successful configuration. If errors occur, review the Ansible logs for details.
Monitor device health with NAPALM
To ensure the router is running the expected IOS version, such as 15.2 or later, and has sufficient uptime -- typically more than one day -- automate device fact collection with NAPALM.
1. Create the monitoring script
Create a script monitor_device_facts.py with this code.
from napalm import get_network_driver
import json
import os
from datetime import datetime, timedelta
from dotenv import load_dotenv

# Load environment variables for secure credential management
load_dotenv()
device_params = {
    'hostname': os.getenv('ROUTER_IP', '192.168.1.1'),  # Default fallback
    'username': os.getenv('ROUTER_USERNAME', 'admin'),
    'password': os.getenv('ROUTER_PASSWORD', ''),
    'optional_args': {'secret': os.getenv('ROUTER_ENABLE_PASSWORD', '')}
}

# Initialize NAPALM driver for Cisco IOS
driver = get_network_driver('ios')
output_dir = "/backups/monitoring"
os.makedirs(output_dir, exist_ok=True)

try:
    print(f"Connecting to {device_params['hostname']}...")
    with driver(**device_params) as device:
        print("✅ Connection successful!")

        # Collect device facts
        facts = device.get_facts()
        print("\n--- Device Facts ---")
        print(json.dumps(facts, indent=2))

        # Save facts to a timestamped file
        timestamp = datetime.now().strftime("%Y%m%d_%H%M%S")
        facts_file = f"{output_dir}/device_facts_{timestamp}.json"
        with open(facts_file, 'w') as f:
            json.dump(facts, f, indent=2)
        print(f"✅ Device facts saved to {facts_file}")

        # Validate device health
        print("\n--- Validating Device Health ---")
        min_uptime = 24 * 3600  # 1 day in seconds
        uptime = facts.get('uptime', 0)
        print(f"✅ Uptime: {timedelta(seconds=uptime)} (Sufficient)" if uptime > min_uptime else
              f"❌ Uptime: {timedelta(seconds=uptime)} (Too low)")

        # Validate IOS version
        expected_os_prefixes = ["Cisco IOS Software, C7200 Software", "Cisco IOS Software, 7200 Software"]
        os_version = facts.get('os_version', 'Unknown')
        os_version_valid = any(os_version.startswith(prefix) for prefix in expected_os_prefixes)
        print(f"✅ IOS Version: {os_version} (Matches expected prefix)" if os_version_valid else
              f"❌ IOS Version: {os_version} (Does NOT match expected prefix)")

        # Collect and validate interface status
        interfaces = device.get_interfaces()
        print("\n--- Interface Status ---")
        target_interfaces = ["FastEthernet0/0", "FastEthernet0/1"]
        interface_report = []
        for if_name in target_interfaces:
            if_data = interfaces.get(if_name, {})
            report = {
                "interface": if_name,
                "description": if_data.get('description', 'N/A'),
                "status": if_data.get('is_up', False),
                "admin_status": if_data.get('is_enabled', False),
                "mac_address": if_data.get('mac_address', 'N/A')
            }
            interface_report.append(report)
            print(f"  Interface: {if_name}")
            print(f"    Description: {report['description']}")
            print(f"    Status: {'✅ Up' if report['status'] else '❌ Down'}")
            print(f"    Admin Status: {'✅ Enabled' if report['admin_status'] else '❌ Disabled'}")
            print(f"    MAC Address: {report['mac_address']}")
            print("-" * 20)

        # Save interface report
        interfaces_file = f"{output_dir}/interface_report_{timestamp}.json"
        with open(interfaces_file, 'w') as f:
            json.dump(interface_report, f, indent=2)
        print(f"✅ Interface report saved to {interfaces_file}")

except Exception as e:
2. Run the script
Use the following command to run the script.
python3 monitor_device_health.pyThis script connects to the router, collects facts, validates health and saves reports to /backups/monitoring.
Automate configuration backups
Create a Python script that automatically backs up the router's configuration.
1. Create a Python script
Use the following to create a Python script for configuration backup.
# backup_branch_config.py
from netmiko import ConnectHandler
import os
from datetime import datetime
from dotenv import load_dotenv

# Load environment variables
load_dotenv()
device = {
    'device_type': 'cisco_ios',
    'host': os.getenv('ROUTER_IP', '192.168.1.1'),
    'username': os.getenv('ROUTER_USERNAME', 'admin'),
    'password': os.getenv('ROUTER_PASSWORD', ''),
    'secret': os.getenv('ROUTER_ENABLE_PASSWORD', '')
}

# Backup directory
backup_dir = "/backups/branch_configs"
os.makedirs(backup_dir, exist_ok=True)

try:
    # Connect to the device
    with ConnectHandler(**device) as net_connect:
        print(f"✅ Connected to {device['host']}")

        # Get and save running configuration
        config = net_connect.send_command("show running-config")
        timestamp = datetime.now().strftime("%Y%m%d_%H%M%S")
        backup_file = f"{backup_dir}/branch_router1_{timestamp}.cfg"
        with open(backup_file, "w") as f:
            f.write(config)
        print(f"✅ Configuration backed up to {backup_file}")

except Exception as e:
    print(f"❌ Error: {e}")
2. Run the script
Use the following command to run the script.
python3 backup_branch_config.pyThis script connects to the router, retrieves the running configuration and saves it to a timestamped file in /backups/branch_configs.
Combined network automation workflow
You can take this a step further and schedule a daily cron job to automate this entire process.
Create a file named workflow.sh with the following shell script.
#!/bin/bash
echo "Starting network automation workflow..."
echo "1. Configuring VLANs and interfaces..."
ansible-playbook -i inventory.yml configure_branch_vlans.yml
if [ $? -eq 0 ]; then
 echo "✅ VLAN configuration completed."
else
 echo "❌ VLAN configuration failed."
 exit 1
fi

echo "2. Monitoring device health..."
python3 monitor_device_health.py
if [ $? -eq 0 ]; then
 echo "✅ Health monitoring completed."
else
 echo "❌ Health monitoring failed."
 exit 1
fi

echo "3. Backing up configuration..."
python3 backup_branch_config.py
if [ $? -eq 0 ]; then
 echo "✅ Configuration backup completed."
else
 echo "❌ Configuration backup failed."
 exit 1
fi
echo "✅ Workflow completed successfully."
Schedule with cron
In the real world, you can choose to run the workflow daily at 2 a.m.
Edit the crontab.
crontab -e
Add the following line.
0 2 * * * /path/to/workflow.sh >> /path/to/workflow.log 2>&1
This schedules the workflow and logs output to workflow.log.
Wrap-up
As you've seen, Ansible and Python are powerful together and can help network engineers move quickly and accomplish several tasks across their diverse IT environments. At the end of the day, efficiency boils down to using the right tools for the job at hand.
You can customize the scripts as needed to fit your environment. However, make sure you always test in a lab before deploying to production.
Wisdom Ekpotu is a DevOps engineer and technical writer focused on building infrastructure with cloud-native technologies.