Getty Images
SSH tunneling explained: A tutorial on SSH port forwarding
SSH tunneling creates secure encrypted connections through private and untrusted networks, enabling remote access, bypassing restrictions and protecting sensitive data transfers.
The Secure Shell protocol defines a mechanism for securely connecting to a remote host. SSH replaced Telnet, the original internet application for running remote login sessions.
Over the years, SSH has become much more than a terminal emulation tool, largely due to its ability to securely route network traffic using ports and host systems defined by the user. These connections are called tunnels because they provide a connection through which users can transmit data securely over an unsecured network.
Let's take a deeper look at SSH tunneling, including how it works and the various types of SSH tunnels, before diving into the tutorials for setting up each type of tunnel.
What is SSH tunneling?
An SSH tunnel is a secure connection between an SSH client and an SSH server. The local machine routes network traffic from an arbitrary port through the SSH connection to a specified port -- usually TCP port 22 -- on the remote system.
SSH tunnels network traffic through application ports from the localhost to a remote system or vice versa. SSH tunneling, also known as SSH port forwarding, enables two systems to exchange data securely through firewalls across an intranet and the internet. It is also a critical component of cloud administration.
Tunneling is useful for many purposes, including the following:
- Accessing internal web services from outside a restricted network by tunneling HTTP or HTTPS traffic through an SSH port.
- Bypassing firewalls and network controls to reach services blocked by those devices. Be careful doing this; those restrictions are there for a reason.
- Tunneling nonsecure protocols, such as virtual network computing (VNC) or Remote Desktop Protocol, over SSH.
- Securing nonencrypted application data in transit across untrusted or trusted networks.
- Securely mounting remote Network File System and Common Internet File System filesystems, providing an encrypted connection for data transfers.
How does SSH work?
The simplest use case for SSH is logging in to a remote host for a terminal emulation session. In this case, a user utilizes SSH client software to connect to another host running an SSH server securely. You can configure SSH to exchange public keys between the client and server to authenticate the user and encrypt the data sent over the SSH connection.
SSH client software is almost always available on modern computers. OpenSSH is an open source command-line SSH implementation originally developed for the OpenBSD OS but is now available on almost all Unix-based OSes, including Linux and macOS. Windows versions 10 and newer also incorporate OpenSSH at the command line. PuTTY is another open source GUI version of SSH available for Windows.
Starting an SSH session requires the following:
- The domain name or IP address of the remote machine to access. This remote host must have an instance of the SSH server program, sshd, running.
- Access to an SSH client on the local machine. Initiate SSH connections by entering the ssh command. Although you can use GUI versions of SSH, such as PuTTY for Windows, learning to use the command-line version is useful for almost any modern OS.
- Credentials for a user login with permission to access the remote server.
For example, initiate a terminal session on a remote host called server.example.com with the user ID example-user with this SSH command:

This command opens a terminal session on the remote server using port 22, the default SSH port. SSH servers can also respond to session requests on other ports. For example, to connect to a remote server with a custom SSH port assignment of 2222, type:
ssh -p 2222 [email protected]
The -p option flag specifies port number 2222 on the remote server, which causes SSH to send traffic to port 2222 instead of the default port 22. This approach only works if you have configured the remote server to listen for requests on that port.
You can use SSH with domain names or IP addresses. If a host named server.example.com has the IP address 192.0.2.127, the following command has the same effect as the example above:
ssh -p 2222 [email protected]
When making an SSH connection, the server and client exchange public key information and negotiate a secure session key for encrypting SSH data exchanges. The first time you connect to a remote SSH host, SSH prompts you to authenticate the remote host's public key.
The standard SSH example has user example-user logging into a terminal session with the remote host server.example.com using port 22.
3 main types of SSH tunneling
SSH tunnels connect streams of data between processes running on two separate hosts. Three main types of SSH tunneling exist; you'll select one based on your specific needs.
1. Local port forwarding
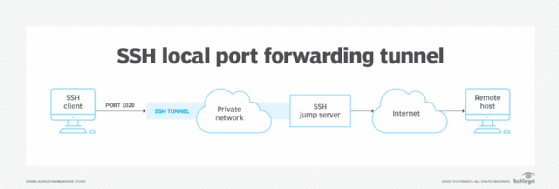
Local port forwarding enables you to connect from your local SSH client to a remote destination SSH server. Choose this approach when the destination server is not accessible to the local host -- for example, due to firewall filtering -- but it is accessible to the SSH server. Local port forwarding can bypass a firewall from inside a private network to access a remote system that the firewall would otherwise block.
2. Remote port forwarding
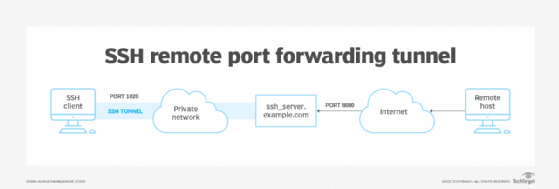
Remote port forwarding, or reverse SSH tunneling, enables a connection to a destination SSH server from a different SSH server using the SSH client software. Remote port forwarding is a less commonly used method to access an internal server from an outside private network that is otherwise inaccessible from the public internet. Malicious hackers might use this method to exploit systems on private networks.
3. Dynamic port forwarding
Dynamic port forwarding routes all inbound and outbound networking traffic through SSH on a specified port. This enables SSH connections between any two hosts, with all connections forwarded by the SSH client via an SSH server. It is also a mechanism for setting up a SOCKS proxy server, which passes networking traffic to be encapsulated in an SSH tunnel when you configure the local client software to pass all traffic to the specified port. Dynamic port forwarding can also circumvent the network firewall and gain access to any destination server from inside a private network.
Preparing to set up an SSH tunnel
This tutorial focuses on using the OpenSSH implementation of the SSH protocol at the command-line interface (CLI).
Before attempting to open an SSH tunnel, take the following steps:
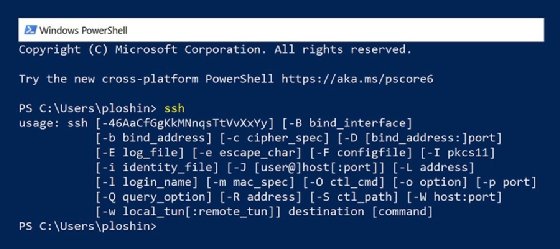
- Verify that SSH is installed and running on the local machine and the remote SSH server. On Windows systems or Unix-based systems, do this by opening a PowerShell window (Windows) or a shell session (Unix-based systems) and entering the ssh command without any parameters. The command returns a help message indicating correct usage and available parameters.
Also, verify that the SSH server sshd is running on the target (destination) host. If the host does not have an SSH daemon (server program) running and listening for SSH connection requests, you must start it before creating a tunnel. One way to verify this is to initiate an SSH connection with the server in question. If the connection is accepted, then it is safe to assume that sshd is running.
This is also a good time to verify that the user account being authenticated on the SSH servers has the correct permissions. At a minimum, the user account should be authorized to issue superuser commands using the sudo command, but with limitations to prevent the account from being hijacked and used against the organization.

- Get or verify the remote server's hostname or IP address. The server IP address is always sufficient, although having the domain name can make entering SSH commands easier.
On Windows systems, you can determine the system's IP address by opening the Settings application, selecting the Network & Internet option, and viewing the Properties of the network interface that is currently connected to the network.
Commands for discovering the IP address using the command line are available for all OSes:
- At the Windows command line, display the system's IP address by entering the command ipconfig. It shows the network configuration, including IP address, for all network interfaces on the system.
- On Linux systems, display the IP address by entering the ip addr command. It shows the network configuration, including IP address, for all network interfaces on the system.

- Determine the port numbers to use for redirection with SSH port forwarding. For well-known ports, refer to the Internet Assigned Numbers Authority (IANA) Service Name and Transport Protocol Port Number Registry. The most commonly used IANA-registered ports include port 80 (HTTP), 443 (HTTPS) and 22.
In general, you can select any non-well-known port from 1024 to 65535, but port 1080 is the registered port for SOCKS. You should use it when setting up a dynamic port forwarding tunnel for a SOCKS proxy.
For example, when setting up a tunnel for local port forwarding from a web server on the internal network to an external server, both the source port and destination port can be set to 80 for HTTP transmissions. When setting up a tunnel on a local server that is running both as an SSH server and a web server, the inbound port could be set to 8080 to differentiate tunnel traffic from ordinary web traffic.
- Review the planned tunnel before implementation by checking the following:
- Are the hosts reachable?
- Do all hosts have up-to-date and interoperable versions of SSH installed?
- Do hosts acting as SSH servers have the SSH server software installed and started?
- Does the user have adequate permissions on relevant systems?
Once you define tunnel endpoints, a step-by-step approach can simplify troubleshooting since you can test each component of the tunnel as you turn it on.
- Initialize the SSH daemon on the SSH server. For Windows 10 and later, you must install the OpenSSH server and start it using a PowerShell command line running with Administrator permissions. Use the following command to initialize the OpenSSH server daemon from the PowerShell command line:
PS C:\Users\peter> Start-Service sshd
Use the following command on Linux systems to start the OpenSSH server:
$ sudo systemctl start sshd

Remember, the sudo command requires an authorized password to gain superuser access to run the server service.
Once you establish connectivity to all endpoint systems and confirm permissions for access to SSH programs, setting up the tunnel is straightforward, although some SSH implementations might offer different options. To determine which SSH version is installed on Windows, open a PowerShell window and enter the following command:

PS C:\Users\userID> ssh -V</p
To verify the version of SSH running on Linux, enter the following command:
$ sudo systemctl status sshd

How to create a local port forwarding tunnel
Local port forwarding uses the -L option in the SSH command to flag that a local port will be forwarded through the SSH server to another server or host. In other words, the local host connects to another host running the SSH server and then patches any network data bound for the forwarded port through the SSH server to the desired destination host.
For example, if you are using a computer on a private network and you want to access a web server that your organization's firewall blocks, you could redirect the local port 8080 to the desired web server with this command:
ssh -L 8080:social.example.org:80 ssh-server.example.com
In this example, the -L option indicates that the SSH server at ssh-server.example.com should forward port 8080 on the localhost to port 80 on the desired but restricted server, social.example.org.
Running the SSH command with the specified ports means you should be able to access the restricted server using a URL in your web browser, such as http://localhost:8080/, which points to the specified port on the local host running SSH. SSH forwards the HTTP request through the SSH tunnel to access the desired web server.

How to create a remote port forwarding tunnel
Ethical hackers, penetration testers and malicious attackers often use remote port forwarding, aka reverse tunneling. If attackers can exploit just one host inside a private network, they can use that access to potentially access any system within the protected network.
To start a reverse tunnel, run the ssh command with the -R option on the host inside the private network you want to use to forward outside network requests to an otherwise restricted host on the private network. Consider the following command, run on a host located inside the firewall perimeter:
ssh -R 5900:localhost:5900 somehost.example.net
In this command, localhost refers to the host located inside the private network. The port being forwarded (5900) is the default port for VNC, which is software that enables remote control of a desktop. The system being forwarded to is somehost.example.net, a host accessible to localhost but also located on the protected network. Ordinarily, this host should not be accessible to anyone outside the firewall perimeter; however, in this case, localhost has been made accessible to the public internet. You can also use this type of forwarding to exploit privileged access on a host outside the private network that has been given privileges to access restricted services.
In this example, you can configure VNC client software to connect to the domain name or public IP address of localhost on port 5900 to gain control over the system somehost.example.net.
In practice, opening a reverse tunnel in this way can be complicated. Many organizations are aware of this exploit, which enables attackers to run remote commands on a protected system, and they deploy protections against it. In any case, check with the network and IT staff to avoid triggering alerts with a reverse tunnel.

How to create a dynamic port forwarding tunnel
Dynamic port forwarding with SSH is often used to set up a SOCKS proxy server. In this example, the SSH client listens on a specific port on the local host. When it receives traffic on that port, the SSH server encapsulates, or tunnels, the application layer messages into a secure tunnel that connects to the receiving host.
When using SOCKS proxies, you must configure client software with the port number on which SSH is accepting traffic to be tunneled. The default port for SOCKS proxies is 1080, so the SSH command to start a SOCKS proxy (enabling dynamic port forwarding) is:
ssh -D 1080 bastion.example.org
The -D option enables dynamic port forwarding on the local host, so all messages received on port 1080 are forwarded to the host named bastion.example.org. Bastion is a type of host typically positioned outside the firewall perimeter or in the network DMZ. It mediates access to external hosts through SSH tunnels.
Wrap-up
SSH is a crucial network security service in today's modern environments. It connects clients with servers, admin workstations with network devices, and various computers to cloud services. Tunneling with SSH offers numerous options for controlling the flow of traffic, ensuring private data transfers. Start working with SSH tunnels today to see how they can benefit your environment.
Editor's note: This article was originally written by Peter Loshin in 2022. It was updated by Damon Garn in 2025.
Damon Garn owns Cogspinner Coaction and provides freelance IT writing and editing services. He has written multiple CompTIA study guides, including the Linux+, Cloud Essentials+ and Server+ guides, and contributes extensively to Informa TechTarget, The New Stack and CompTIA Blogs.


