
Getty Images/iStockphoto
How to configure automatic Azure Virtual Desktop scaling
Azure Virtual Desktop now supports VM automation for tasks such as scaling up and ramping down. These features can lead to a more efficient and cost-effective VDI environment.

With the release of Azure Virtual Desktop, Microsoft introduced a new way to provide easily scalable virtual desktops to end users as a native Azure service.
One of the main advantages of using a cloud-based virtual desktop from a service such as Azure Virtual Desktop (AVD) is the pay-as-you-go model, which allows organizations to pay only for the capacity their workers use. Microsoft also bills organizations on a per-second level for each of the Azure-hosted virtual machines.
Up until now, however, Microsoft has not provided a useful and native method to handle automatic scaling up and down of VDI environments running AVD. Virtual desktop administrators have to turn to third-party scripts or add-ons to handle this.
However, Microsoft recently introduced the following new features:
- Start Virtual Machine on Connect
- AVD scaling plans
These features will allow IT admins to take full advantage of a cloud-based VDI service and run their environment much more efficiently.
Start VM on Connect is a feature that allows end users to turn on their VMs when they need them. IT administrators can enable this feature for both personal and pooled host pools. The AVD scaling plans allow organizations to customize and optimize how and when their VMs start up and run.
To enable these features, IT admins need to create a role-based access control instance within Azure and provide AVD with access to these virtual machines. IT should address this with a custom Azure Research Manager role, and the simplest approach is to create a custom role that supports both features.
First, IT admins should create a JSON file that contains the following code. However, they must change the name and description of the role's purpose and the subscription ID section to reflect their subscription information.
 {
 "properties": {
 "roleName": "Autoscale",
 "description": "Friendly description.",
 "assignableScopes": [
 "/subscriptions/<subscriptionid>"
 ],
 "permissions": [
  {
  "actions": [
           "Microsoft.Insights/eventtypes/values/read",
      "Microsoft.Compute/virtualMachines/deallocate/action",
           "Microsoft.Compute/virtualMachines/restart/action",
           "Microsoft.Compute/virtualMachines/powerOff/action",
           "Microsoft.Compute/virtualMachines/start/action", (Required for Start VM on Connect)
           "Microsoft.Compute/virtualMachines/read", (Required for Start VM on Connect)

           "Microsoft.DesktopVirtualization/hostpools/read",
           "Microsoft.DesktopVirtualization/hostpools/write",
           "Microsoft.DesktopVirtualization/hostpools/sessionhosts/read",
           "Microsoft.DesktopVirtualization/hostpools/sessionhosts/write",
           "Microsoft.DesktopVirtualization/hostpools/sessionhosts/usersessions/delete",
"Microsoft.DesktopVirtualization/hostpools/sessionhosts/usersessions/read",
"Microsoft.DesktopVirtualization/hostpools/sessionhosts/usersessions/sendMessage/action",
"Microsoft.DesktopVirtualization/hostpools/sessionhosts/usersessions/read"
],
 "notActions": [],
 "dataActions": [],
 "notDataActions": []
 }
 ]
}
}
Once the IT admins have customized this JSON file, it's time to enter the Azure Portal and click through the following sequence: Azure Portal > Subscription > Access Control > Add > Add Custom Role.Next, click on Start from JSON and select the custom JSON file. Then, click through the wizard to create the custom role.
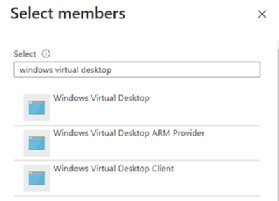
From there, the administrators need to assign AVD permissions to this role. Go back to the subscription pane, click access control and then click Add Role Assignments. The next step is to select the role that the admin just created -- either from the list or using search. Click next into the members pane, select User, Groups or Service Principals, choose find select members and search for Windows Virtual Desktop (Figure 1).
Finally, complete the wizard.
Start VM on Connect
To enable Start VM on Connect, IT admins need to go into a host pool and configure the option by selecting the following sequence: Host pool > Properties > Start VM on connect.
IT admins could also go with PowerShell and execute the following code:
Update-AzWvdHostPool -ResourceGroupName <resourcegroupname> -Name <hostpoolname> -StartVMOnConnect:$true
Now, when users try to connect to a VM within that host virtual desktop pool, they will get a message verifying their launch process (Figure 2).

Boot time on the VM will depend on the kind of hardware the end user has access to and any other guest configurations such as group policy.
The Start VM on Connect feature only handles powering on the VM, so when a user disconnects from the session, the VM will continue to run. Users can shut down their VMs from their respective virtual desktop, but the virtual hardware will still be allocated in Azure.
AVD scaling plans
Before going further, it's crucial to disclose that at the time this article is published, this feature is currently in preview and therefore has some limitations. For example, IT can only configure autoscaling in the Azure portal and only within the U.S. and European data centers.
To enable automatic virtual desktop scaling, IT admins need to create a scaling plan that will be attached to a host pool. IT can only configure one scaling plan for a host pool at any given time.It can have multiple configured schedules but not overlapping on days. Additionally, scaling plans will overwrite any load balancing that IT has configured on the host pools with their own logic.
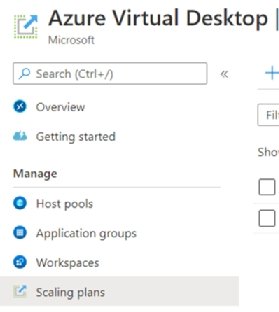
The first step in this process is to create a scaling plan, which is now available through the Azure portal (Figure 3).
When creating a scaling plan, IT admins must keep in mind that it only works against pooled virtual desktops -- it doesn't work against personal host pools. Once IT creates a scaling plan, it needs to define a schedule consisting of the weekdays and the timeline for desktops to scale up and down.
Note: If IT administrators configured drain mode for a host pool, Autoscale will overwrite it. IT admins can exclude this using the Azure tags defined on the scaling plan (Figure 4).

When defining a schedule, IT has four different modes to configure with the help of the wizard.
- Ramp-up. When the desktops should start booting. IT can define how many session hosts should be available as a minimum and what the capacity threshold should be before it powers on a new virtual machine. IT admins can also configure what kind of load balancing algorithm should be in place.
- Peak hours. The time of day when usage is highest. Here, IT can only define what kind of load balancing algorithm the scaling should use.
- Ramp-down. When desktops should start powering down. IT can define a start time, load balancing algorithm, minimum percentage of hosts and capacity threshold. Lastly, IT can also configure if it wants to force users to log off a custom notification message and a delay before the service will log off users and shut down the VMs.
- Off-peak hours. The maximum number of VMs that can be active during the non-peak hours based on the peak hours defined above.
Once IT admins have defined a schedule, they need to assign it to a host pool. They also need to enable diagnostics and collect the logs to a Log Analytics workspace in Azure. That way, they can monitor the autoscaling mechanism and receive notifications when the scaling is triggered.
The only downside now is that this feature does not provide an option to deallocate personal virtual desktop VMs when they are no longer in use.