
Getty Images/iStockphoto
Azure Virtual Desktop setup tutorial
When IT administrators set up an Azure Virtual Desktop environment, they must ensure that the proper prerequisites are in place and follow the process outlined below.

Organizations looking for a fully supported virtual desktop service can turn to Azure Virtual Desktop from Microsoft. Still, like any virtualization service, there are a lot of steps to get it up and running.
Organizations deploying Azure Virtual Desktop (AVD) need to consider the setup process, prerequisites, integrations with existing technologies and more. Additionally, organizations should evaluate AVD compared to Windows Virtual Desktop (WVD) to understand what additional features come with AVD .
What new features does Azure Virtual Desktop offer?
New features differentiate AVD from WVD, but they are more evolutionary than revolutionary. The largest difference is that AVD is a true desktop as a service (DaaS) offering, whereas WVD can run on VDI or with a hybrid approach. Additional features that AVD offers to distinguish itself from WVD include the following admin capabilities:
- Join Azure Virtual Desktop hosts directly to Azure Active Directory (AD) without setting up an Active Directory or Active Directory Domain Services domain environment. This will eliminate the need for a domain controller, correctly set up DNS, AD credentials and more.
- Take advantage of a native Microsoft Endpoint Manager (MEM) integration. IT admins can manage the virtual machine host of Azure Virtual Desktop with MEM's Intune functionality. In addition, AVD supports Windows 10 and 11 multi-user via MEM. This allows admins to quickly deploy software and set up user policies on Azure Virtual Desktop hosts.
- Create a virtual desktop environment faster via AVD QuickStart.
- Receive support for Windows 11. Microsoft has recently released Windows 11 and made a special multi-user version of Windows 11 for Azure Virtual Desktop. As with Windows 10 multi-user, there is a version of Windows 11 with the Microsoft Office productivity applications preinstalled and optimized for Azure Virtual Desktop.
- Stream via RemoteApp based on per-month pricing. Many organizations want to stream out at least one legacy application to their end users or customers. RemoteApp makes that easier by only requiring one price per user, per month to stream that application.
Prerequisites to the Azure Virtual Desktop setup process
Now that we know the difference, it's time to set up a new Azure Virtual Desktop environment.
First, consider the following AVD requirements:
- Azure subscription with payment setup; However, IT admins can get a free test subscription with $200 of credits;
- Azure Active Directory (AD) subscription; Organizations that have an Azure subscription will automatically have Azure AD;
- an Azure Virtual Desktop license;
- an optional file share or Azure storage container for the FSLogix profiles; and
- an optional connection to on-premises apps through VPN or Express Route.
Organizations that don't want to connect the Azure Virtual Desktop host directly to Azure AD need to meet the following additional requirements:
- Microsoft Active Directory connection, which IT can achieve via a domain controller on premises connected with a VPN, a domain controller in Azure or Azure Active Directory Domain Services;
- Azure Virtual Network (VNET) connected to the domain controller, either in the same VNET or with VNET peering;
- DNS setup to point to the domain controller on the VNET; and
- Azure Active Directory Sync.
With the prerequisites in order, IT admins will be ready to begin deploying Azure Virtual Desktop. There is no PowerShell requirement anymore, and IT admins can complete this process via the Azure Portal simply by clicking through the proper commands. The portal makes the implementation a whole lot simpler.
Of course, there is still a way to script the implementation via PowerShell if IT administrators prefer that approach. Microsoft has released a new PowerShell module which is now part of the Az PowerShell modules -- Az.DesktopVirtualization.
Note: The demo will add the Azure Virtual Desktop hosts to an existing domain.
Azure Virtual Desktop setup demo
1. First, sign in to the Microsoft Azure Portal. It is essential to sign in with an account that can create resource groups and resources. The admin must also be allowed to write in the Azure Active Directory. This demo uses a Global Administrator account.
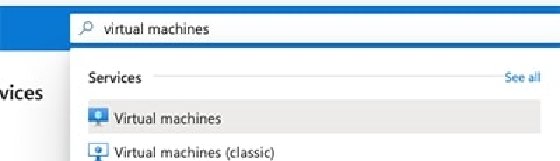
2. After signing in to the Microsoft Azure Portal, double-check the prerequisites. The domain controller is running in Microsoft Azure, so the next step is to check that the domain controller is running and the Azure Virtual Network DNS settings are correct. Search for Virtual Machines in the top search field and click on virtual machines (Figure 1).
Here, the domain controller called Domain01 is in a running state (Figure 2).

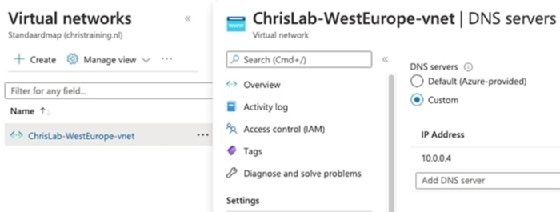
Once the IT admin verifies that the DNS is functioning properly, search for Virtual Networks in the top bar and click on virtual networks. This will show the network to which the domain controller is joined. Click on the network name and then click on DNS servers. It should be set to custom and have the IP address of the domain controller specified. In this case, the 10.0.0.4 -- Domain01 (Figure 3).
With the prerequisites in place, it's time to start the actual Azure Virtual Desktop setup and deployment.
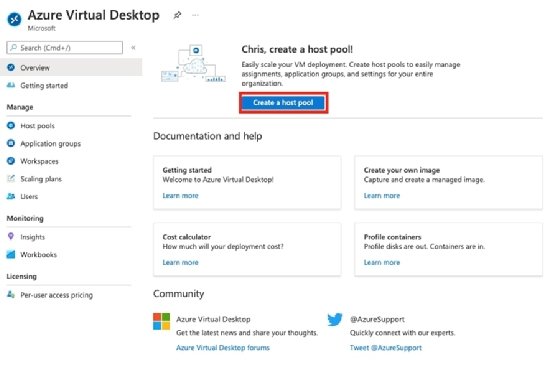
Search for Azure Virtual Desktop in the top bar and click on it. This will launch the new Azure Virtual Desktop management environment. To start Azure Virtual Desktop's setup process, click on the Create a host pool button (Figure 4).
3. Now it's time to fill in the Basics form.
Subscription
First off, the form prompts for a subscription. It can be any subscription with a credit or a payment method attached to it (Figure 5).
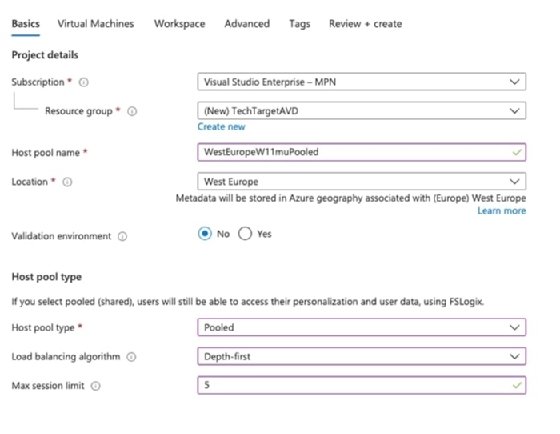
Resource group
Here, IT administrators should strongly consider creating a new resource group. It is essential to group all components, such as the VNET, so they are accessible between resource groups. This demo will use the name 'TechTargetAVD.'
Host pool name
It is wise to give the host pool a clear name to easily distinguish between pools. Consider the OS type, pooled or personal and location as distinguishing factors. The name for the demo is 'WestEuropeW11muPooled.'
Location
Here IT admins can select an Azure Region to host the AVD deployment. Make this as close to the end users as possible. This demo will use 'West Europe.'
Validation environment
IT admins can choose whether they create a test environment for the production. Select No.
Host pool type
The pool type allows administrators to choose between a single or multi-user environment. The single approach leads to each machine hosting one user's OS that can function as single-user operating systems such as Windows 10 or Windows 11. This will prompt a choice of either Automatic or Direct assignment. Automatic will randomly assign users to VMs, while Direct allows IT to link a user to a particular virtual machine.
Multi-user environments allow IT admins to select Pooled, which enables OSes such as Windows 10 and 11 Multi-User and Windows 2019 RDSH. Selecting Pooled also gives admins the choice to set up a load balancing method; this can be 'Breadth-first,' which will spread new users over the available hosts. The other option is 'Depth-first,' which will add new users to the same host until it reaches the max session limit.
The last host pool step is to set the Max Session Limit. Generally, it is a good idea to set a low session limit -- around five to 10 users per host is generally acceptable. Organizations with a workspace of 1,000 users, for example, could create 200 VMs with five users each then 25 VMs with 40 users each. The discrepancy is efficient because IT can shut down VMs that don't have users to save costs. Depth-first load balancing also helps because fewer users will be accessing the same server. This AVD setup demo uses Pooled, Depth-First and five sessions.
4. Next we need to fill in the Virtual Machines form. First, select Yes at Add virtual machines.
Resource group
Here, IT can choose a resource group for the VMs or select Defaulted to same as host pool (Figure 6). This option will create the VMs in the same resource group as the host pool. This is good for most deployments. IT should make individual resource groups for testing, production and other tasks for enterprise production deployments.
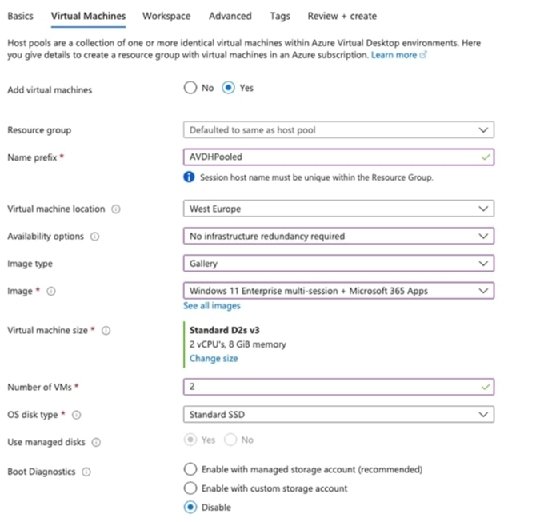
Name prefix
Here, IT should fill in a name that the VMs will be referred to as. Azure Virtual Desktop automatically puts a number after the prefix and numbers machines sequentially. It is smart to create an easily recognizable name like 'AVDHPooled.'
Virtual machine location
Here IT admins can select an Azure region that will create the VMs. It's a good idea to put them in the same location as the pool, as close as possible to the end users.
Availability options
Azure offers multiple availability options, which allow IT admins to keep working even during data center outages. The demo uses the No infrastructure redundancy required option.
Image type
Here, IT admins can select an image from the gallery or select their image from a storage blob. The demo will use a gallery image.
Image
IT admins can choose the images that the hosts will receive. Because this demo uses a pooled environment, it will only show Multi-User OSes in the dropdown. This demo will use Windows 11 Enterprise Multi-session plus Microsoft 365 apps. The image is optimized and contains the Office 365 suite of software.
Virtual machine size
With this option, IT admins can choose the size of the VM depending on their ideal specifications.
Number of VMs
IT should fill in how many AVD hosts it needs to create, depending on the end-user needs.
OS disk type
IT admins should select the type of disk they want to use for optimal performance. Premium SSDs are usually the safest bet.
Boot diagnostics
This allows IT admins to save the boot log files to an Azure storage account. The diagnostics are handy for troubleshooting, but it's not necessary for the demo.
5. It's time to fill out the second part of the Virtual Machine form -- the networking and security section.
Virtual network
IT admins should select their VNET, which is either peered with the domain controller VNET or is the domain controller VNET (Figure 7).
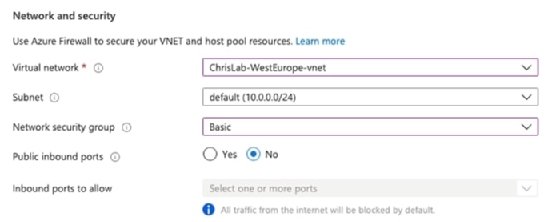
Subnet
Here, IT admins can select the subnet that the VMs will join. Make sure this subnet has the correct DNS settings.
Network security group
A network security group (NSG) allows IT to block and permit access to ports on the VM. If admins set it to Basic, Azure will automatically create an NSG for the VMs and configure the correct ports for AVD. IT admins can also choose not to have an NSG or select their own via the Advanced command.
Public inbound ports
This option lets IT select ports open from the internet to the hosts. For AVD hosts, this is not necessary and the section should stay on No.
6. The third part of the Virtual Machine form is about the domain to join. Here, select the domain we want the AVD hosts to join.
Select which directory you would like to join
IT admins can select either traditional Active Directory or Azure Active Directory. If IT chooses Azure Active Directory, it gets the option to also enroll the VM automatically with Intune. This would add the VM to Microsoft Endpoint Manager.
AD domain join UPN
IT needs to fill in an administrator within the local domain with enough rights to add a computer to the domain. This user does not have to be synced with Azure AD (Figure 8).
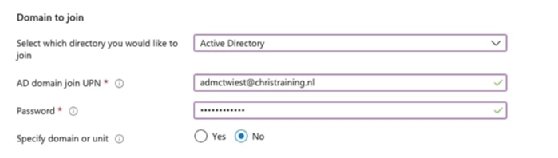
Password
Fill in the password of the user from above.
Specify domain or unit
Here, IT can determine the organizational unit (OU) in which Azure will create the VM's AD account. If IT administrators leave this option set to No, AVD will create the accounts in the default computers' OU. IT can move them later.
7. The next part of the Virtual Machine form is the Virtual Machine Administrator Account.
Username
Fill in a username for the local admin account on the virtual machine.
Password
Fill in a password for the local admin account on the virtual machine.
8. The final portion of the Virtual Machine form is the post-update custom configuration. This allows IT to point to an Azure Resource Manager file to configure the hosts. For example, it may add software or set policies. This is not present in the demo.
Now click on Next: Workspace (Figure 9).

The workspace form lets IT admins register the default application group with a new or existing workspace. Click on Yes at Register desktop app group. The To this workspace option allows IT admins to select an existing workspace or click on Create new. Because this is a new demo environment, this option is set to create a new workspace (Figure 10).

Then, move to the advanced page by clicking Next: advanced.
9. Add the advanced page. IT can enable diagnostic settings, which can be handy for environment metrics, and IT admins should configure them in production. For now, it can stay disabled.
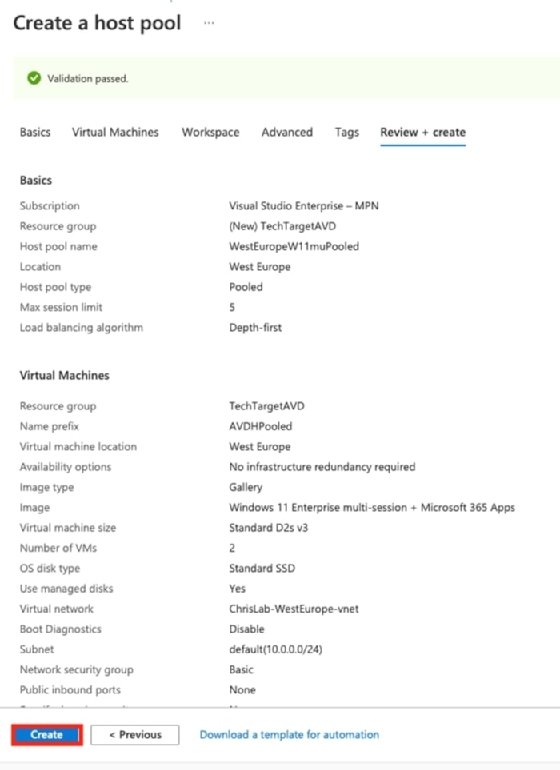
10. Next, click on Review + Create.
11. After double-checking the configurations, click on Create (Figure 11).
12. Now, Azure Virtual Desktop will create the environment. This may take up to 10 minutes.
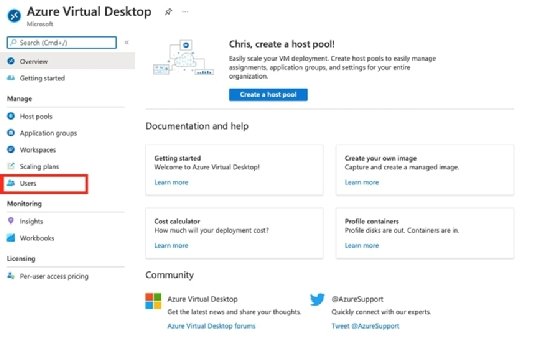
13. When the deployment is ready, search in the top bar for Azure Virtual Desktop and click on it. The last task to handle is to assign users to the host pool. Do this by clicking on Users in the sidebar (Figure 12).
14. Search for the designated user that IT will add to the environment. This user must be Azure AD-synced to access the machine.
15. Click on the user and navigate to Individual assignments.
16. Click on + Add, select the group and click on Add (Figure 13).
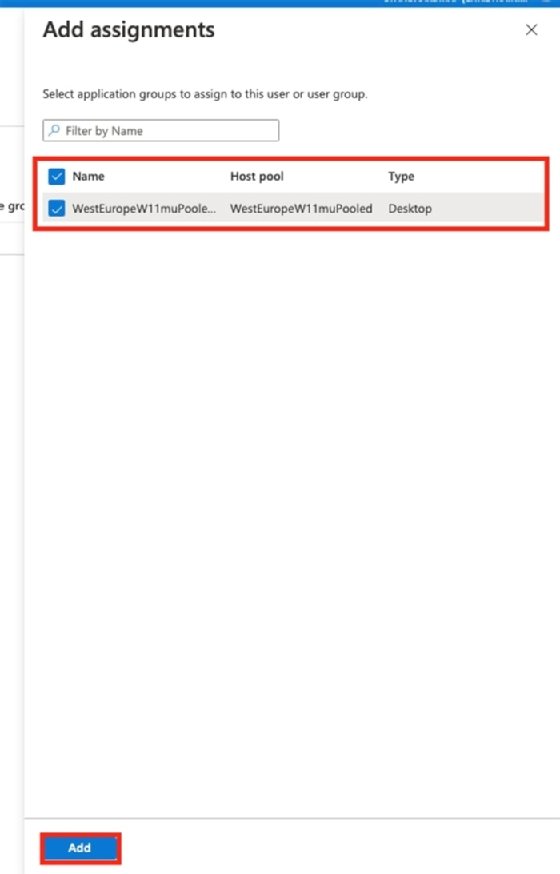
17. Now the designated user is assigned to the host pool and has access to the published desktop on the Azure Virtual Desktop host with Windows 11 Multi-User and Office 365 apps.