
Guido Vrola - Fotolia
How to deploy GPU-enabled virtual applications
More apps are graphics-intensive than ever before. As a result, VDI shops must know the steps it takes to deliver said apps to users without too much hassle.

The issue of delivering graphics-intensive applications in VDI deployments is no longer a technical one, but rather a question of cost benefits.
With the release of multi-user graphics processing unit (GPU) cards -- which deliver graphics processing capabilities to more than one user at the same time -- from companies such as Nvidia and Advanced Micro Devices (AMD), more and more applications once considered impractical for remote desktop deployments are suitable for publishing with a remote protocol. Multi-user GPUs are not exactly cheap, however. For example, Nvidia's Tesla M60 is listed for $3,999 on Amazon.
The introduction of Windows 10, Windows Server 2016 and Microsoft Office 2016 shifts the conversation of GPU-enabled applications further, making GPU offloading a must-have rather than a would-like. The graphic subsystems for these two operating systems and Office 2016 benefit greatly from the ability to offload GPU processing to a dedicated GPU card, rather than using CPU emulated graphics. The potential increase in VDI density per host alone could recoup costs very quickly.
What must IT do to deliver GPU-enabled apps?
This example deals with a VMware vSphere and Horizon based deployment.
As a VDI administrator, you must install a physical GPU card on the host server before you can deploy your first GPU-enabled desktops or apps. There are a couple additional prerequisites for deploying GPU-enabled virtual desktops or apps, including the following:
- You must have a valid Nvidia Grid license and license server.
- Synchronize the clock on all devices on the network. To do so, use a Network Time Protocol (NTP) or Domain Sync. NTP is preferable.
- Disable error-correcting code with Tesla P cards or confirm that the GPU card on the server is in graphics mode rather than compute mode. IT can use the GPUMODESWITCH tool to change this in a Tesla M card.
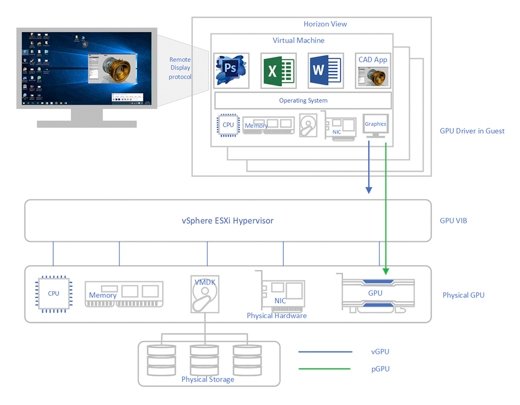
You must install a vSphere Installation Bundle (VIB) -- the device driver that enables VMware ESXi to see the graphics card -- because this is not a common deployment configuration for an ESXi host, and the drivers are not in the default installation ISO. This enables the ESXi host to pass the GPUs through the host server to the guest operating systems.
You should now place your host server in maintenance mode and download the relevant VIB from Nvidia or AMD and simply run the following command:
esxcli software vib install -v /path_to_vib/GPU_vib
Afterward, reboot the host server.
Next, open the vSphere web client and navigate to Host > Configure > Hardware > Host Graphics > Edit and modify the form in Figure B.
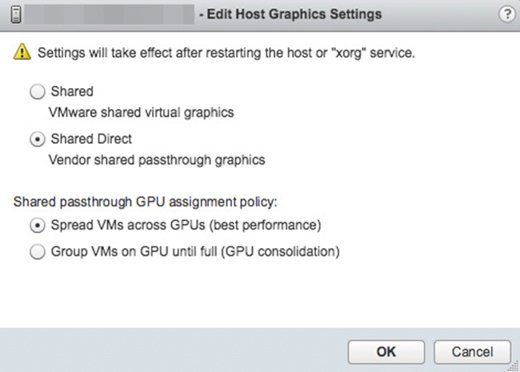
If, however, you use different profiles per GPU, you must make sure that you select the Group VMs on GPU until full (GPU consolidation) button.
With regards to configuration on the Horizon View deployment itself, there is little to do other than simply add the GPU-enabled hosts to a cluster. Horizon View will manage the load balancing of the desktops across the hosts in the cluster.
Preparing the desktop
The process to deploy a graphical application is no different than deploying any application. Take your deployment methodology of choice and install the app in the same manner you would for any other application. And the specifications for the VM are not that high compared to a standard physical computer-aided design workstation. The process for allowing the VM to communicate with the physical endpoint that the graphics-enabled application runs on, however, is different.
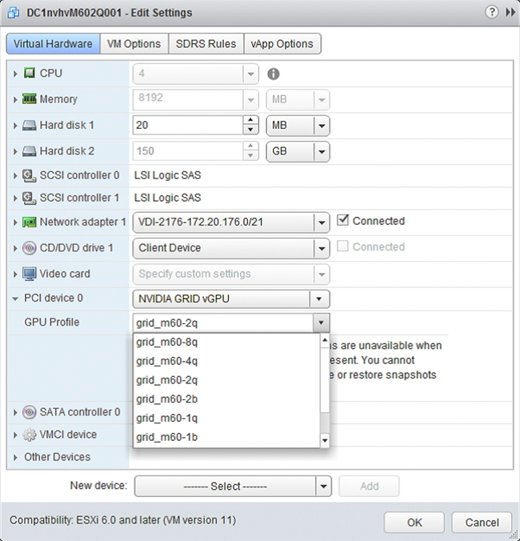
Preparing the desktop is as simple as adding a new Peripheral Component Interconnect (PCI) device to the golden image. In a vSphere deployment, simply follow the procedure below:
- open vCenter
- go to Edit VM settings
- add shared PCI device under new device
- select Add
- select GPU profile, then select OK
- start VM
Next, power up the relevant virtual machine and install the Nvidia graphics driver. You can download the driver from the Nvidia support site.
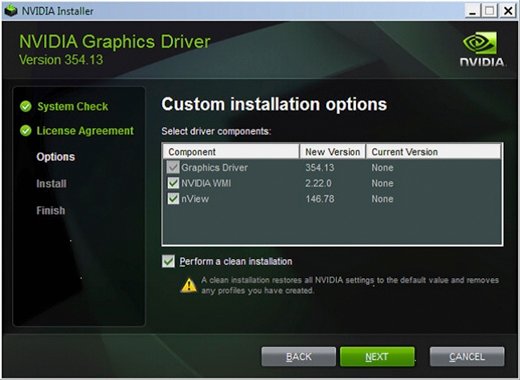
The basics of a GPU-enabled VM are now in place, allowing you to use the golden image in desktop pools. The pools can be full clones; linked; or, since the release of Horizon View 7.1, Instant Clones.