
pixel - Fotolia
How to install ESXi on a USB drive and why you should
With just a USB flash drive and an ISO image, you can install VMware ESXi. Learn how this can save you time and money, as well as two methods for installation.

You can save money on server hardware by installing VMware ESXi on a USB instead of using internal disks of your host. You don't need any specialized knowledge or skill to do so; all you need is an ISO image of ESXi and a USB drive.
VMware ESXi is a reliable, popular hypervisor. It supports key features, such as traffic shaping, role-based security access and vSphere PowerCLI, and it requires minimal hardware resources. You can use free software -- such as Rufus -- or VMware Workstation to install ESXi on a flash drive. From there, you can run ESXi on almost any system.
If you already use ESXi on local disks, it might not be worth switching to a USB method. But for new servers, installing ESXi on a USB might be the cheapest and most efficient installation option.
ESXi Embedded vs. Installable
Standard servers include internal or external USB slots. ESXi can use the storage provided by USB thumb drives to boot a small-footprint ESXi hypervisor. You can deploy a diskless server system this way, which saves electricity and money.
Most modern servers don't provide optical drives. In the past, you might have used such drives to install software or even to install a whole server's OS. However, they fell to the wayside as other technologies -- such as solid-state drives -- outpaced them in terms of capacity. As a result, you can no longer install ESXi using CDs or DVDs.
Instead, VMware makes an ESXi Embedded edition available for physical servers equipped with ESXi firmware. The vendor provides an image on a USB flash drive that plugs into an internal port on a server's motherboard. This product only works with servers from specific vendors that support ESXi, such as Dell Technologies, VMware's parent company.
However, you can also install ESXi on a USB flash drive yourself. This Installable version works with any server that supports booting from removable USB drives. In addition, with Installable, you can install the latest version of ESXi, with the latest patches included.
Pros and cons of installing ESXi on a USB
When you use a small USB flash device to contain your ESXi hypervisor, you save precious space in your internal direct-attached storage. In fact, you don't require internal storage at all if you use traditional shared storage infrastructure. This lowers the cost of each of your servers by several hundreds of dollars. It lowers your electricity bill, too, because diskless servers use less electricity and generate less heat.
In addition, some servers lack much internal storage space. You should maximize your internal storage for data, rather than an ESXi hypervisor.
However, USB devices can wear out fast due the high ratio of I/O operations. Pay attention when picking your USB and choose a supported device.
Flash drives also don't support RAID. This means if your USB device fails, your ESXi host goes down until you replace your flash drive, which requires you to reinstall and reconfigure ESXi on a new drive. This takes time.
Finally, the installer -- by design -- doesn't create a scratch partition on USB devices. When you install ESXi, the installer attempts to allocate a scratch region on an available local disk or data store. In instances when it can't find a local disk or data store -- such as when you use a USB device -- the installer places "/scratch" on the RAMDisk.
You need a scratch partition to store vm-support output when you create a support bundle. If you don't have a scratch partition, the ramdisk stores your vm-support output instead, which means the system will erase that content in the event of a reboot. As a result, you must reconfigure the scratch partition on per-host basis and configure shared storage or local disk storage.
What do you need?
Device support. Not all USBs are created equal. Quality varies, and you must ensure VMware supports your USB of choice.
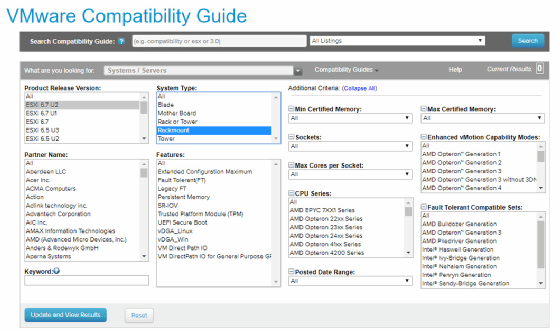
VMware provides a vendor-approved hardware compatibility list (HCL) for servers and USB flash devices. You can use this list to ensure the vendor supports your USB flash device.
ISO image. You need an ISO image of ESXi Installable. You can download this directly from VMware.
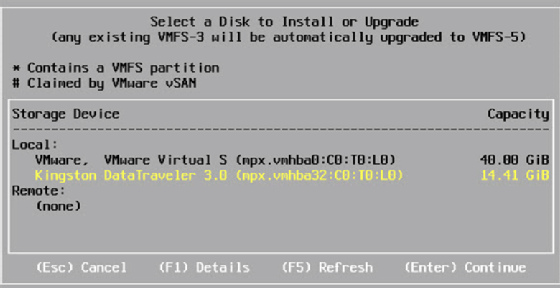
USB flash device for the installer. You can use any 16 GB or 32 GB flash device to hold the ESXi installer.
USB or SD card to use as a destination. ESXi creates multiple partitions when it installs and stores several additional files, such as VMware tools, for different OSes. The larger your USB device, the more of these files you can accommodate without errors. The partitions contain a backup copy, so you can revert back to a previous image if an ESXi update fails.
Make sure your hardware manufacturer certifies this device.
Server manual. Consult your host's user manual to configure the boot sequence from a USB. Sometimes you must enable booting from a removable USB device in your server's BIOS. A server's BIOS might also ask you to choose a USB version -- 1.1, 2.0 or 3.0 -- for your ports.
Internal USB port. Your hardware should contain an internal USB slot for the ESXi flash drive. Most modern servers have at least one internal USB slot. To check, open the cover and look around.
Make sure your USB hardware fits even with the server cover closed; otherwise, you might get an alarm from your hardware monitoring system that your cover is open. You can also use an external USB port, but this puts your hardware at greater risk for damage.
The Rufus method
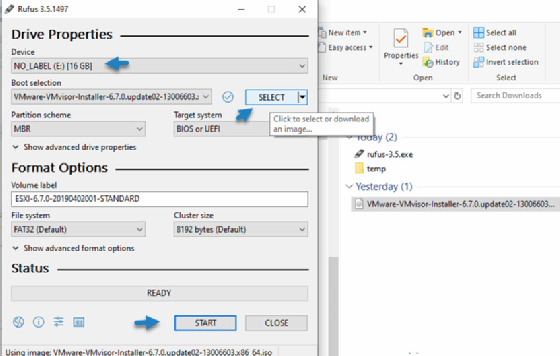
1. Download the freeware application Rufus.
2. Download the latest ESXi Installation ISO from VMware's website.
3. Run the Rufus executable. A screen should prompt you to select your destination -- your generic USB containing the installer -- and your source, the VMware ESXi Installable ISO image.
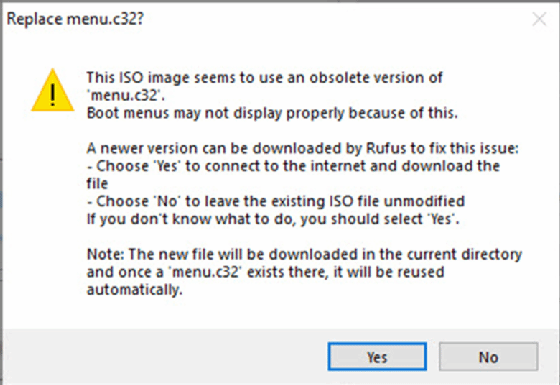
4. When a prompt appears informing you that the boot menu on the VMware ISO is obsolete, click yes.
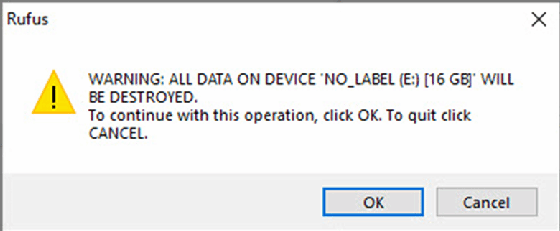
5. Confirm before Rufus erases your USB device to create a partition scheme.
6. Plug your USB device into a server and select it as a boot device in your BIOS. Then, boot from that USB.
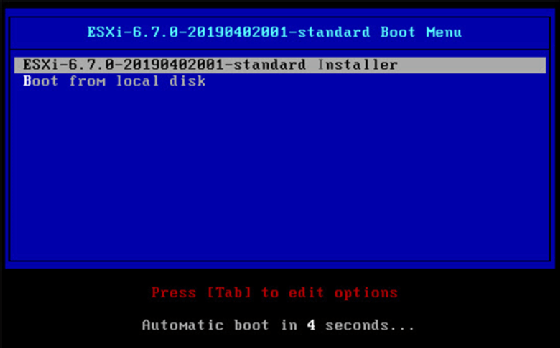
7. Hit Enter to continue the installer, and then hit F11. You can then select the HCL-supported USB as a destination.
8. Once the ESXi installation completes, remove the source USB and reboot. ESXi should load from the flash drive.
The Workstation method
This method requires you to have a copy of VMware Workstation software. If you use Workstation, you don't need a generic USB to create an installer.
1. Open VMware Workstation and create a new VM, specifying the VMware ESXi installation ISO. Workstation should automatically detect VMware ESXi.
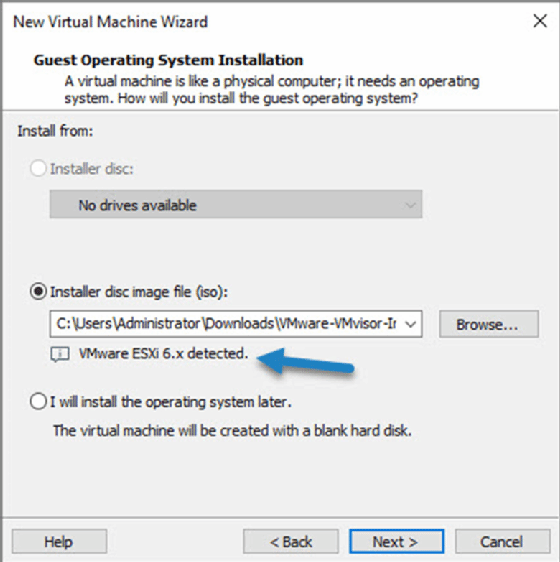
Use the defaults to create the new VM. The VM automatically powers on after you finish the creation wizard.
2. Follow the installer. Hit Enter and then Choose the USB supported by your hardware manufacturer.

3. After the installation completes, power off the VM.
4. Pull out the flash drive and plug it into a server. You can now boot your server from the freshly installed USB drive. The server should load VMware ESXi hypervisor.
After you configure your root password and networking, you can connect to this server via remote console.
Life expectancy of a USB flash drive
If your USB wears out, your server might stop working. Flash drives have a finite number of write cycles, meaning you can only overwrite them so many times before they fail. However, high-quality flash drives can last many years and sustain more than 10,000 write cycles before experiencing problems.
Still, you should keep a backup ESXi flash drive in the event of a flash drive failure. You can use one of several image-based software tools -- such as USB Image Tool -- to create an image-level backup of your USB drive.
You can also save a configuration of your ESXi host using the following PowerCLI command:
Get-VMHostFirmware -VMHost ESXi_host_IP_address -BackupConfiguration -DestinationPath output_directory