
Getty Images
How to execute a Windows Server 2012 file server migration
The Storage Migration Service can reduce the stress involved with shifting the data from the outdated file server operating system to one with a newer version of Windows Server.

Time is about to run out on your Windows Server 2012 file server's lifespan, making it imperative to make the switch soon.
Windows Server 2012 and 2012 R2 are rapidly approaching their end-of-life date. After Oct. 10, Microsoft will not provide security patches and bug fixes for these legacy server operating systems. Enterprises that rely on an on-premises file server should consider their options to execute a Windows Server 2012 file server migration and put those workloads to a newer operating system, such as Windows Server 2022.
What is the Storage Migration Service?
IT pros tend to be apprehensive when it comes to file server migrations. These operations can be complex, time consuming and expensive. Any issues that stymie the migration process can disrupt the organization and hinder users who need access to files to do their jobs.
To address these types of problems, Microsoft created the Storage Migration Service, which is a feature in the Windows Admin Center. The Storage Migration Service attempts to prevent the difficulties associated with migrating Windows Server file servers, Linux Samba file shares and NetApp Common Internet File System (CIFS) servers to a newer version of Windows Server on either a physical box or a virtual machine. The Storage Migration Service can also migrate this workload to the Azure cloud platform, including Azure IaaS or Azure Files.
The Storage Migration Service orchestrates file server migrations by executing a cutover migration to minimize downtime. The Storage Migration Service handles the communication and data transfer between the source and destination servers. The Storage Migration Service gives the option to add the identity of the source server and apply it to the destination server to avoid problems with changing links or paths so apps and users have a more seamless experience.
The Storage Migration Service is helpful in situations where you don't use distributed file system (DFS) or have unusual applications that can only bind directly to the file shares.
Steps for the Storage Migration Service process include the following:
- Install an orchestrator for Storage Migration Service on a server.
- Create a migration job with one or several source servers and one destination server.
- Transfer the data from the source server to the orchestrator and then to the destination server.
- Perform a final cutover by assigning a new name and IP address to the source server and assigning the source server's original name and IP address to the destination server.
What are the Storage Migration Service requirements?
To use the Storage Migration Service, you will need the following:
- A domain-joined source server that needs to be migrated. For this article, we will migrate a Windows Server 2012 R2 server, although the Storage Migration Service supports older Windows Server versions.
- A domain-joined destination server running Windows Server 2022. The destination server should reside in the same subnet as the source server.
- A domain-joined orchestration server to coordinate the migration process. For this article, this will be a Windows Server 2022 server with the Windows Admin Center installed.
- The source, destination and orchestration servers need the following ports open: Remote Procedure Call (RPC), Web Services Management (WSMAN), Windows Management Instrumentation (WMI) and Server Message Block (SMB).
- A domain administrator account to perform the migration.
Adjust the time-to-live for a smoother file-server migration
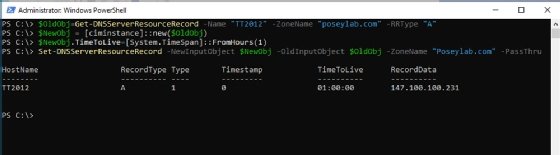
While it's not mandatory, it's helpful to shorten the time-to-live (TTL) on the source server's DNS record. This reduces the downtime during the cut-over. This only helps when assigning a new IP address. If the destination server will inherit the source server's address, then there is no benefit to adjust the TTL.
The Domain Name System (DNS) Manager cannot change the TTL for a single host, so you can use PowerShell. Start by opening an elevated PowerShell window on your DNS server and enter these commands, substituting names for the ones in your environment.
$OldObj = Get-DnsServerResourceRecord -Name "TT2012" -ZoneName "poseylab.com" -RRType "A"
$NewObj = [ciminstance]::new($OldObj)
$NewObj.TimeToLive = [System.TimeSpan]::FromHours(1)
Set-DnsServerResourceRecord -NewInputObject $NewObj -OldInputObject $OldObj -ZoneName "poseylab.com" -PassThru
Install Storage Migration Proxy on the destination server
On the Windows Server 2022 destination server, open an elevated PowerShell session and enter the following command.
Install-WindowsFeature SMS-Proxy
This installs the Storage Migration Proxy that communicates with the orchestrator.
Next, configure the Storage Migration Service on Windows Admin Center to set up the migration job.
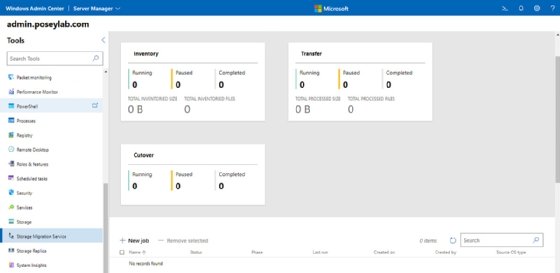
Set up the Storage Migration Service on the orchestrator
Open the Windows Admin Center and click on Storage Migration Service under the Tools section. If this is the first time running the Storage Migration Service, then click the Install button to set it up.
How to create the storage migration job with the Storage Migration Service
Next, set up the file-server migration job. In the Windows Admin Center's Storage Migration Service section, click New Job.
Give the job a name and set the source devices -- Windows server and clusters, Linux servers or NetApp FAS array -- and press OK.
Click Next to bypass the Check prerequisites screen. Enter credentials for an account with local admin privileges on the source server and press Next.
Click Next and the Install required features menu will appear. Let the system install the necessary features and click Next.
At the Add and scan devices screen, click on Add a device, enter the fully qualified domain name (FQDN) or name of the source server, and click Add.
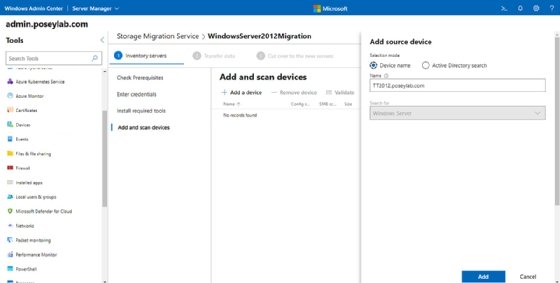
Click the More icon and then choose the Start scan command. The Storage Migration Service will launch an inventory job on the source server. Wait for the scan to finish and press Next on the bottom of the page to start mapping the source disks to the destination server hard drive.
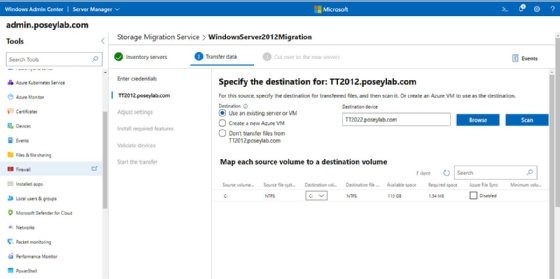
Enter a set of credentials for the destination device and click Next. You will be prompted to specify the destination device. Choose the option to use an existing server or VM, specify the FQDN of the destination device, and click the Scan button.
When the scan completes, map each source volume to a destination volume. For example, the C: disk on source is being mapped to the C: drive on the destination server in the figure below.
You don't have to worry about accidentally overwriting the destination server's operating system. If you scroll to the bottom of the page, you will see a list of the file shares that exist on the source server. Just select the shares that you want to migrate and then click Next.
At the Adjust transfer settings screen, we are using domain accounts. Click Next to accept the default settings.
At the Install required features menu, wait for the system to install the necessary features on the destination server. You might get a prompt for a password. Click Next when the process finishes.
At the Validate devices menu, select your migration job from the list and then click the Validate button. The validation process, which should not take long to complete, confirms that the source and destination servers are ready for the file-server migration. Scroll to the bottom of the screen and click Next.
Start the Windows Server 2012 file server migration
With the configuration work done, the Storage Migration Service can start the data copying process. Click the Start transfer button.
The next step is the most critical of the operation: the cutover migration. The Storage Migration Service will execute a differential transfer, then change the IP and name on the source server.
Start by either entering new credentials for the source and destination servers or by telling the wizard to use the stored credentials. In most cases, you should be able to use the stored credentials without issue. Click Next to continue.
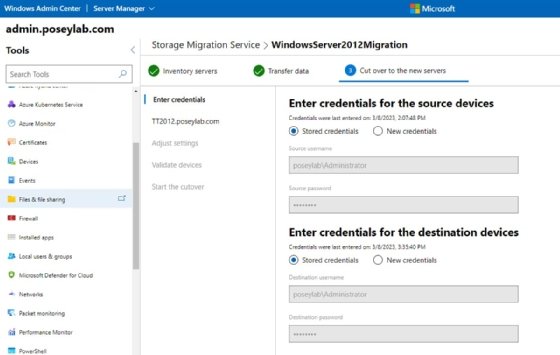
The next menu migrates the network settings to a network adapter on the destination server. Although this screen is set up for use with static IP addresses, there is an option to use DHCP for address assignments.
The cutover process also requires the source server to be renamed because the destination server will inherit the source server's original name. You can either assign a randomly generated name to the source server or you can give it your own name.
Click Next to go to the Adjust settings screen, which only requires your Active Directory credentials. Click Next.
Click the Validate button on the Validate devices screen. The Storage Migration Service will run tests to ensure it can execute the cutover migration. When complete, click Next.
The final screen gives the option to perform the cutover once you click Start cutover. This section also features buttons to stop and resume the cutover process. The Resume button is helpful if you encounter an error and need to restart the cutover process.
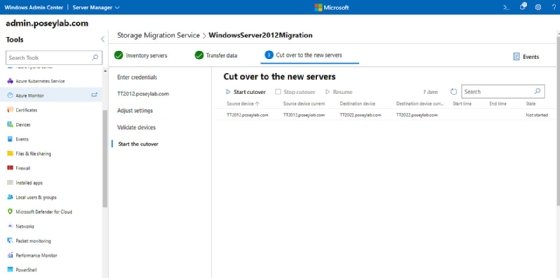
The time to complete the cutover process will vary based on the network configuration, but in my experience, the cutover migration only takes several minutes.
Dig Deeper on Windows Server OS and management
-
![]()
What are best practices for backup cloud repatriation?
By: Paul Kirvan
-
![]()
Tips to avoid a bumpy Exchange 2010 migration to Office 365
By: Helen Searle-Jones
-
![]()
Ad agency slashes NetApp costs with Datadobi data migration
By: Antony Adshead
-
![]()
Minimize headaches with these Office 365 PST migration tips
By: Reda Chouffani