
Getty Images/iStockphoto
How to enable and manage Windows 11 Hyper-V
Hyper-V virtual machines have many use cases in enterprise IT. Windows administrators should follow these steps to create new VMs no matter what their intended use is.

IT administrators can use Hyper-V on Windows 11 for a variety of business tasks, from testing software and services to securing individual sessions. However, there are several steps they need to take before Hyper-V and any virtual machines are ready to use.
Successfully running Hyper-V requires a solid grasp of how it fits into existing security, infrastructure and operational workflows. IT teams must understand Hyper-V for Windows 11, including the prerequisites, how to enable it, and how to set up a VM and network. Additionally, as an administrator, you should learn what Hyper-V can do compared to other virtualization tools and what features make it stand out.
Why use Hyper-V on a Windows 11 machine?
One of the biggest reasons that you might want to use Hyper-V is that it's free and included in your Windows 11 Pro or Enterprise license. Other virtualization software often requires you to pay extra. Even if some technologies are free -- for example, VMware Workstation Pro -- you must download and register the software. The enrollment process for Hyper-V is quite straightforward for Windows administrators.
Virtualization is most often hosted on specialized servers with many CPU cores and plenty of RAM, so why would IT want to run Hyper-V on a Windows 11 machine? There are many good scenarios for this.
Security
Hyper-V is very useful for creating a VM to work within. This way, you can separate work and private software. You can even sandbox the machine on the network to only let it connect to corporate resources.
Many viruses or ransomware still come through phishing emails or messenger apps. The risk of viruses and ransomware is much lower if you don't have social media or email on the VM. Also, the chance of spreading it to the company network is lower. IT administrators -- especially those who connect directly from their workstations to servers and the company back end -- should consider doing this from a secure VM.
Lab testing
Another good use of Hyper-V is a lab environment to test changes and updates to software. You can have a VM with company software and install the update first on the VM. Then, you can go through a testing procedure before installing the update on all computers in the corporate network.
A major advantage of using Hyper-V is its ability to create checkpoints, which are snapshots of the VM, and bring the VM directly back to that point. You can quickly test out an update, and if it doesn't work, you can just set back the VM to the checkpoint. Then, it's immediately ready for another test.
Education and training
When engaging with IT training from vendors, you might learn about new tools that your organization doesn't use. Creating a VM on your own workstation to go through the training material can be an easy way to learn hands-on. Checkpoints can quickly reset these training machines to a clean state to let you do a different exercise or retry a lesson.
Prerequisites for Hyper-V on Windows 11
Running Hyper-V on a Windows 11 machine has the following prerequisites:
- Windows 11 Pro or Enterprise 64-bit OS.
- A 64-bit processor with Second Level Address Translation.
- A minimum of 4 GB of RAM.
- BIOS-level hardware virtualization support.
To check if a system meets these requirements, start up the Task Manager by right-clicking on the taskbar. In the CPU part of the performance tab, see if the processor has virtualization enabled (Figure 1).
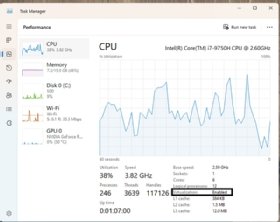
Most modern CPUs and motherboards support virtualization by default, but it might be disabled.
You can change the virtualization setting in your machine's BIOS. The best way to do this is to Google your motherboard type or laptop manufacturer for "[brand and model] change BIOS CPU virtualization setting." This should provide manual or guided steps to change the virtualization feature of your CPU.
In the performance tab, you can also see if you have enough RAM to use Hyper-V. In Figure 1, there is a total of 15.9 GB, which exceeds the 4 GB needed. If the prerequisites are met, you can enable Hyper-V.
3 methods to enable Hyper-V on Windows 11
There are three ways to enable Hyper-V. The first method relies on Windows features. First, search for Windows features in the Start menu. This will bring up the features window and let you turn features on or off. Scroll to Hyper-V and check the boxes for Hyper-V (Figure 2). After you click OK, the Hyper-V installation will start. After the installation, a prompt will appear to reboot the machine.

You can also use the following command prompt to enable Hyper-V:
DISM /Online /Enable-Feature /All /FeatureName:Microsoft-Hyper-V
After this Deployment Image Servicing and Management command runs, you will be prompted to restart the machine.
The last way to enable Hyper-V on your system is to use the following PowerShell command:
Enable-WindowsOptionalFeature -Online -FeatureName Microsoft-Hyper-V-AllAfter the PowerShell script, you will be prompted to restart the machine.
To start using Hyper-V, you'll need to start the Hyper-V Manager. This tool is installed when enabling Hyper-V on the system in the last step. Searching the Start menu for Hyper-V will prompt you to open the manager.
How to manage Hyper-V on Windows 11
In the Hyper-V Manager, you can create and manage multiple VMs, change global settings and set up virtual networking. If this is your first time using Hyper-V, look over the global settings and check the networking settings to see if they fit your use case.
To access the global settings, click on Hyper-V Settings... in the Hyper-V Manager. This option should be under Actions, either on the right side or in the top bar.
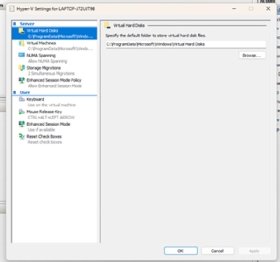
The settings you can change here will affect how the VMs are created. There are two settings that have the most significant effect on your Hyper-V system. First, the virtual hard disk setting is where the VHDs are created for your VMs. You can browse to a different HDD or SSD location in your system to save these files (Figure 3). The VHD files can grow into large files and require available storage.
The second setting to check is Virtual Machines, shown just below the Virtual Hard Disks setting in Figure 3. This is the location where VM configuration files are saved. Most of the time, you should save these in the same location as the VHDs.
Networking for Hyper-V VMs
The network is an integral part of Hyper-V because it works with virtual network switches, which you can set to different access levels. To access the Virtual Switch Manager, click on Actions in the Hyper-V Manager or on the right-side action pane under Hyper-V settings.
Hyper-V will always create a default network switch. This will be an internal switch with NAT enabled.
From there, you can create three types of switches: external, internal or private (Figure 4). Understanding the differences between these switches and selecting the correct one for your environment is essential.
Private switch
A private switch allows only communication between VMs on this private switch. It stops communication between the VM and the host.
Internal switch
An internal switch allows communication between all VMs on the switch and connection to the host. It can also communicate with the host and use its internet connection through NAT.
External switch
An external switch requires its own physical network adapter and can be used to separate the Virtual Machine and Host Networks.

How to create a VM with Hyper-V
After enabling Hyper-V and setting up the network and global settings, you can create a VM. Before you begin, you need an ISO of the OS you want to install. This example uses an ISO of Windows Server 2022.
To start creating a VM, select Action > New > Virtual Machine in the Action menu (Figure 5).

This will bring up the New Virtual Machine Wizard. On the first screen, click Next. Then, specify a name for the VM. You can also choose to store the VM in a different location than the one set in the global settings (Figure 6). After entering a name, click Next.

This will bring you to the Generation selection screen. For modern OSes such as Windows Server 2022 or Windows 11, you can go with Generation 2 -- older OSes or 32-bit OSes require Generation 1. After selecting the right generation, click Next.
Next, assign the VM the right amount of startup memory. If you check the Dynamic Memory box, the VM will not take all the RAM of the host assigned to it; rather, it takes only the memory it is using at the moment (Figure 7). After setting the right amount for your deployment, click Next.

On the next screen, select which virtual network switch the VM will connect to. Select the switch you decided on and click Next.
After that, you need to configure the VHD for the VM. Select the option to create a new disk. By default, it will choose the location of the global Hyper-V settings to save the virtual hard drive. These VHDX files are dynamic and will only require the storage they use, not their full storage capacity (Figure 8). After setting up the disk, click Next.

The last thing to do is select the ISO from which you want to install your OS on the VM and click Next > Finish. Now that the VM is created, you can connect to it and install the OS in the VM. To do this, right-click on the VM in the Hyper-V Manager and click Connect.
After connecting, you can start the VM by selecting Action > Start or pressing the green power button in the upper left corner (Figure 9).

The VM will now boot from the ISO and is ready to install the OS.
After the OS installation, you don't need to install extra drivers, as is the case with many other virtualization tools. Because Hyper-V is a Microsoft product, the drivers are already included in the Windows OS.
How to manage a VM in Windows 11
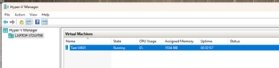
With a VM up and running, you can perform all administrative tasks from the Hyper-V Manager. In the Hyper-V Manager's Virtual Machines pane, you can see a list of all VMs created in Hyper-V (Figure 10).
By right-clicking on the VM, you can start it, suspend it or shut it down. Hyper-V also enables admins to pause and reset a VM. One other important option that Hyper-V offers is Checkpoints, which are snapshots of the VM that let you reset the VM to the point in time the checkpoint was created.
You can create and manage a checkpoint by right-clicking on the VM, where you can select Checkpoint -- which will create a new point in time -- or Revert, which lets you restore an earlier state of the VM.
Editor's note: This article was updated in February 2026 to reflect technology changes and to improve the reader experience.
Chris Twiest works as a technology officer at RawWorks in the Netherlands, focusing on the future Workspace and Cloud technologies for the end user.