
Creativa - Fotolia
Set up and stream CloudFront video and audio
Netflix and Samsung are two of several companies relying on AWS' streaming video platform, Amazon CloudFront. Here's a step-by-step on how to set up the streaming service.

The Amazon CloudFront video streaming platform enables viewers to receive streams from servers that are geographically close to them, resulting in faster load times, less buffering and a better overall end-user experience. But setting up CloudFront in the enterprise isn't always simple.
Netflix, an AWS poster child and a global provider of streaming movies and TV, turns to Amazon CloudFront because it allows the company to stream audio and video files -- without having to write code or install additional server software. Another example is Samsung Smart TV, which handled 500,000 RPS to support its 2015 Super Bowl advertising campaign: Katy Perry's halftime show, during which data was transferred in and out of Samsung Smart TVs using AWS.
CloudFront support protocols such as RTMP (Flash) and HTTP adaptive bitrate streaming for live and on-demand streaming. AWS customers can securely stream media content directly from an S3 account to the closest server to end users. Users are automatically routed to server locations that provide the best streaming performance and lowest latency. The streaming platform doesn't require any server-side players, like JW Player, or client plug-ins, such as Flash Player, QuickTime or Silverlight.
There are two elements required to stream media files with Amazon CloudFront: the video file and the media player you want end users to use. Follow these steps to upload CloudFront video files and JW player files to Amazon S3.
1. Download the JW Player zip file and click on Get the Player.
2. Click on Free to download the free version of JW Player.
3. Create an account with your email address.
4. You will be redirected to your homepage. Click on the License Keys and Downloads link to import the JW Player zip file.
5. Sign in to the AWS Management Console and click to open the Amazon S3 console.
6. Click on Create Bucket in the Amazon S3 console and then provide a Bucket Name.
7, Next, select a region that is close to the enterprise that has optimized latency and then click Create.
8. Select your bucket and click Upload (Figure 1).
9. On the upload page, select Add Files and add the following files:
- jwplayer.flash.swf
- jwplayer.html5.js
- jwplayer.js
- Your .mp4 or .flv media file
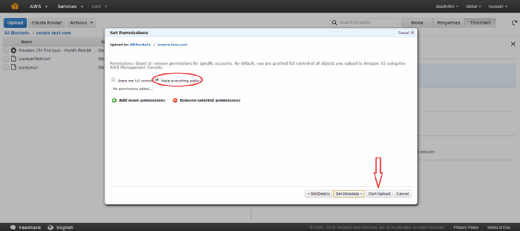
10. Give public read permissions for the files that were added by following these steps:
- Click on Set Details.
- Select Set Permissions on the Set Details page.
- Check the Make Everything Public box on the Set Permissions page.
- Click Start Upload.
Create a Web and RTMP distribution for a CloudFront video
To stream a media file or video file using Amazon CloudFront, you need a CloudFront Web distribution for the JW Player files, an HTML file and an RTMP distribution for the media file. Web distributions send files over HTTP, while RTMP distributions stream media files over RTMP.
To create a CloudFront Web distribution for JW Player files:
- Open the Amazon CloudFront console.
- Click Create Distribution.
- Go to the Web section on the first page of the Create Distribution Wizard and click on Get Started.
- On the second page of the Wizard, select the Amazon S3 bucket that you created in the Origin Domain Name field.
- Accept the default values for the remaining fields and select Create Distribution.
- After CloudFront creates the distribution, the value of the Status column for the distribution will change from "In Progress" to "Deployed." This should take about 15 minutes or less.
- The domain name that CloudFront assigns to the distribution will appear in the list of distributions. You can also see the domain name on the Distribution Settings page for a selected distribution.
The process involved in creating RTMP distribution for media files is fairly similar to that used to create CloudFront Web distribution for JW Player files. Developers can create distributions in the CloudFront console and then select the S3 bucket they assigned. Next, they should assign default values and select "Create Distribution." After creation, the CloudFront-assigned domain name appears in the list of distributions.

Embedding a CloudFront video file in a webpage
Once you've created CloudFront Web distribution for a JW Player and CloudFront RTMP distribution for the media file, the next step is to embed video in an HTML file. Embedding a CloudFront video file in the Web allows you to stream the video on any webpage.
Follow the steps below to embed a video in your webpage:
- Copy the HTML code below and paste into your text editor.
<HTML>
<HEAD>
<TITLE>Amazon CloudFront Streaming with JW Player 6</TITLE>
Note: Call the JW Player JavaScript file, jwplayer.js. Replace the "WEB-DISTRIBUTION-DOMAIN-NAME" with the domain name of your CloudFront Web distribution, for example, "d1234.cloudfront.net" (beginning with "d"). This causes a browser to download the JW Player file before streaming begins.
<script type='text/javascript' src='https://WEB-DISTRIBUTION-DOMAIN-NAME/jwplayer.js'></script>
</HEAD>
<BODY>
<H1>This video is streamed by CloudFront and played by JW Player 6.</H1>
Note: Replace the "RTMP-DISTRIBUTION-DOMAIN-NAME" with the domain name of your RTMP distribution, for example, "s5678.cloudfront.net" (beginning with "s"). Replace the "VIDEO-FILE-NAME" with the name of your .mp4 or .flv video file, including the .mp4 or .flv filename extension. For example, if you uploaded "my-vacation.mp4", enter "my-vacation.mp4." You might need to add "mp4:" to the name of your video file, for example, "mp4:my-vacation.mp4."
<div id='mediaplayer'></div>
<script type="text/javascript">
jwplayer('mediaplayer').setup({
file: "rtmp://RTMP-DISTRIBUTION-DOMAIN-NAME/cfx/st/VIDEO-FILE-NAME",
width: "720",
height: "480"
});
</script>
</BODY>
</HTML>
2. See the comments and replace the placeholder with the correct values.
- WEB-DISTRIBUTION-DOMAIN-NAME
- RTMP-DISTRIBUTION-DOMAIN-NAME
- VIDEO-FILE-NAME
3. After editing the file, save the file with an extension .html, such as "test.html."
Uploading an HTML file and playing the video
To play the video on a webpage, upload the HTML file in your Amazon S3 bucket. To do so:
- Open the Amazon S3 console.
- Select an S3 bucket and click Upload.
- On the upload page, choose Add Files and add your HTML file.
- Allow public read permissions for the HTML file that you added in the previous step by following these steps:
- Click Set Details.
- On the Set Details page, select Set Permissions.
- On the Set Permissions page, check the Make Everything Public box.
- After granting permission click Start Upload.
- To play the video, enter the following URL in your browser: http://domain name of your CloudFront web distribution/your HTML file name.
- Replace the orange colored text with correct values, such as http://d2o93do277zemp.cloudfront.net/test.html.
Understanding CloudFront costs
To determine the full cost of Amazon CloudFront, we can use the AWS Calculator for cost analysis. Estimating cost depends on two parameters:
- Storing files in Amazon S3.
- Video streaming using CloudFront.
Therefore, for 500 GB of S3 videos with 100 GB of CloudFront monthly data transfer, the estimated cost will be $18.05 plus $6.78, totaling $24.83.