Getty Images/iStockphoto
How to implement file classification in file servers
File classification with File Server Resource Manager enables admins to classify and organize data. This tutorial shows how to implement and manage file classifications.

Like many system administrator tasks, file classification begins when admins identify data -- where data is stored, what form it takes and how to categorize it. Such a project is usually beyond the scope of the IT department and requires input from day-to-day users.
Once organizations understand data classifications, they can create a design for file properties and an implementation through classification rules.
Many organizations use File Server Resource Manager (FSRM) to implement classification schemes. Schedule the application of classification rules as a form of ongoing maintenance. Many organizations find it difficult to identify specific data types and manage that data automatically. Data classification helps identify files that contain such data and automates management based on a series of classification types and associated rules.
What is file classification?
FSRM file classification enables users to specify attributes beyond author, owner, last saved and similar values. By creating classifications, administrators give their organizations more flexibility to automate file management and identify specific data within stored files and folders. For example, an organization might want to identify and manage personally identifiable information, such as Social Security and credit card numbers, or label files with values, such as Confidential.
Add the FSRM role to Windows Server to use file classification. Once installed, select the utility from the Tools menu in Server Manager. This tutorial provides steps on how to classify data with FSRM.
Configure classification properties
File classification identifies and categorizes files for policy-based file management. In the FSRM console, expand the Classification Management node to display the Classification Properties and Classification Rules nodes. Use these two nodes for most classification tasks.
Create one or more Classification Properties to manage file classifications. These properties define the criteria to classify files and folders. There are seven types:
- Yes/No
- Date-time
- Number
- Ordered list
- String
- Multi-choice
- Multi-string
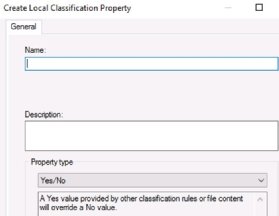
Right-click on the Classification Properties node, and select Create Local Property to define a classification property and manage it via a classification rule. Fill in the name and description fields, and then select the appropriate Property type.
You have now created a classification property that can be applied to resources on the system. The next step is to use rules to apply the properties.
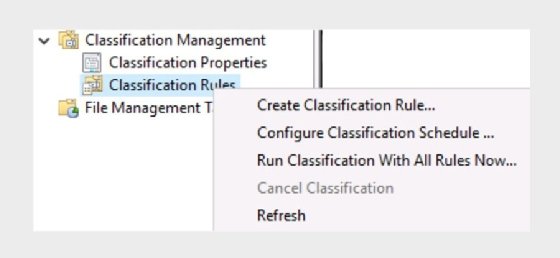
Configure classification rules
To define a new rule, right-click the Classification Rules node, and then select Create Classification Rule. The interface provides four tabs:
- On the General tab, set a name and description.
- On the Scope tab, define where the rule applies. You may select any number of the four provided data types or set a path to specific directories.
- The Classification tab enables you to configure Classification methods and select a classification property -- one of the properties you created in the Classification Properties node earlier. Note that some types require additional parameter configuration.
- The fourth tab is Evaluation Type, and it sets how to handle existing classifications if any exist.

Use the Scope tab to select the file types or paths the rule applies to. If you use Windows Explorer to select a file in that path, you can see the rule in the file Properties under the Classification tab.
Right-click a classification rule to temporarily disable it or permanently delete it. You can also edit the existing rule.
Configure folder classification
FSRM provides three built-in Folder Management properties:
- Access-Denied Assistance Message
- Folder Owner Email
- Folder Usage
The Access-Denied Assistance Message enables administrators to provide custom text to users instead of a generic and uninformative Access Denied message. For example, the user could be directed to the service desk to request access.
Folder Owner Email enables users to view the email address of the folder owner, presumably so they can request access directly.
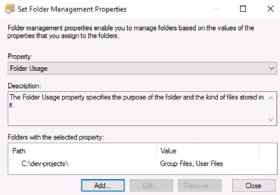
Folder Usage enables administrators to specify values that define the purpose of the folder and the expected content within it. These values control how the folder's contents are managed by FSRM.
To edit these settings, select one of the Folder Management properties, and then select Set Folder Management Properties from the Action menu.
You can also create your own Folder Management properties with custom criteria.
Schedule classification rules
Classification rules may run on a regular schedule. For performance reasons, it's recommended to execute the schedule during off-hours. To configure the schedule from within the Classification Management node, right-click the Classification Rules node, and select Configure Classification Schedule.
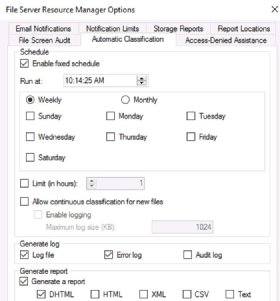
Note that the scheduling interface is considered to be part of the FSRM options. Right-click the top File Server Resource Manager node, and select Configure Options to access it.
The first choice is whether to enable the schedule. Once enabled, you may select specific times, days, weeks and months. Logging options are also available.
It's likely your organization will use the specific classifications to maintain compliance with the defined guidelines.
Right-click the Classification Rules node, and select Run Classification With All Rules Now to manually initiate classification. Be aware of a possible performance hit, especially on a busy file server.