
Rymden - stock.adobe.com
6 steps to troubleshoot remote printing via VPN
While each organization's printing infrastructure is different, IT administrators should follow these six general steps to determine the cause of remote printing issues over a VPN.

Remote printing is becoming more popular than perhaps ever before -- especially with the remote work boom -- but this may present some management difficulties for IT admins.
Remote printing is generally straightforward, but there are underlying complexities that sometimes lead to problems.
This is especially the case when users attempt to use a VPN connection to access a remote printer.
As an IT administrator, you should learn these six troubleshooting options to assist users experiencing trouble with remote printing via VPN.
1. Narrow the scope of the problem
If users are having difficulty printing remotely, then the first thing you need to do is narrow down the scope of the problem. More specifically, there are two things that you will need to try.
First, try printing to the printer from a device that exists on the same network as the printer. This will allow you to verify that the printer itself is turned on and working, and that network printing is functional. Remember, you shouldn't automatically assume the VPN is the problem. It's entirely possible the problem exists on your own network and has nothing to do with the VPN.
Once you verify it is possible to print from a non-VPN client, the next thing you should do is ask another VPN-attached user to try printing. This will allow you to determine if the problem is related to the VPN or if it's specific to a certain user who just happens to be connecting through the VPN.
2. Verify that VPN access is functioning normally
If you are able to determine that users who are remote printing via VPN are experiencing problems, then the next step in the troubleshooting process is to determine whether additional VPN-related problems are occurring. This will determine if the problem only affects remote printing via VPN.
The best way to accomplish this is to simply ask the user in question to log in through the VPN connection and have them try to access local network resources that are not related to the print server. For example, you might ask the user to try accessing files from a server message block (SMB) network share. If the user is able to successfully access such resources, it will confirm the user is successfully authenticating onto your network and the VPN is allowing the user to access resources on your private network. This rules out larger VPN-related issues as the source of the problem.
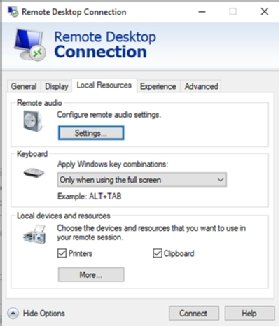
3. Check VPN client printer redirection
Once you have verified the VPN itself is functioning properly, the next step in the troubleshooting process is to verify the user's VPN client is configured correctly. Normally, a VPN client should silently redirect a user's print jobs to a network printer. However, if the VPN client is configured incorrectly, then print jobs may be directed to the user's local printer rather than the network printer.
Unfortunately, every VPN client is different so you may have to refer to the client's documentation to find printer-related settings. Normally there will be an option to manage this (Figure 1). This screen capture, taken from Microsoft's Remote Desktop Client, shows how a checkbox is used to direct print jobs either toward a local printer or to a remote printer.
4. Try using the printer's IP address
If you have verified that the VPN connection is working as intended and that the user's VPN client is configured correctly, then you should ask the user to connect to the printer by using its IP address rather than its name. This technique may be effective if the problem stems from a name resolution issue.
The method used to connect to a printer varies depending on the user's endpoint -- Mac or PC. On a Mac, the user needs to open the Apple menu and then click on System Preferences. From there, they should click Printers and Scanners to access the list of connected printers. At this point, the user should click the "plus" icon to access the Add Printers screen. Now the user only needs to enter the printer's IP address and click Add.
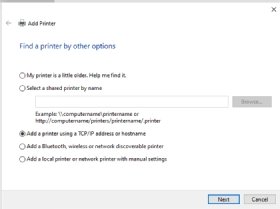
On a Windows system, the user would need to click Settings, followed by Devices. When the Devices window opens, the user should select the Printers and Scanners tab, then click on the "plus" icon to add a new printer. Next, click the Printer is Not Listed link, and Windows will display the Add Printer dialog box. Choose the Add a Printer using a TCP/IP address or Hostname option (Figure 2), then click Next.
When prompted, enter the printer's IP address and follow the remaining prompts to add the printer. It is worth noting that Windows will try to detect the printer, so the user will need to be connected to the VPN while performing these steps.
5. Check the split tunneling settings
Some VPN clients support a feature called split tunneling. The idea behind this feature is that not all traffic needs to be sent over a VPN. If a user is accessing a public website for instance, there aren't many reasons the web request would need to go through the VPN when the user could simply access the site directly through their own internet connection. Split tunneling makes it possible to route some traffic over the VPN and other traffic over the internet.
VPN clients that support split tunneling generally give you the ability to determine what traffic should run through the VPN. At least some clients are designed so any traffic that is not specifically authorized for VPN use is instead routed over the public network. This means VPN printing can fail because printing jobs are forbidden from traversing the VPN. The best way to fix this problem is to either disable split tunneling or reconfigure the split tunneling feature to allow print-related traffic to traverse the VPN.

6. Verify firewall settings
If you still have not been able to resolve the remote printing issue, make sure the necessary firewall ports are open. The required ports will vary widely depending on how your network printer is set up. If, for example, users are connecting to a Windows Print Server, then you will need to open TCP ports 139 and 445 and UDP ports 137 and 138. The Windows firewall actually contains an option to allow file and print sharing without you having to open each port individually (Figure 3).
As previously mentioned, the required ports can vary depending on how you have configured the network printing. If, for instance, users are attaching directly to an HP JetDirect port rather than going through a Windows Print Server, you will need to open a number of different ports. Similarly, Mac computers may use the Internet Printing Protocol, which requires TCP port 631 to be open.