
Getty Images
3 FAQs to improve your Hyper-V basic knowledge
It is critical to develop a foundation of Hyper-V knowledge for successful management. These three FAQs can broaden your Hyper-V expertise prior to installation and deployment.

Hyper-V streamlines virtualization in many ways; it can help manage virtual resources, run several VMs simultaneously and facilitate live VM migrations with ease. These three FAQs can help you fully grasp Hyper-V basics, such as virtual switch types, must-know skills, and export and import capabilities.
Hyper-V simplifies the virtualization process and is easy to install and deploy. Even IT pros shouldn't delve into a technology without first understanding its base functions. Learning the different Hyper-V virtual switch types, critical skills such as failover clustering, and how to initiate VM exports and imports can improve use and management, as well as ensure effective installations and deployments.
What virtual switch types does Hyper-V offer?
A virtual switch is software that forwards and inspects data packets between VMs. A virtual switch can simplify VM migration between two physical hosts and ensures the VM's profile integrity.
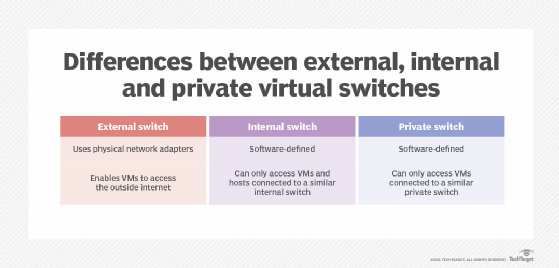
A Hyper-V virtual switch facilitates communications between VMs, the host OS and networks across the internet. There are three Hyper-V virtual switch types: external, internal and private.
External virtual switch. An external virtual switch offers physical network access to VMs and is bound to a physical network adapter. Once you connect them to an external switch, these VMs can communicate with one another.
Internal virtual switch. An internal virtual switch connects software-defined networks to each other. VMs or hosts that connect to an internal switch can communicate and send data packets, but they can't access the internet. VMs or hosts that don't connect to an internal switch can't communicate with those that connect to an internal virtual switch.
Private virtual switch. A private virtual switch, similar to an internal virtual switch, is software-based. VMs that connect to a private switch can only communicate with other VMs on another private switch -- they cannot communicate outside of the private switch. The host OS is also unable to communicate with VMs on a private switch.
What are some examples of Hyper-V skills you should know?
Hyper-V is known for streamlined installation, deployment and management compared to other industry hypervisors. Hyper-V requires you to become familiar with Windows Server knowledge, failover clustering, the System Center suite, network virtualization and storage.
Fundamental Windows Server knowledge for Hyper-V installation. When you host VMs on Hyper-V, a majority of those VMs run Windows as the guest OS -- which makes Hyper-V a Windows Server component. To ensure resource contention doesn't occur it is vital that you become familiar with Windows Server tools, such as the Windows Performance Monitor.
Use Hyper-V failover clustering to protect Hyper-V deployments. Failover clustering is a feature of Windows OS and provides a safe haven for Hyper-V deployments. Failover clusters prevent Hyper-V hosts from becoming a single point of failure. You should understand that Hyper-V replications don't offer the same protection as failover clustering. In the case of limited expertise and resources, Hyper-V replication can be a viable alternative to a failover cluster.
Gain knowledge of the System Center suite. Microsoft's System Center is a suite of system management products, such as the System Center Data Protection Manager, Data Protection Manager and Virtual Machine Manager. But only certain organizations can use these products to their full potential.
System Center's Hyper-V Manager is viable for smaller businesses because its functions are host-centric; it doesn't offer a consolidated view of VMs across Hyper-V hosts. System Center does have the System Center Virtual Machine Manager (SCVMM), which is designed specifically for Windows-based infrastructures. SCVMM can consolidate multiple physical servers into a centralized and virtualized system, which can reduce costs and streamline operations.
Learn network virtualization limitations. Despite virtualization's many benefits, it does come with its challenges. Network virtualization adds several layers of complexity, such as multiple network segments and switches, when VMs use a host's network adapter. Hyper-V offers virtual switches and network adapters and introduces network segmentation, which complicate management tasks. This is where knowledge of TCP/IP stacks, subnetting and rounding are critical.
Familiarize yourself with Hyper-V storage requirements. Those that understand Hyper-V storage fundamentals can more effectively prevent resource contention between VMs. Keep an eye on storage IOPS, -- the resource often in shortest supply -- and determine Hyper-V storage requirements prior to deployment.
How do you import and export Hyper-V VMs?
You can export and import Hyper-V VMs with Hyper-V Manager or PowerShell. To export Hyper-V VMs with Hyper-V Manager, select the desired VM to export. Then click the Export option found in Hyper-V Manager's Actions pane. Then select the location you plan to export the VM files to. From there, Hyper-V executes the export.
To import VMs with Hyper-V Manager, instead select the Import option found in Hyper-V Manager's Actions pane. This prompts the Hyper-V Manager to launch the Import VM wizard. Click Next on the welcome screen, and the Import VM wizard leads you through the process. You must select the folder that bears the VM's name, click Next and then select the VM you're importing.
Hyper-V Manager then offers three import methods: register the VM in place, copy the VM or restore the VM.
To export bulk VMs in PowerShell, you can use the Export-VM PowerShell cmdlet. When you use this cmdlet, you must provide the VM name and the export path below.
Export-VM -Name MyVM -Path D:\
If you only plan to export a single VM with PowerShell, you can use Get-VM | Export-VM -Path D:\ instead.
To import bulk VMs, you can use PowerShell's Import-VM cmdlet. If you plan to register a VM in place, you must include the VM path. But if you must restore or copy the VM, you can find supporting cmdlets and commands at Microsoft's dedicated doc page.