
your123 - stock.adobe.com
CI/CD tutorial: How to set up a pipeline
A CI/CD pipeline saves time and ensures software quality during development. Follow this tutorial to level up your project and reduce developer workload with automation.

Continuous integration and continuous deployment are an enormous benefit to any IT project. CI runs various validations continuously on a project's codebase during development.
For example, an application's CI pipeline might run a formatting check -- which highlights errors such as lowercase variables that should be uppercase -- unit tests or performance tests every time a developer commits new code. Continuous deployment refers to an automated deployment performed after a project passes all the validations set up in the CI portion of a CI/CD pipeline.
Continuous integration and continuous deployment complement each other. A strong CI pipeline that undergoes multiple stages of testing ensures that an application is valid, correct and ready for deployment. Success in the early testing stages triggers the continuous deployment stage and deploys the application once it meets the automated testing requirements. This process saves countless developer hours by testing and deploying applications automatically so developers can focus on writing new features. Let's look at a simple example of a CI/CD pipeline.
A CI/CD pipeline
In this CI/CD pipeline tutorial, we'll use a simple Python web application. The application uses Flask, a popular Python web framework. For more information on Flask, visit the main documentation page. Our example project can be found in a dedicated GitHub repository.
Let's walk through the different moving parts to understand how a CI/CD pipeline runs various tests and deploys the application.
To start, the application serves an HTML page at the root of the web domain as seen in Figure 1.
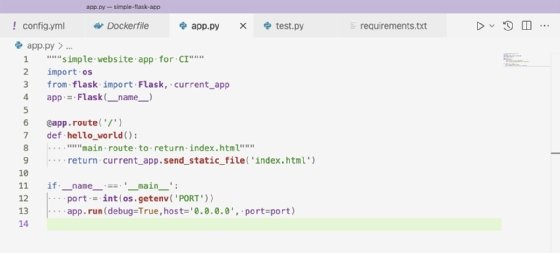
This is a basic setup for Flask that defines one available route for the root of the web domain. This means the web application will respond only to requests at the URL example-domain.com/.
On line 11, the application starts with app.run, a basic Flask call. The port is set on line 12, using an environment variable set outside of our application. The function os.getenv reaches out to the system running the Python application and finds the environment variable's value for the argument specified. In this case, it is PORT.
The system running the Python application in this CI/CD tutorial is a Heroku server. The Heroku server sets the PORT environment variable to the proper port to run the Docker container on Heroku's web server.
Examine the pipeline
Now that we understand the Flask application, let's look at our CI/CD pipeline. This tutorial uses CircleCI as my CI/CD system, but there are many options available. CircleCI is a free tool that enables projects to run different commands and processes on each commit to a Git repository. To define the commands and processes, use a YAML file. Our YAML file defines four different processes to run: lint, test, build and deploy.
The lint stage checks for possible errors and formatting issues without running the code. The linting program used in this case is a popular tool called Pylint. Pylint identifies stylistic problems -- such as capital letters that should be lowercase, for example -- with the application's code that contribute to technical debt and poor readability. Figure 2 displays the steps to run Pylint.
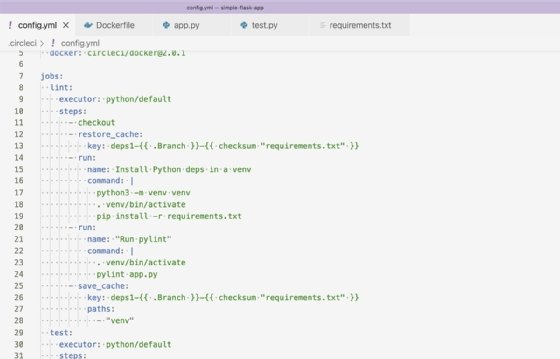
In the lint job, we set up a cache for the Python dependencies being installed. This speeds up build times and runs the Pylint program with app.py. The cache setup is a CircleCI feature that enables builds to persist files across build runs. In this tutorial, we persist the downloaded dependencies across build runs to avoid downloading the same files for every build.
Figure 3 is an example of a failed lint run from CircleCI.
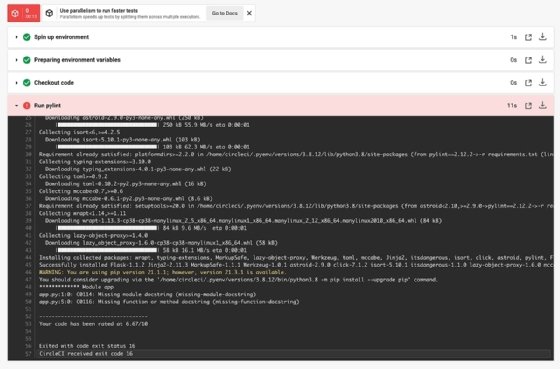
Pylint reports the lines that need changes along with the issue type found. From there, a developer can fix issues and improve code quality.
The next step in our CI/CD pipeline tutorial is testing. Our tests in this project are run with the unittest framework as shown in Figure 5.
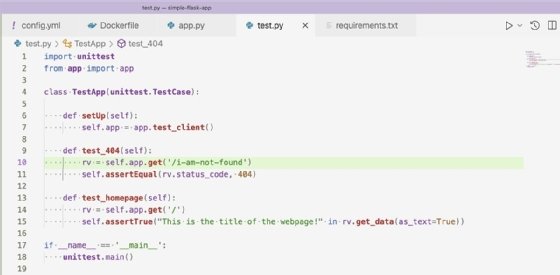
The tests check that our application returns a 404 response code and the root domain returns our HTML properly. The steps to run the tests in our CircleCI configuration YAML file are shown in Figure 6.
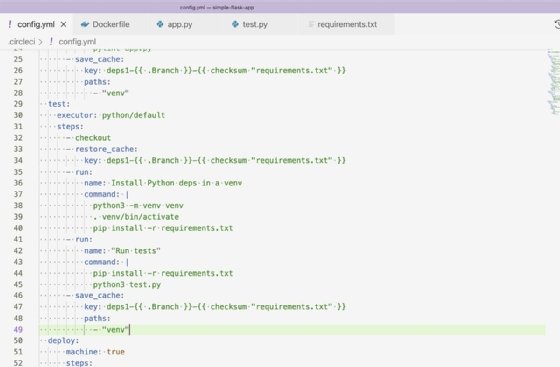
For the dependencies in the test job, use the same cache from the lint job and run the tests with Python3 test.py. Running tests on every commit is crucial to a project's success. These tests enable developers to identify issues with their code quickly and protect against regressions when adding or updating features.
The last validation before deployment is a Docker build. Run the Dockerfile to ensure it is correct as well as resources like the Python package requirements file, used by the Dockerfile. Our Dockerfile is as shown in Figure 7.
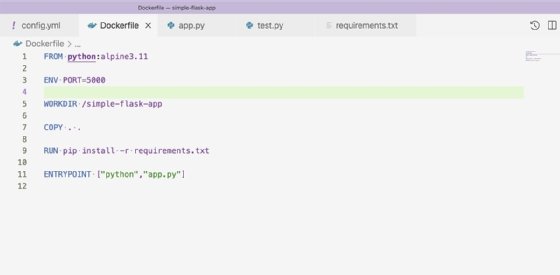
The Dockerfile builds our Python application inside a Docker image and provides the command to run the application on container start. Docker provides a CircleCI orb, which is an abstraction of CircleCI commands contained within an importable job. For this reason, the steps to build the Dockerfile are as shown in Figure 8.

Lines 66-68 reference the Docker orb and define how the Docker job will run. Set the deploy attribute to false to instruct the Docker/publish job to build the image without pushing it to a repository. By default, the Docker/publish job finds the Dockerfile by name and builds it. It will also fail the job if the Docker build fails.
After the three stages -- lint, test and build -- have succeeded, we can deploy our application. For this project, I used Heroku, which is an easy-to-set-up application hosting service. Heroku offers a command-line interface (CLI) that integrates with GitHub and supports different deployment methods. For our CI/CD tutorial, we're using the Heroku CLI to deploy a container to build and push our Docker image to Heroku. Heroku will then run the image as a container. The job to deploy our image to Heroku is seen in Figure 9.
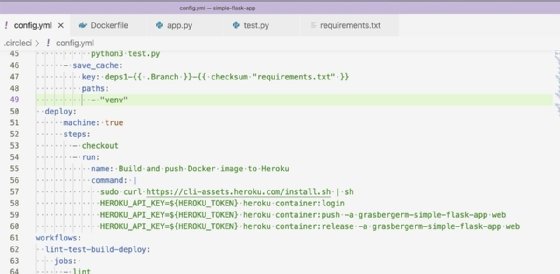
On line 57, the Heroku CLI is installed. Then it runs the commands to build and release the container. The environment variable HEROKU_TOKEN is required to authenticate our Heroku credentials to push up our image. The value for HEROKU_TOKEN is found in the Heroku account settings and can be provided to CircleCI through the project's environment variables.
This project's CI/CD pipeline evaluates the application constantly for proper formatting and correctness. When those requirements are satisfied, a Docker image deploys automatically to Heroku, where the application runs. To further explore this example, you can examine the application and pipeline used.