
Fotolia
Create and configure a shielded VM in Hyper-V
In just a few easy steps, including installing a Host Guardian Service server and creating certificates, you can shield a Hyper-V VM to protect it against access or tampering.

Creating a shielded VM to protect your data is a relatively straightforward process that consists of a few simple steps and PowerShell commands.
A shielded VM depends on a dedicated server separate from the Hyper-V host that runs the Host Guardian Service (HGS). The HGS server must not be domain-joined because it is going to take on the role of a special-purpose domain controller. To install HGS, open an administrative PowerShell window and run this command:
Install-WindowsFeature -Name HostGuardianServiceRole -Restart
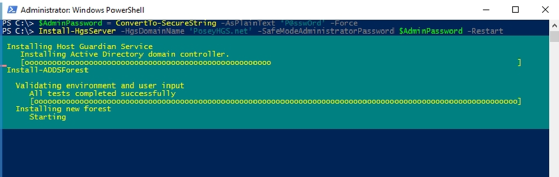
Once the server reboots, create the required domain. Here, the password is P@ssw0rd and the domain name is PoseyHGS.net. Create the domain by entering these commands:
$AdminPassword = ConvertTo-SecureString -AsPlainText 'P@ssw0rd' -Force
Install-HgsServer -HgsDomainName 'PoseyHGS.net' -SafeModeAdministratorPassword $AdminPassword -Restart
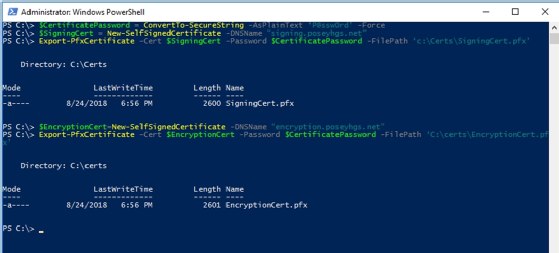
The next step in the process of creating and configuring a shielded VM is to create two certificates: an encryption certificate and a signing certificate. In production, you must use certificates from a trusted certificate authority. In a lab environment, you can use self-signed certificates, such as those used in the example below. To create these certificates, use the following commands:
$CertificatePassword = ConvertTo-SecureString -AsPlainText 'P@ssw0rd' -Force
$SigningCert = New-SelfSignedCertificate -DNSName "signing.poseyhgs.net"
Export-PfxCertificate -Cert $SigningCert -Password $CertificatePassword -FilePath 'c:\Certs\SigningCert.pfx'
$EncryptionCert=New-SelfSignedCertificate -DNSName "encryption.poseyhgs.net"
Export-PfxCertificate -Cert $EncryptionCert -Password $CertificatePassword -FilePath 'C:\certs\EncryptionCert.pfx'
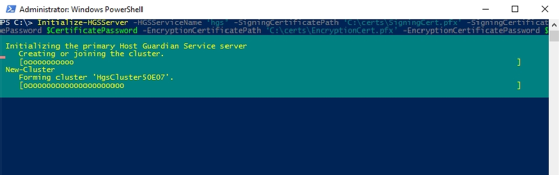
Now, it's time to initialize the HGS server. To perform the initialization process, use the following command:
Initialize-HGSServer -HGSServiceName 'hgs' -SigningCertificatePath 'C:\certs\SigningCert.pfx' -SigningCertificatePassword $CertificatePassword -EncryptionCertificatePath 'C:\certs\EncryptionCert.pfx' -EncryptionCertificatePassword $CertificatePassword -TrustTPM
The last thing you need to do when provisioning the HGS server is to set up conditional domain name service (DNS) forwarding. To do so, use the following commands:
Add-DnsServerConditionalForwardZone -Name "PoseyHDS.net" -ReplicationScope "Forest" -MasterServers <IP Address>
Netdom trust PoseyHDS.net /domain:PoseyHDS.net /userD:PoseyHDS.net\Administrator /password:<PASSWORD> /add
In the process of creating and configuring a shielded VM, the next step is to add the guarded Hyper-V host to the Active Directory (AD) domain that you just created. You must create a global AD security group called GuardedHosts. You must also set up conditional DNS forwarding on the host so the host can find the domain controller.
Once all of that is complete, retrieve the security identifier (SID) for the GuardedHosts group, and then add that SID to the HGS attestation host group. From the domain controller, enter the following command to retrieve the group's SID:
Get-ADGroup "GuardedHosts" | Select-Object SID
Once you know the SID, run this command on the HGS server:
Add-HgsAttestationHostGroup -Name "GuardedHosts" -Identifier "<SID>"
Now, it's time to create a code integrity policy on the Hyper-V server. To do so, enter the following commands:
New-CIPPolicy -Level FilePublisher -Fallback Hash -FilePath 'C:\Policy\HWLCodeIntegrity.xml'
ConvertFrom-CIPolicy -XMLFilePath 'C:\Policy\HwlCodeIntegrity.xml' -BinaryFilePath 'C:\Policy\HWLCodeIntegrity.p7b'
Now, you must copy the P7B file you just created to the HGS server. From there, run this command:
Add-HGSAttestationCIPolicy -Path 'C:\HWLCodeIntegrity.p7b' -Name 'StdGuardHost'
Get-HGSServer
At this point, the server should display an attestation URL and a key protection URL. Be sure to make note of both of these URLs. Now, go back to the Hyper-V host and enter this command:
Set-HGSClientConfiguration -KeyProtectionServerURL "<key protection URL>" -AttestationServerURL "<attestation server URL>"
To wrap things up on the Hyper-V server, retrieve an XML file from the HGS server and import it. You must also define the host's HGS guardian. Here are the commands to do so:
Invoke-WebRequest "<key protection URL>/service/metadata/2014-07/metadata.xml" -OutFile 'C:\certs\metadata.xml'
Import-HGSGuardian -Path 'C:\certs\metadata.xml' -Name 'PoseyHGS' -AllowUntrustedRoot
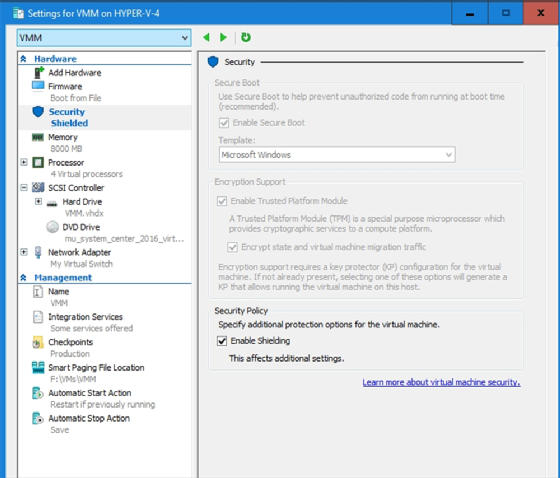
Once you import the host guardian into the Hyper-V server, you can use PowerShell to configure a shielded VM. However, you can also enable shielding directly through the Hyper-V Manager by selecting the Enable Shielding checkbox on the VM's Settings screen, as shown in Figure D above.