
Follow this tutorial to get started with Azure Bicep
Azure Bicep enables IT ops teams working with IaC to create and deploy Azure resources in a more streamlined manner. Follow this tutorial to learn how.

Infrastructure as code is becoming more and more popular, and its benefits are numerous. As a result, the tools and frameworks surrounding it are experiencing constant changes, improvements and innovations.
In this tutorial, let's explore one of the newer tools to manage IaC on the Azure cloud platform called Bicep, its advantages over current Azure IaC tools and how to get started with it.
Prerequisites
To use Azure Bicep, you'll need a few tools set up on your local machine, all of which are available for macOS, Linux and Windows. These prerequisites include the following:
- an integrated development environment, such as Visual Studio Code;
- the Azure command line interface (CLI) installed and configured;
- a Microsoft Azure account; and
- optionally, the Bicep VS Code extension.
A background on Bicep
If you work with Azure, you're probably familiar with Azure Resource Manager (ARM) templates. They are JSON documents that describe Azure resources and create resources via the Azure template deployment service.
ARM templates can get extremely verbose, however, which makes them difficult for engineers to read and interpret. ARM templates also cannot reference external code. To use the same pattern to define resources in more than one place, you must copy and paste that template section wherever you want to use it.
Azure Bicep's goal is to create an easy-to-read infrastructure language that can reuse components across different templates. Once those resources are defined in Bicep, they can compile into ARM templates for Azure deployment services.
Infrastructure written in Bicep is smaller, reusable across different projects and easier to read than ARM templates, while still providing the same reliable deployments.
Flex your Bicep
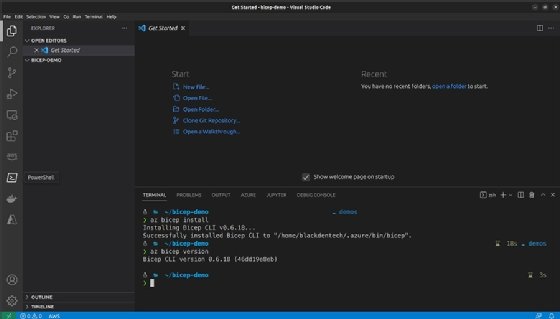
To start creating Azure resources with Bicep, open an empty directory in VS Code and install Bicep via the az bicep install command. Different installation methods are available in Microsoft's Bicep documentation.
Once Bicep installs, verify by running az bicep version as seen in Figure 1.
To remove the resources from this demo, create a new resource group to delete and remove the resources when done. Go into the Resource Groups pane in the Azure portal or use the az group create command to make one. Name the resource group for this demo demo-rg.
Next, create a new Bicep file, define a storage account and Azure blob storage container with Bicep, and then deploy it. The file name can be anything with a .bicep extension and is where you will write your configuration code. Create a new file called main.bicep and copy the following code into it.
@description('The name of the Azure Storage account.')
param storageAccountName string

@description('The name of the blob container.')
var containerName = 'logs'

@description('The location in which the Azure Storage resources should be deployed.')
param location string = resourceGroup().location

resource storageaccount 'Microsoft.Storage/storageAccounts@2021-09-01' = {
  name: storageAccountName
  location: location
  sku: {
    name: 'Standard_LRS'
  }
  kind: 'StorageV2'
  properties: {
    accessTier: 'Hot'
  }
}

resource container 'Microsoft.Storage/storageAccounts/blobServices/containers@2021-09-01' = {
  name: '${storageaccount.name}/default/${containerName}'
}
This is a modified version of an Azure Bicep quick-start template that the Azure community maintains. To see how different Azure resources are defined, that's a good place to look.
Before deploying, examine the following lines inside the file to see how Bicep differs from ARM templates.
@description('The Azure Storage account's name.')
param storageAccountName string

@description('The blob container's name.')
var containerName = 'logs'

@description('The deployment location for the Azure Storage resources.')
param location string = resourceGroup().location
These are the variables and parameters necessary to create resources. In Bicep, a parameter passes a specific data type's dynamic value when the template deploys. A variable is set inside the template to ease code reuse.
The location parameter is set automatically with the resourceGroup scope function, which looks up the resource group location to which that template deploys. The @description decorator is also attached to each line to describe what information is passing.
The next lines describe the resources to create in a new resource block.
resource storageaccount 'Microsoft.Storage/storageAccounts@2021-09-01' = {
  name: storageAccountName
  location: location
  sku: {
    name: 'Standard_LRS'
  }
  kind: 'StorageV2'
  properties: {
    accessTier: 'Hot'
  }
}
The resource tag is a declaration to create a new resource. That tag will be the same for any resource you create. The next item in that block definition is storageaccount. This is a semantic name that's not used by the resource itself, but by Bicep when compiling the ARM template to send to Azure deployment services.
The namespace for the resource and the API version are put before opening the block. In this case, it's using the 2021-09-01 API version of the Microsoft.Storage/storageAccounts namespace to create a storage account. Other namespaces and API versions can be found in the Azure Bicep and ARM template reference page in the Azure documentation. Inside of the resource block, the parameters are defined to configure that resource.
The key list is in the template reference page under each resource type. Engineers can hardcode the values or pass them in with variables and parameters -- both of which can be used within the same file. This is the case with the storageAccountName (variable) and location (parameter) fields.
Deploy Bicep
Deploy your resources from the Azure CLI with the following command.
az deployment group create --resource-group demo-rg --template-file main.bicep
Substitute the name of your resource group and Bicep file. It will then prompt you for the storageAccountName parameter. This parameter isn't defined in your configuration file, but it's required by the storageAccounts API.
Once you input a value for the prompt that matches the expected data type, the Bicep configuration will be compiled into an ARM template and sent to the deployment service. This creates the new resources. Verify the creation, and then you can delete the resource group to destroy the resources.
Dig Deeper on Systems automation and orchestration
-
![]()
How to work with Jumpstart ArcBox for IT Pros
By: James Bannan
-
![]()
Free Azure Administrator Questions and Answers | AZ-104 Study Guide
By: Cameron McKenzie
-
![]()
Certified Azure Administrator Associate Practice Exams
By: Cameron McKenzie
-
![]()
AZ-400 DevOps Engineer Expert Questions and Answers
By: Cameron McKenzie