buchachon - Fotolia
Painlessly deploy Azure File Sync with PowerShell
Have you ever run low on file server capacity or struggled to access files? Setting up Azure File Sync can give your organization centralized file shares with local accessibility.
Organizations trying to choose between the manageability of the cloud and the accessibility of on-premises files can use Microsoft's Azure File Sync to get the best of both worlds, and it only takes three steps -- preparation, installation of an Azure File Sync agent and setting endpoints -- to set up.
Azure File Sync connects on-premises users to the centralized cloud file shares in Azure Files. The service uses local caches to provide users with the same performance level of an on-premises file server. An Azure File Sync agent on Windows Server 2012 R2, 2016 or 2019 can automatically replicate data and sync files to an Azure storage account.
There are a few different ways you can deploy Azure File Sync on Windows Servers and ease storage management, but PowerShell offers an easy way to set up an Azure File Sync agent. Commands in each step make the process easy to copy and reuse through the entire process.
Step 1: Prepare to deploy Azure File Sync
Azure File Sync agents will not run with the Internet Explorer Enhanced Security Configuration setting enabled. First temporarily disable it during setup. Run the PowerShell code below to set the registry keys and stop and restart the explorer process.
$AdminKey = 'HKLM:\SOFTWARE\Microsoft\Active Setup\Installed Components\{A509B1A7-37EF-4b3f-8CFC-4F3A74704073}'
 $UserKey = 'HKLM:\SOFTWARE\Microsoft\Active Setup\Installed Components\{A509B1A8-37EF-4b3f-8CFC-4F3A74704073}'
 Set-ItemProperty -Path $AdminKey -Name 'IsInstalled' -Value 0
 Set-ItemProperty -Path $UserKey -Name 'IsInstalled' -Value 0
 Stop-Process -Name Explorer
After disabling IE Enhanced Security Configuration, create a file share in Azure to sync to. To simplify the deployment process, assign the resource group, storage account and name to variables. Use the Get-AzureRmStorageAccount cmdlet and assign it to the storage account variable.
$resourceGroup = 'TechSnipsBackEnd'
 $storageAccountName = 'techsnips'
 $storageAccount = Get-AzureRmStorageAccount -ResourceGroupName $resourceGroup -Name $storageAccountName
You will need the key to access the storage account. Use the Get-AzureRmStorageAccountKey cmdlet and pass to the Select-Object cmdlet to select just the first key and look at its value property. Assign the first key value to the storage key variable and pull the storage context.
$storageKey = (Get-AzureRmStorageAccountKey -ResourceGroupName $storageAccount.ResourceGroupName -Name $storageAccount.StorageAccountName | select -first 1).Value
 $storageContext = New-AzureStorageContext -StorageAccountName $storageAccount.StorageAccountName -StorageAccountKey $storageKey
With the storage context, create a share -- named myfileshare below -- using the New-AzureStorageShare cmdlet and store it in the share variable.
$share = New-AzureStorageShare -Name myfileshare -Context $storageContext
Step 2: How to install the Azure File Sync agent
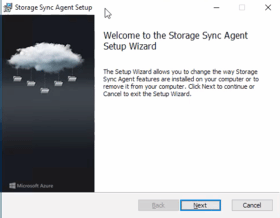
Next, install the agent on your server using Invoke-WebRequest to download it from Microsoft. Use the Invoke-Item cmdlet to run the executable and then accept the defaults for the installed agent. Note which directory you install it on and close any other open PowerShell sessions before install.
$downloadUri = 'https://download.microsoft.com/download/1/8/D/18DC8184-E7E2-45EF-823F-F8A36B9FF240/StorageSyncAgent_V3_WS2016.EXE'
 Invoke-WebRequest -Uri $downloadUri -OutFile 'C:\filesyncagent.exe'
 Invoke-Item 'C:\filesyncagent.exe'

The agent installs to a default path of C:Files. Assign that to the $agentPath variable and the region to the $region variable, which is the same region as the storage account.
Create the service in the SharedLab resource group and assign the name tsstorsync. Once you've assigned all variables, use the Import-Module cmdlet to get the module that was installed with the agent.
$agentPath = 'C:\Program Files\Azure\StorageSyncAgent' ## Make sure to change this if the default path was not used
 $region = 'East US 2' ## This needs to be in the same region as the storage account
 $resourceGroup = 'SharedLab'
 $storageSyncName = 'tsstorsync'
 Import-Module "$agentPath\StorageSync.Management.PowerShell.Cmdlets.dll"
With the module imported, you now have the commands to set up the file sync service. Query the Azure subscription where the file sync service will be set up and use that subscription and tenant ID to authenticate to the storage sync service. Once authenticated, create a new sync service using New-AzureRmStorageSyncService. You should see a result returned in your console.
$subscription = Get-AzureRmSubscription -SubscriptionName 'TechSnips'
 Login-AzureRmStorageSync –SubscriptionId $subscription.Id -ResourceGroupName $resourceGroup -TenantId $subscription.TenantID -Location $region
 New-AzureRmStorageSyncService -StorageSyncServiceName $storageSyncName

Now that the storage sync service exists, register the Windows Server to the storage sync service. Use the Register-AzureRmStorageSyncServer command and specify the service name you just created.
$registeredServer = Register-AzureRmStorageSyncServer -StorageSyncServiceName $storageSyncName
Next create the sync group with the New-AzureRmStorageSyncGroup command, providing the name of the group and the name of the sync service you created earlier.
$syncGroupName = 'TechSnipsSyncGroup'
 New-AzureRmStorageSyncGroup -SyncGroupName $syncGroupName -StorageSyncService $storageSyncName
Step 3: Create the cloud and server endpoints
Use the New-AzureRmStorageSyncCloudEndpoint cmdlet to create a cloud endpoint. Use PowerShell splatting to provide the parameters for the cmdlet. Variables simplify reusing values in your scripts instead of typing them in again.
$parameters = @{
     StorageSyncServiceName = $storageSyncName
     SyncGroupName = $syncGroupName
     StorageAccountResourceId = $storageAccount.Id
     StorageAccountShareName = 'myfileshare'
 }
 New-AzureRmStorageSyncCloudEndpoint @parameters
The last step is to set up server endpoints, so local servers can connect to the cloud endpoint. Run the New-AzureRmStorageSyncServerEndpoint command with the parameters below. Reuse the variables you've already created. Now you will specify the path to sync, shown as the local path on the C drive in a folder called FileSyncDemo.
New-AzureRmStorageSyncServerEndpoint -StorageSyncServiceName $storageSyncName -SyncGroupName $syncGroupName -ServerId $registeredServer.Id -ServerLocalPath 'C:\FileSyncDemo'
Once you deploy Azure File Sync server endpoints, you are done. Now start dropping files and folders into your synced folder and watch them show up in the Azure storage account.
Predict your Azure File Sync cost
Azure File Sync uses Azure Files to function, which comes at a cost. As of May 2019, Microsoft charges Azure Files $5 per month for each server enrolled in Sync; however, the storage used for your files adds costs based on the storage you choose to use. Storage prices range from $0.06 to $0.10 per gigabyte, per month plus small storage account activity costs. Outbound data transfers cost from $0.08 to $0.12 per gigabyte based on the region where you host your Azure Files storage.


