
Getty Images/iStockphoto
How to install and deploy Quay on Red Hat OpenShift
Quay enables Red Hat OpenShift users to store and manage container images -- with added advantages. Follow this tutorial to install and deploy the container registry.

For containers to be beneficial to an organization, IT admins must properly store and manage container images in a container. For Red Hat OpenShift users, Quay is a viable option.
Quay is an open source container registry with built-in features such as image scanning, automated container builds and integrations with source code repositories. It's also the de facto enterprise container registry in the Red Hat product line -- a fact that reflects Quay's origins at CoreOS, a company acquired by Red Hat in 2018.
Let's walk through the steps to get started with Quay in a Red Hat OpenShift containerization environment. Start with an overview of how Quay works and then learn how to set up Quay on OpenShift using both the OpenShift Web UI and the command line.
What is Quay?
Quay serves as a central repository to store and manage container images.
Quay is comparable to other popular container registries, such as Docker Hub. Most of the main features of Quay -- like the ability to automate image builds and scan container images -- are also available in other mainstream container registries.
However, Quay provides advantages not available from other container registries, such as granular access-control features and deep integration with source code management systems. In addition, as noted above, Quay is Red Hat's preferred enterprise container registry. For that reason, IT organizations that operate a Red Hat OpenShift environment might choose Quay to manage container images rather than another registry.
Quay is compatible with most Kubernetes distributions, not just OpenShift. Red Hat offers a hosted version of Quay or users can install it in their own cluster. Taking the latter approach gives admins the greatest degree of control over the Quay installation. An installed version of Quay also means the IT organization controls the storage medium for the container images, as opposed to relying on Red Hat's cloud service.
For this tutorial, we'll install Quay in a private OpenShift cluster. I set up a local OpenShift cluster using Red Hat's CodeReady Containers tool to provide an environment for this tutorial, but the steps below should work on any modern OpenShift cluster.
Author's note: It is possible to follow a similar process on any Kubernetes distribution, although the steps won't be identical because aspects like oc are unique to OpenShift.
Install Quay on OpenShift
The simplest approach to install Quay is the official Quay Kubernetes operator. Operators are packages that automate the installation of software on Kubernetes. This approach does not offer the IT admin as much control over configuration as a manual install.
Quay can install manually to gain that control. However, the approach only makes sense when working with nonstandard configurations.
Regardless of the approach, prepare the OpenShift environment prior to Quay installation by setting up the following prerequisites:
- Object storage. Quay uses object storage for container images. Use a cloud service like AWS S3 for this purpose, or set up a storage cluster using a platform like Red Hat Ceph Storage.
- Database. In theory, any relational database should work for a Quay deployment, but PostgreSQL and MySQL are the most straightforward database types to use for this purpose.
- Key-value store. Quay stores its configuration data in a key-value. Use a service like Redis to set one up.
For the purposes of this tutorial, configure these prerequisites in OpenShift prior to beginning the Quay installation.
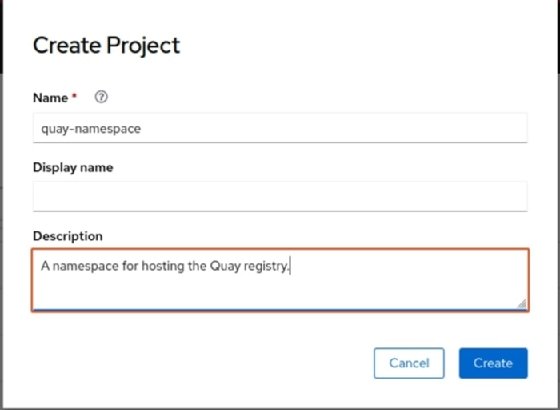
To install Quay with an operator, first create a new namespace in the OpenShift cluster. Use the OpenShift web console and navigate to Projects > Create Project.
In this tutorial, the namespace is called quay-namespace, as seen in Figure 1.
Alternatively, use the oc command:
oc create namespace quay-namespace
Next, in the OpenShift web console, select Operators and then OperatorHub, as shown in Figure 2.
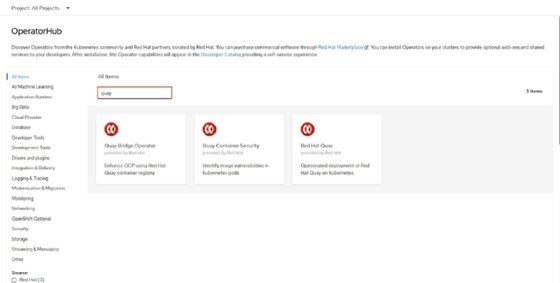
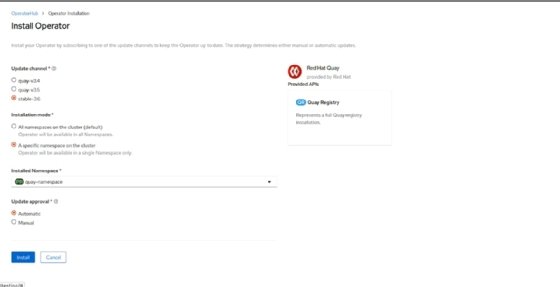
Search for "quay" and select the Red Hat Quay operator icon. Then click the Install button and follow the instructions to complete the Quay operator deployment, as shown in Figure 3.
Alternatively, install the operator from the command line with:
oc create -n openshift-marketplace -f ./bundle/quay-
operator.catalogsource.yaml
oc get packagemanifest --all-namespaces | grep quay
oc create -n quay-namespace -f ./bundle/quay-
operator.operatorgroup.yaml
oc create -n quay-namespace -f ./bundle/quay-
operator.subscription.yaml
Adjust the commands to use the name of your Quay namespace, which is in bold in the example of commands.
Deploy Quay
With Quay installed, click the Projects tab under Home to open Quay from the OpenShift web console. Then select the namespace where you installed Quay. In this tutorial, we used quay-namespace.
After the namespace screen loads, select the Routes button under the Networking tab, then click the link in the Location column. Quay is now ready to manage container images.