Learn Kubernetes infrastructure in a personal lab
Live servers are not the place to build up Kubernetes skills. Instead, set up a Kubernetes cluster, and start experimenting with it on a laptop in a lab.

IT operations pros see containers on the horizon, if they're not already floating around in production. A Kubernetes lab is a great way to understand container orchestration and management before attempting large-scale enterprise deployments, so long as the lab is designed around the Kubernetes cluster infrastructure.
This Kubernetes lab focuses on the cluster install and support, from the hardware up. This training environment should be a replica of the on-premises setup where Kubernetes will run. The lab is based on HashiCorp Vagrant, a command-line tool that builds lightweight virtual environments. It includes three Linux VMs and specified versions of Docker and Kubernetes to build a cluster.
The Kubernetes lab here does not cover everything you need to know about the tool, such as how to manage the containers inside that cluster. It also is just the beginning of Kubernetes cluster operations; you will need to add a lot more functionality before this basic cluster represents a production-featured environment.
Vagrant Kubernetes lab requirements
To get started with a Kubernetes infrastructure lab, install Vagrant. Go to vagrantup.com, and download the installer for your OS. Vagrant works with many virtualization platforms, but this lab uses the free, open source Oracle VM VirtualBox because it is easy to work with. Install the latest version of VirtualBox for your computer.
Next, install the Git source code repository. This Kubernetes lab is available from the author's Git files.
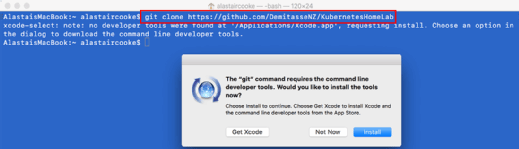
The Git tools automatically installed when the author first ran a Git command on the Mac hosting this lab (see Figure 1). There are a variety of Git tools for Windows as well, such as the official GitHub Desktop app.
After problems deploying on different Linux distributions, this lab was created on Red Hat Fedora 25. While this OS was not the author's first or second choice, it offers the ability to use the right version of Docker and a fairly simple Kubernetes infrastructure deployment. Kubernetes has a reputation of being a science project, and this is just one example. Make life easier by sharing code over a GitHub repository with others in the Kubernetes operations community. For example, the nodes for this lab would not join the master even after the OS distribution problem was solved, and virtualization and cloud expert Cody Bunch helped resolve the issue. Bunch cloned the repository and used vagrant up to duplicate the environment. When Bunch fixed the lab's errors, he sent the author a pull request on GitHub, and the exact changes were integrated.
Cloud labs
If your production Kubernetes deployment runs in a public cloud, then training on the same public cloud will give the highest fidelity replica of production. Cloud-based Kubernetes labs are available, using a web browser to access all the Kubernetes infrastructure and containerized applications run in the cloud. Look for free Kubernetes labs with limited capacity, or set up a managed Kubernetes service on a public cloud platform. Just remember to turn off instances when you finish a project or experiment.
Clone this Kubernetes lab
Once you install Git, clone the repository for the Kubernetes infrastructure lab from github.com/DemitasseNZ/KubernetesHomeLab. Change into the directory with the clone, and run vagrant up.
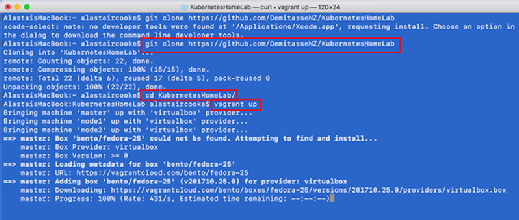
Cloning will take a while, particularly over a slow internet connection. The system downloads a VirtualBox image of Fedora 25 and uses it to create three VMs: a Kubernetes master and two slaves. Docker and Kubernetes then deploy to all three VMs, again via downloads. Once the lab builds the master, that master initializes a Kubernetes cluster, which requires a few more minutes to set up. As is always the case with a home lab, your laptop specifications determine how responsive the lab is; lots of RAM, solid-state drives and a fast CPU will help.
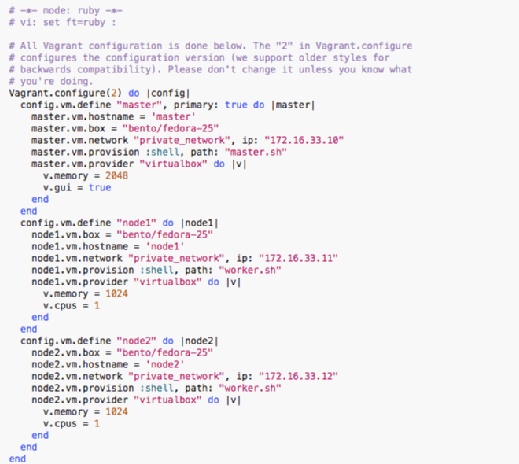
Use the download and install time to learn about Vagrant and the mechanics to build Kubernetes infrastructure. The Vagrantfile says to create the three Fedora 25 VMs, each with an IP address on the private network (see Figure 3). The master VM spins up first and uses the script master.sh to complete its configuration. Both the worker nodes use the worker.sh script.
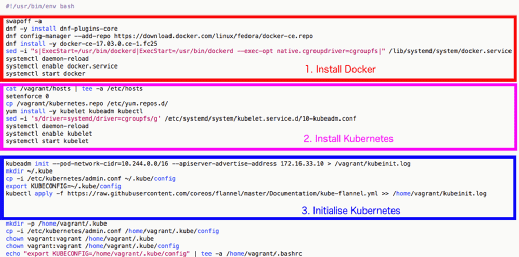
The master script (see Figure 4) is more complex than the worker one, because it must set up the Kubernetes cluster and the master VM that the admin will use to manage the cluster. The first block of master.sh (outlined in red) deals with the Docker installation, specifically Docker version 17.03, which is the latest version supported by Kubernetes at the time of writing. The line that starts sed -i changes a line in a Docker configuration file so that Docker uses the drivers that Kubernetes prefers. The second block (outlined in pink) installs Kubernetes and again changes a configuration file for consistency. The third block (outlined in blue) creates the Kubernetes cluster and the flannel networking plug-in that allows network connections to work across the nodes. Both lines of the Kubernetes cluster initiation script have their output redirected into a log file in /vagrant, which is a folder inside the VM that maps to the folder on your computer where the Vagrantfile is located.
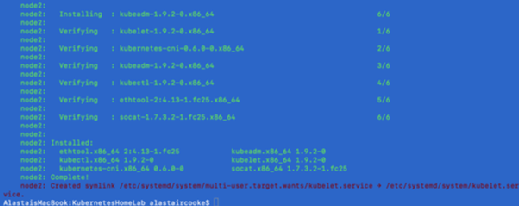
While this Kubernetes lab requires a time commitment to set up (see Figure 5), it took a half-hour to build the VMs, Kubernetes cluster and the vagrant up command prompt returns -- some of the wait is a one-time expense. For example, the Fedora 25 image took a long time to download, but you won't repeat that step if you destroy and recreate the lab on the same laptop.
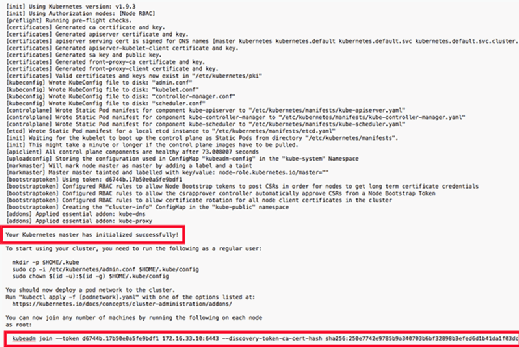
The log file, Kubeinit.log (see Figure 6), starts with actions taken by kubeadm, a Kubernetes cluster bootstrapping toolkit. The logs then show that the master initialized. Then, the log file gives the command line to use on each worker node to join them to the cluster. The token is a password for nodes to join the cluster, while the certificate authority hash at the end (ca-cert) ensures it joins the right one.
Use the Kubernetes infrastructure lab
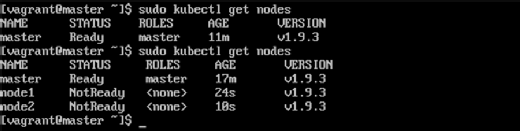
Vagrant shares the folder /home/vagrant among the nodes. It is mapped to the folder where you ran vagrant up, so it's accessible from the lab laptop, too. The worker.sh script is identical to the master script, until the end of the Kubernetes install process, where the kubeadm join ... command is extracted from the log file and executed. In this Kubernetes lab, Vagrant opens a VM console window for the master; the two nodes remain headless, which is the Vagrant default. Use vagrant ssh master to open a session on the master, or use the console window as described here. To see the cluster, log on to the console of the master VM as user vagrant with vagrant for the password. Then, run sudo kubectl get nodes to see that you have three nodes: one master and two with <none> for a role.
This lab creates a basic Kubernetes cluster that the user can play with and not worry about destroying. To stop the lab and free up its 4 GB of RAM, use vagrant halt. If you mess up the lab, use vagrant destroy to delete all of the VMs, then vagrant up to start the lab fresh. For these commands to work, they must be entered in the directory where the Vagrantfile lives.
This lab demonstrates how to build a Kubernetes cluster and gives operations insights into the concepts that dictate Kubernetes infrastructure. There is a lot of networking and storage to learn about and set up before the container orchestrator is ready to use for real workloads.