Follow this Minikube tutorial to brew up a Kubernetes home lab
Set up a Minikube home lab, and begin exploring Kubernetes container orchestration before the coffee in your mug turns cold.

Enterprise IT pros should learn to manage Kubernetes in an environment with no stress or detrimental effects: the home lab.
This Minikube tutorial enables admins to work with Kubernetes without additional equipment, software or a significant time investment to set it up. Home labs isolate new technology from vital live infrastructure in production environments.
Follow the installation steps, run kubectl commands in the Kubernetes lab and then access the application workloads within it.
Minikube Kubernetes lab requirements
A Minikube Kubernetes cluster, complete with workload containers, is prebuilt and runs inside a single VM on the user's computer. Minikube runs on Linux, Windows and macOS and can use a variety of hypervisors for its VM.
Minikube kubectl command lines run directly on the home lab computer, and Kubernetes-run applications are accessible there as well.
This Minikube tutorial spins up a simple Kubernetes-hosted application on macOS with Oracle VM VirtualBox. The install processes for Linux and Windows are a little different. There is also a range of other available hypervisors for the Minikube VM. The Kubernetes website offers a guide for Minikube deployment on any OS.
Install Minikube
To start the Minikube tutorial, install the latest version of VirtualBox, and then, install the kubectl command line to manage Kubernetes, via direct download. Minikube is installed via direct download as well.
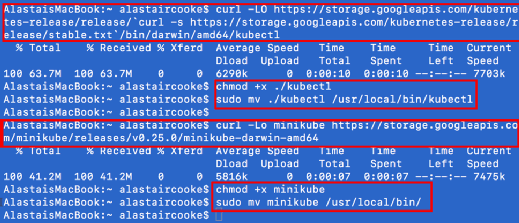
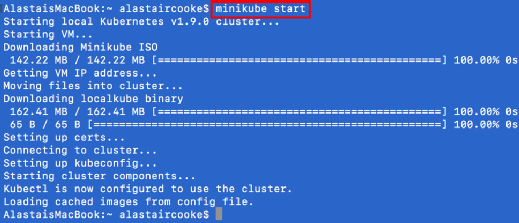
Go to the author's GitHub repository for Kubernetes labs, github.com/DemitasseNZ/KubernetesHomeLab, and access Minikube.txt. These commands can be cloned and can be pasted into a terminal window. When installation is complete, Minikube start will download and boot up the Minikube VM, followed by the Kubernetes cluster. Once downloaded, Minikube does not require internet access, provided any necessary Docker images are also downloaded.
Use the Minikube Kubernetes lab
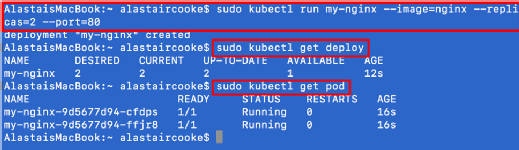
At this point in the Minikube tutorial, you have everything you need to start learning Kubernetes. Start two instances of the Nginx web server, and then, verify both instances are available.
Nginx is now running in two Docker containers but is not accessible from outside the Kubernetes cluster. The easiest way to expose the deployment and make it externally accessible is to use the Minikube VM's standard IP address of 192.168.99.100 and expose a NodePort. The system now has port address translation for one TCP port from that IP address to the container's internal IP address.
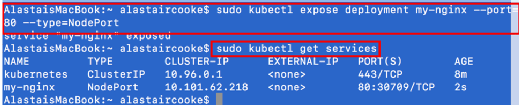
To ensure that Nginx is active, open a web browser, and point it to http://192.168.99.100:<port>, where the port is the one shown in the kubectl get services command output, as seen in Figure 4.
A web server has now deployed successfully on top of Kubernetes.
Thus far in this Minikube tutorial, we have used command-line tools to manage Kubernetes, which is a great practice for automation. However, a browser-based GUI makes it much easier to explore what is happening in the Kubernetes lab. Use the command minikube dashboard to launch a web browser and open the dashboard.
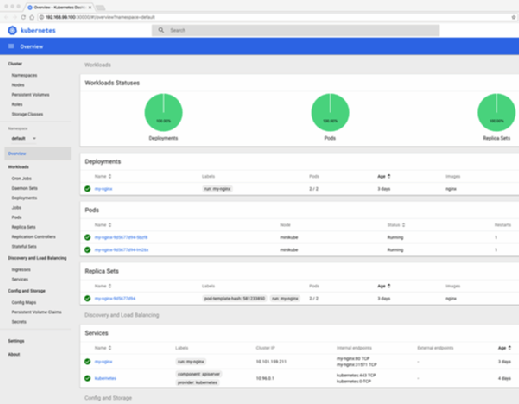
The dashboard displays information about active deployments, running Pods wherein containers reside and several other items beyond the scope of this Minikube tutorial. Explore them as you develop familiarity with Kubernetes management.
To close Minikube, run minikube stop to shut down the VM. Minikube will keep the defined deployments and services upon startup. To prevent the deployment from resuming, delete the setup with kubectl delete po,svc,deploy my-nginx before closing Minikube.
A production Kubernetes cluster will have more than one host, so this lab is only practical for small-scale tests. However, this Minikube tutorial helps users understand how to work with the container orchestration technology safely.
Dig Deeper on Containers and virtualization
-
![]()
Create an Amazon EKS cluster and deploy Docker containers
By: Cameron McKenzie
-
![]()
Manage Kubernetes clusters with PowerShell and kubectl
By: Anthony Howell
-
![]()
Learn to manage Kubernetes costs with this Kubecost tutorial
By: Prateek Singh
-
![]()
Step-by-step guide to working with Crossplane and Kubernetes
By: Deepak Dhami