Step-by-step guide to working with Crossplane and Kubernetes
Crossplane is built to extend Kubernetes resources to and from external sources like databases, the cloud or the edge. Try out the tool, and learn its processes with this tutorial.

Kubernetes changed how the industry provisions, consumes and extends infrastructure. It also demonstrated how platforms can build abstractions and extend upon themselves with custom resources and operators.
The paradigm shift led to the current industry standards, such as the declarative API; the reconciliation loop, which brings the infrastructure to the desired state; the ability to extend the platform via custom resource definitions; and maintaining the custom resources' lifecycles with operators. These standards are bringing a new wave of tools, such as Crossplane, that are changing how we manage infrastructure.
What is Crossplane?
Crossplane uses Kubernetes as the underlying platform to expose these features and workflows to manage cloud infrastructure outside of Kubernetes, such as data centers, the cloud or the edge.
It installs a set of components called providers by extending Kubernetes to manage resources from cloud providers. Providers build on the Kubernetes API, along with the custom resources and controllers, and expose declarative APIs to manage cloud provider resources.
Crossplane is geared toward platform teams and operators looking to build abstractions and easier-to-consume infrastructure components based on an organization's needs. It has a few concepts, such as CompositeResourceDefinition and Composition, that enable teams to extend and build on top of the default resources exposed for a cloud provider.
Let's go over the steps to install Crossplane on an existing Kubernetes cluster and install and configure Crossplane to provision Azure resources. Refer to this GitHub repository.
Prerequisites
This tutorial requires the following be installed on your developer machine:
Initial setup
We can use an existing Kubernetes cluster on hand, but for this tutorial, we create a test cluster with kind.
If you have kind installed on your machine already, run the following command to create a cluster with the name crossplane-test:
kind create cluster --image kindest/node:v1.23.0 --wait 5m --name crossplane-test
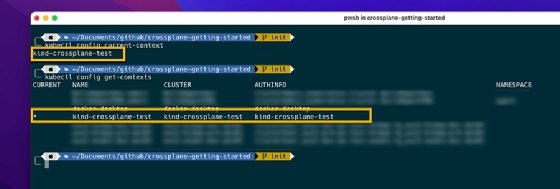
Once the cluster is up, Crossplane should automatically set the kubeconfig and the current context. Run the following command to verify this:
kubectl config current-context
After verifying that the kubectl context points to the right cluster, install the Crossplane core components on the cluster using Helm:
kubectl creates namespace crossplane-system
helm repo add crossplane-stable https://charts.crossplane.io/stable
helm repo update
helm install crossplane --namespace crossplane-system crossplane-stable/crossplane
We have installed the Crossplane components in a dedicated namespace called crossplane-system. Verify the installation is complete by running the following commands:
helm list -n crossplane-system
kubectl get all -n crossplane-system
After installing the components on the Kubernetes cluster, set up the Crossplane command-line interface (CLI), which is a kubectl extension:
curl -sL https://raw.githubusercontent.com/crossplane/crossplane/master/install.sh | sh
# Move the crossplane kubectl extension to the bin
sudo mv kubectl-crossplane /usr/local/bin
# verify that it is installed
kubectl crossplane --help
Configure Azure provider
Now that we have set up a test cluster with the Crossplane core components, we configure Crossplane's Azure provider on the cluster. But, before we visit our cluster for this configuration, we need a service principal in Azure, which our Crossplane Azure provider uses to connect and provision resources.
For this tutorial, the requirements for the service principal are simple: We must assign the Azure built-in owner role on the subscription on which we will deploy resources. Create the service principal with the following code. Use the Crossplane documentation to add more permissions to the service principal when provisioning complex resources, such as an Azure Kubernetes Service cluster.
az ad sp create-for-rbac --sdk-auth --role Owner --scopes="/subscriptions/XXXXXXXX-XXXX-XXXX-XXXXXXXXXXXXXXXXX" -n "crossplane-sp-rbac" > "creds.json"
Once the service principal is set up, create a Kubernetes secret to hold the above service principal information to use later with the Crossplane provider.
kubectl create secret generic azure-creds -n crossplane-system --from-file=creds=./creds.json
Install the Crossplane Azure provider, and supply the configuration that includes the secret that was created above for Azure authentication. We can do both in a single Kubernetes manifest, such as az-provider.yaml.
apiVersion: pkg.crossplane.io/v1
kind: Provider
metadata:
 name: provider-azure
spec:
 package: "crossplane/provider-azure:master"
---
apiVersion: azure.crossplane.io/v1beta1
kind: ProviderConfig
metadata:
 name: default
spec:
 credentials:
   source: Secret
   secretRef:
     namespace: crossplane-system
     name: azure-creds
     key: creds
The first manifest instructs Crossplane to download and make the Azure provider available. The second manifest creates the ProviderConfig for the Azure provider.
Apply the above manifest with kubectl:
kubectl apply -f az-provider.yaml
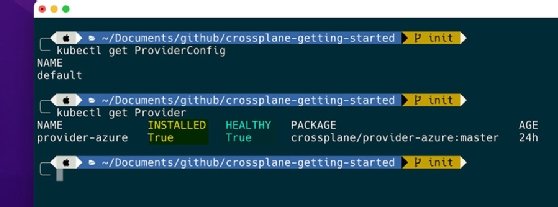
Once the manifest is applied, wait until the Azure provider installs and is in a healthy state, as shown in Figure 2.
Provision resources
Now, use the declarative Kubernetes API to provision Azure resources. We provision a resource group and then a storage account inside it.
To create a resource group, use the following YAML manifest, and place it inside the test-rg.yaml file:
apiVersion: azure.crossplane.io/v1alpha3
kind: ResourceGroup
metadata:
 name: test-rg-crossplane
spec:
 location: eastus
Apply the manifest using the following:
kubectl apply -f test-rg.yaml
To see the resource status, run the following command, and wait until it is synced and ready:
kubectl get ResourceGroup --watch

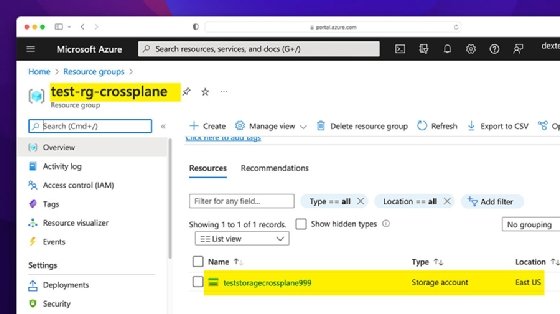
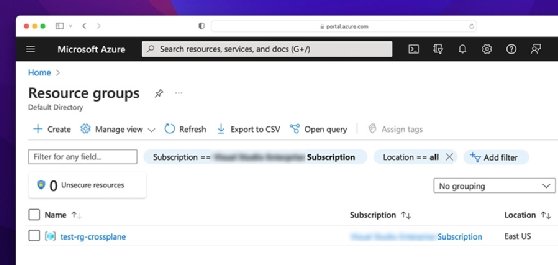
You can verify successful creation from the Azure portal or via the Azure CLI.
After you verify the resource group creation, provision a storage account inside it using the following YAML manifest. Place it in the test-storage.yaml file.
apiVersion: storage.azure.crossplane.io/v1alpha3
kind: Account
metadata:
 name: teststoragecrossplane999
spec:
 resourceGroupName: test-rg-crossplane
 storageAccountSpec:
   kind: Storage
   location: eastus
   sku:
     name: Standard_LRS
 writeConnectionSecretToRef:
   namespace: default
   name: storageaccount-connection-secret
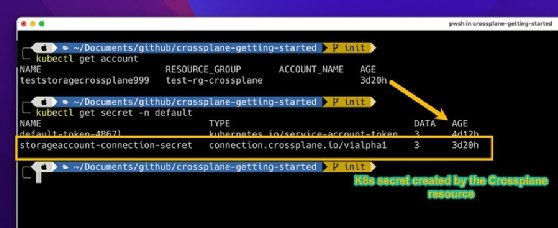
Crossplane resources write resource-specific secrets as Kubernetes secrets. In the above manifest, we use the writeConnectionSecretToRef property to write the storage account connection strings to a Kubernetes secret under the default namespace with the name storage account-connection-secret. This makes it convenient to later mount these secrets inside a pod running our application without creating additional overhead.
To verify the storage account creation, as well as the Kubernetes secret, use the following commands:
kubectl get account # for storage account
kubectl get secret -n default # check if the writeConnectionSecretToRef worked and created a secret
Verify the same with the Azure portal.