
Getty Images
How to configure multiple DHCP scopes on one Windows server
Deploying one DHCP server per subnet is time-consuming and costly. Configure multiple DHCP scopes on one Windows server to centralize network management and increase efficiency.

Administrators almost always rely on the Dynamic Host Configuration Protocol service to automatically make IP address configurations available to clients. Though DHCP is an essential service on most networks, deploying a single DHCP server for each subnet or other IP address ranges the network might contain isn't practical.
DHCP handles many critical network settings for clients, such as the IP address, subnet mask, router (default gateway) and DNS server. Despite this, DHCP is a lightweight service, so using an entire server's functionality on this single feature isn't cost-effective. Instead, administrators should manage multiple DHCP scopes on a single server, saving money and administrative effort. Windows Server is a solid platform for DHCP, and you can get the most from it by deploying multiple scopes on a single server.
Configuring multiple DHCP scopes on a Windows server is straightforward, but there are a few specific details to remember. This article covers how to deploy multiple DHCP scopes on one Windows server to enhance efficiency and centralize service management.
DHCP summary
Before beginning, make sure you have a solid understanding of the DHCP service. DHCP server administrators configure a scope -- or range -- of IP addresses and related settings. DHCP clients acquire IP address configurations from this pool using the following four-step lease generation process:
- DHCP discover. The client broadcasts for a DHCP server.
- DHCP offer. The DHCP server responds to the broadcast by offering an IP address configuration.
- DHCP request. The client requests the use of the IP address configuration from the DHCP server.
- DHCP acknowledge. The DHCP server completes the process by acknowledging the client's request.
At the end of this process, the client device has a complete IP address configuration.
Deploying DHCP
It's likely your environment already has at least one DHCP server deployed. If not, install the service using the following PowerShell cmdlet:
Install-WindowsFeature DHCP -IncludeManagementTools
Launch the DHCP management console from the Tools menu of the Server Manager Utility.
It's best to do this on an isolated test network so the experimental scopes don't interfere with the network's existing IP address infrastructure. You must authorize the DHCP server in Active Directory before it leases IP addresses to clients. To do this, right-click the server node in the DHCP console and select the Authorize option. You must have domain admin or enterprise admin privileges to authorize the server.

Deploy one DHCP server with multiple scopes
This article exemplifies a specific scenario where you need to deploy one DHCP server connected to multiple subnets -- either directly or indirectly. Each subnet requires a different DHCP scope with specific router and DNS settings.
Your design might look like the following:
- DevNet: 192.168.1.15-254/24, default gateway 192.168.1.1, DNS 192.168.2.10
- ProdNet: 192.168.2.15-254/24, default gateway 192.168.2.1, DNS 192.168.2.10
- SalesNet: 192.168.3.15-254/24, default gateway 192.168.3.1, DNS 192.168.2.10
- EngineersNet: 192.168.4.15-254/24, default gateway 192.168.4.1, DNS 192.168.2.10
This design has four separate IP address pools, each containing specific network service settings. Notice the address range settings. Addresses 15 through 254 are free, making addresses 1 through 14 available for static IP address settings within the subnet. Devices using static IP addresses in the subnet include those for printers, servers, routers and other devices.
One option for building this infrastructure is deploying four DHCP servers, one for each subnet. However, that makes centralized administration more challenging and potentially wastes an entire Windows Server installation and license. Tasks such as monitoring DHCP logging are more time-consuming when spread across multiple servers. Because of this, deploying a single DHCP server with four separate scopes is a better practice.
Create the first scope
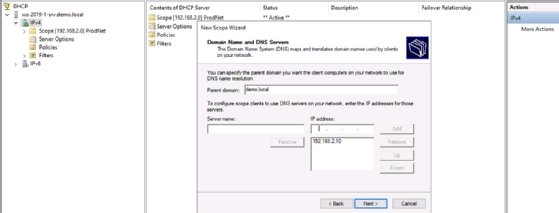
Log in to the DHCP server, open Server Manager and select DHCP from the Tools menu. To create one or more DHCP scopes, expand the server icon in the DHCP console, right-click the IPv4 node and select New Scope.
Using the example above, create a scope called "DevNet" with the IP address range 192.168.1.50-254/24, default gateway value 192.168.1.1 and DNS IP address 192.168.2.10.
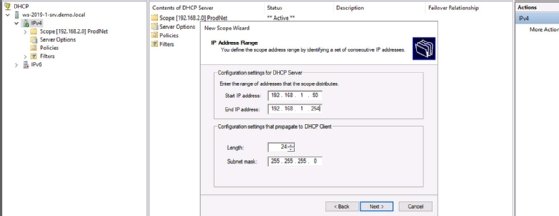
The server can now lease IP addresses from that pool to client devices. Other scope options are available, but you'll mainly configure the default gateway and DNS server addresses.
The scope answers DHCP Discover queries on whichever server network interface card (NIC) matches the IP address configuration. Manage this in the DHCP console by taking the following steps:
- Right-click the server node.
- Select Properties.
- Select the Advanced tab.
- Select Bindings.
- Check the box for each NIC you want the server to listen on. This setting is server-wide and not scope-specific.
Activate the scope when you finish the configuration.
Create additional scopes
The trick to managing additional scopes is installing and configuring a separate NIC in the DHCP for each scope it will host. Continuing the example used above, add three NICs to the server. Configure each with a static IP address that matches the IP address configuration of the scopes you wish to build. Set the following configurations:
- eth1: 192.168.1.9/24. This is the first NIC in the server and the one associated with the first DevNet scope you created above.
- eth2: 192.168.2.9/24 (ProdNet).
- eth3: 192.168.3.9/24 (SalesNet).
- eth4: 192.168.4.9/24 (EngineersNet).
Next, repeat the process to create the three new scopes. Carefully enter the appropriate values for the ProdNet, SalesNet and EngineersNet configurations. Mistakes in the DHCP scope configuration can cause many frustrating network issues.
The server now hosts four pools of unique IP address settings. You can activate or deactivate them individually.

The key differentiator between the pools is the scope options. Each scope has unique values -- the range of available addresses and the default gateway IP address.
Note that a server options node resides in the DHCP console under the IPv4 node, with another under the IPv6 node. This node enables you to configure global options that apply to all DHCP scopes. These broader settings make administration easier. In this tutorial's example, you can set the DNS server IP address option at the server level once, and it will apply to all scopes.
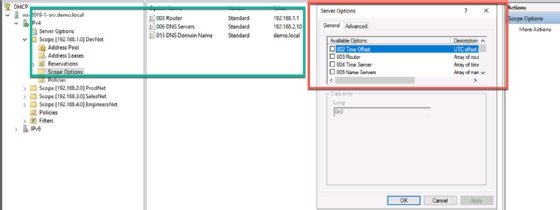
If server and scope options conflict, the more granular scope options win. This gives the administrator more control on a per-scope basis.
The DHCP console enables administrators to configure various settings that apply to all IP addresses leased by the server (server options) and set custom options that apply to all IP addresses leased by a particular scope (scope options). You also retain the ability to configure reserved IP addresses in each scope. The benefit of this configuration is centralizing the DHCP service to a single Windows deployment.
Damon Garn owns Cogspinner Coaction and provides freelance IT writing and editing services. He has written multiple CompTIA study guides, including the Linux+, Cloud Essentials+ and Server+ guides, and contributes extensively to Informa TechTarget, The New Stack and CompTIA Blogs.