Network nodes require an IP address configuration that typically includes the IP address, subnet mask, default gateway IP address for the router, name servers and other values.
Administrators can manually set this information, resulting in a static configuration. A Dynamic Host Configuration Protocol (DHCP) server can also dynamically provide the information.
Generally, servers, routers, network printers and other comparable devices have a static configuration. Workstations, laptops, phones, tablets and other end-user devices receive their configuration using DHCP.
Client devices lease their IP address configuration by using the following four-step DORA process:
Discover. The client broadcasts an attempt to discover a DHCP server.
Offer. DHCP servers that receive the client broadcast offer an IP address configuration.
Request. The client formally requests the IP configuration from the first DHCP server to respond.
Acknowledge. The DHCP server acknowledges the lease and doesn't offer that same address to another client.
The client must renew the lease periodically.
Now that we've briefly reviewed how IP addresses are allocated and the lease generation process, let's delve into more detail on Windows DHCP server configuration. Follow these steps to manage deployment.
1. Install DHCP on Windows Server
The DHCP service is not automatically installed on Windows Server. It is easy to add, however, using either Server Manager or Windows PowerShell.
Ensure that you deploy essential services such as DHCP on the most current version of Windows Server for the most up-to-date features and security enhancements. Older versions of Windows Server do not support DHCP failover and other crucial capabilities.
DHCP is a relatively lightweight service, but if the server manages thousands of clients, its DHCP database and log file structure can become cumbersome. Plan the following minimum hardware specifications:
8GB RAM. Increase this to 16GB for larger networks.
120GB SSD. Storage for logs, DHCP database and the OS. Increase this if the server hosts other services, such as Active Directory (AD) or DNS.
One 1-gigabit Ethernet network adapter. Consider implementing a dual network adapter configuration with network interface card (NIC) teaming for redundancy and performance.
To add DHCP using Server Manager, select Add Roles and Features, and then choose DHCP in the Roles list.
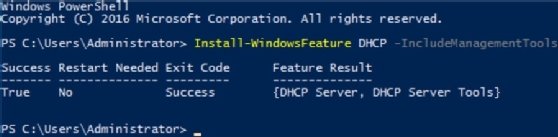
To add the DHCP role using the CLI, open Windows PowerShell, and type the following:
Figure 1. Install the DHCP role by using Windows PowerShell.
The installation takes about one minute to complete.
Once admins install the DHCP service, they can manage it by selecting Server Manager > Tools > DHCP.
2. Authorize DHCP in AD
You must register Windows-based DHCP servers with AD before they can offer IP address configurations to clients.
Right-click on the server node in the DHCP console and select Authorize to complete this authorization. You need Enterprise Admin privileges to authorize DHCP.
Trouble authorizing DHCP in AD often indicates connectivity and replication issues. Use the following troubleshooting steps to correct authorization challenges:
Confirm you have sufficient privileges to authorize the server in AD.
Confirm connectivity to one or more domain controllers.
Verify firewall settings are not blocking Lightweight Active Directory Protocol queries.
Wait a few minutes for AD replication to occur.
Confirm AD replication health.
Check Event Viewer for entries indicating authorization failure, such as Event ID 1046.
Verify DNS functionality and confirm resource records exist for the domain controllers and the DHCP server.
Windows Server DHCP servers deployed in a workgroup configuration do not need authorization. Windows Server Workgroups are typically 10 or fewer computers, requiring no centralized administration or security. You might find these deployments in small businesses, lab environments or non-essential areas.
3. Create a scope
Before building the first pool of available IP addresses, you must plan the deployment. Devices, such as servers, routers and even printers, might have static IP address configurations. Ensure you have identified these addresses and that you allow for them in scope. Many administrators place all statically assigned IP addresses at the front of the IP range. These are not included in the DHCP scope to avoid conflicts.
Keep growth and scalability in mind when configuring Windows DHCP servers. DHCP must be able to provide IP addresses as departments, branch locations or network segments expand within the company. Create a scope large enough to support any expected growth. Don't forget about new print devices, temporary or seasonal employees, VMs and business partner computers that join the network.
This example design starts with a standard Class C reserved IP address range. It accounts for the static IP addresses assigned to network devices and the dynamically leased IP addresses for client systems:
Scope address range: 192.168.2.0/24.
Static IP addresses: 192.168.2.1 through 192.168.2.25. Be sure to leave some room for additional devices.
Dynamic IP addresses: 192.168.2.26 through 192.168.2.254.
You also need to decide on additional configuration details, including the following:
Name and description. The scope name and an optional description.
Default gateway value. The IP address of the NIC in the router attached to this network.
Name resolution servers. The IP address of one or more DNS servers.
Reservations. Any IP addresses that are dynamically allocated to specific clients enable those clients to acquire a consistent IP configuration from DHCP.
Lease time. The period during which the IP address lease is valid. It needs to be renewed at the halfway point of the lease. The default Windows Server DHCP lease duration is eight days.
4. Configure and activate the scope
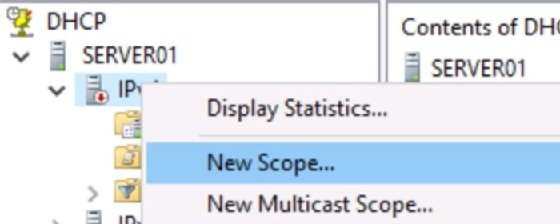
Once you have documented the above values, you can configure the scope. Right-click the server node in the DHCP console, and then select New Scope. A wizard prompts you for the information you chose above. You can change these settings later.
Figure 2. Create a new DHCP scope.
Once activated, the DHCP server begins responding to DHCP client discover messages by offering IP addresses. Use AD to deactivate the scope, stop or start the DHCP service or deauthorize the DHCP server itself.
Windows Server DHCP servers can host multiple scopes to manage various subnets.
5. Manage DNS registration
DNS links easy-to-remember hostnames to difficult-to-remember IP addresses. You can populate this database in several ways.
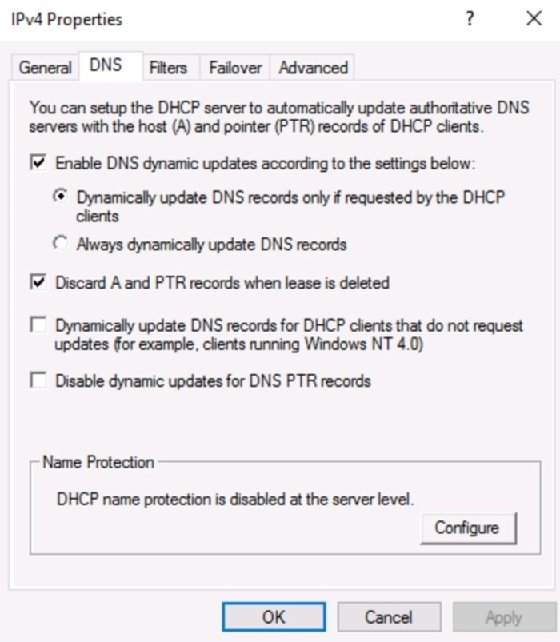
One method is to configure the DHCP server to create resource records for the client. The DHCP server can create the following:
A records. Hostname to IP address.
Pointer records. IP address to hostname. Also known as PTR records.
Both record types. A records and pointer records together.
By default, the DHCP server creates the PTR record, while the client itself registers its A record with DNS.
Figure 3. Configure DNS options.
Administrative DHCP tasks
The DHCP service is simple to configure. But sysadmins often find some additional settings to be useful, among them:
Create client reservations
In some cases, it's useful to allow a client machine to maintain a consistent IP address. While you could set the IP address configuration statically, it's often better to reserve the IP address for the client in DHCP. The client undergoes the DORA process to receive its settings, so values such as router and name resolution servers can still be updated using DHCP.
Use the ipconfig /all command on the client to find the MAC address.
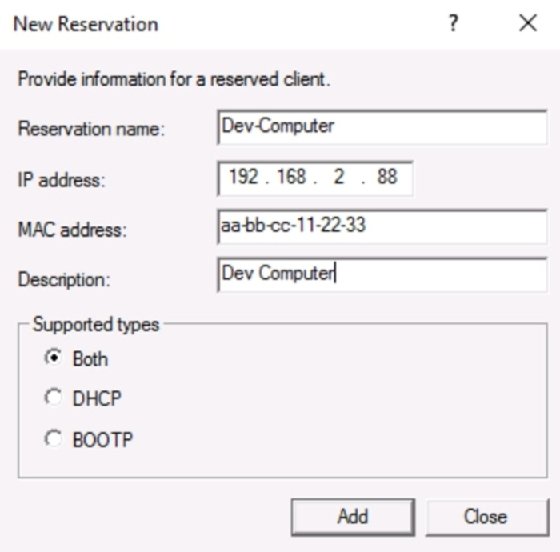
Right-click the Reservations node in the DHCP Scope on the DHCP server. Choose New Reservation.
Provide a reservation name, IP address to assign, the client's MAC address and a description that explains why this client needs an unchanging address.
Click Add to save the configuration.
You can also right-click on existing leases in the DHCP console and select Add to Reservation.
Figure 4. Reserve an IP address for the Dev-Computer.
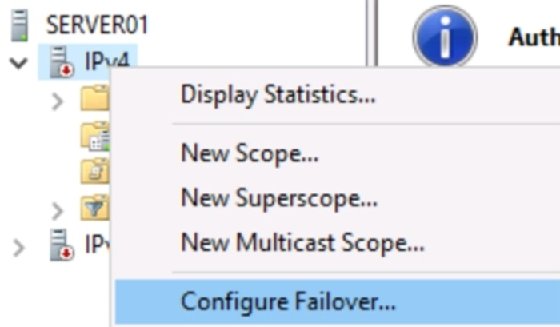
Configure DHCP failover
Microsoft introduced DHCP failover with Windows Server 2012, more than a decade after the release of the first server OS. However, it appears many administrators are unaware of DHCP failover. Configuration is straightforward and requires no special software.
Ensure you've installed the DHCP role on both DHCP servers and that each has network connectivity with the other.
Configure a DHCP scope on one of the servers.
Right-click the scope and select DHCP Failover from the context menu.
Complete the wizard.
Select the second DHCP server and observe that the new scope appears.
Figure 5. Configure DHCP failover.
Manage logs
Managing service log files is a standard function for sysadmins. DHCP writes messages to Event Viewer and to text files.
Sysadmins can check the system log for general DHCP and network messages. They can find DHCP entries by drilling down to Applications and Services > Microsoft > Windows > DHCP-Server > Microsoft-Windows-DHCP-Server-Events > Operational.
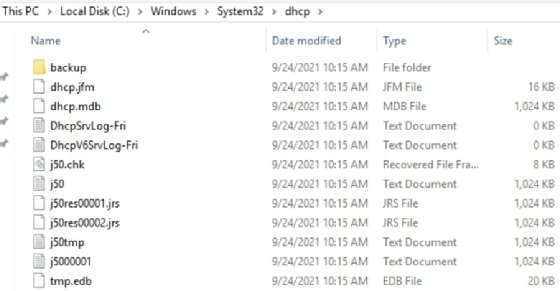
DHCP also generates text-based log files stored at C:\Windows\System32\dhcp. These logs are useful for troubleshooting. They can display information on why the server was unable to lease configurations to clients.
Figure 6. DHCP text logs.
Text file logs are named by day of the week and are overwritten weekly. If you want to retain these logs, you must rename them before the upcoming day of the week can overwrite them.
Manage DHCP lease durations
Maintaining reasonable lease durations is crucial to optimizing DHCP. Shorter lease times help recycle unused IP addresses, which is important in some venues.
Begin by considering the type of DHCP environment you're supporting. For example, a coffee shop might provide wireless connectivity to customers. Chances are, these customers will only need to lease an IP address for an hour or less, meaning short lease durations will recycle addresses quickly as customers leave.
Business offices, however, would see increased network traffic and server activity with such short lease durations in a relatively unchanging environment. Lease times in these settings would typically be at least one day, and likely far more than that.
In addition, transient device types typically require shorter lease durations than more permanent systems, such as workstations. Consider the following lease durations for different types of devices:
Laptops. Up to eight hours.
Smartphones. Up to eight hours.
Tablets. Up to eight hours.
Workstation. Eight days. This is the default lease duration for Windows Server DHCP servers.
VMs. Varies depending on the VM's use; likely very short.
Adjust these values to meet your organization's requirements.
Identify conflicting scopes
As more subnets -- and, therefore, more DHCP scopes -- are added to the network, it's imperative that sysadmins accurately document the IP address ranges. Overlapping scopes, where two DHCP servers offer the same IP addresses to clients, result in various network communication issues.
Carefully document the following Windows DHCP server configuration settings:
Static IP addresses. Manually configured on servers and network devices.
Reserved IP addresses. Assigned by DHCP to clients that require unchanging addresses.
IP address usage. Available versus consumed IP addresses based on network inventory to ensure enough IP addresses exist when adding more clients to the subnet.
MAC addresses. DHCP reservations, MAC address filtering and switch troubleshooting.
DHCP must be able to provide IP addresses as departments, branch locations or network segments expand within the company. Create a scope large enough to support any expected growth.
Avoiding conflicting scopes is one reason why Microsoft requires administrators to use AD to authorize DHCP servers. That authorization can only be implemented by enterprise admins, who should have enough broad knowledge of network configuration to prevent conflicting scopes.
Avoid duplicate IP address offers
One of the most serious misconfigurations is a client computer configured with a static IP address that falls within the DHCP server's assigned IP address range. In that case, the server can offer the IP address to a client because it is unaware of the static IP. This results in an IP address conflict.
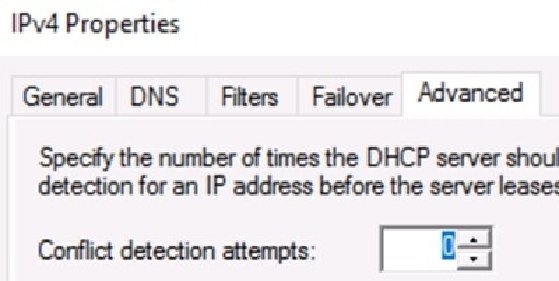
You can configure the Windows DHCP service to ping an IP address before offering it to a client. If the ping returns a response, the DHCP server knows the address is already in use and should not be offered. The server offers a different address to the client.
Figure 7. Configure conflict detection attempts.
The ping request occurs between the Discover and Offer steps of the lease generation process. It introduces a significant delay, so only configure this setting if you have a genuine concern about undocumented static IP addresses on client devices.
Implement a maintenance schedule
Keeping your DHCP servers healthy is crucial for maintaining smooth, uninterrupted IP address management. Target these three areas for regular maintenance: Monitoring, optimization and security.
Monitor the following areas:
Review status and uptime records regularly.
Audit log files regularly.
Review scope settings to ensure availability.
Review administrative privileges on the server.
Implement the following performance improvements:
Right-size DHCP scopes for the number of clients.
Adjust lease times depending on scope and client type.
Ensure sufficient quantities of static IP addresses remain available for network devices and servers.
Document all settings and changes.
Consider the following security settings:
Harden the server and the DHCP service by removing unnecessary privileges and services.
Update the server with the latest security patches.
Implement MAC filtering to control client leases more effectively.
Scan for rogue DHCP servers that might result from misconfiguration or malicious intent.
Windows DHCP server configuration is straightforward. Make sure you have a solid understanding of the entire network's IP address configurations before you begin, and plan your scope around both dynamic and static IP address assignments. Don't forget to create a structured maintenance schedule during your deployment.
The DHCP role is not installed by default, so the first step is to add it. From there, create a new scope based on your plan. Add any options, such as DNS and reserved addresses. Review log files regularly. DHCP is simple, but critical for network communication.
Damon Garn owns Cogspinner Coaction and provides freelance IT writing and editing services. He has written multiple CompTIA study guides, including the Linux+, Cloud Essentials+ and Server+ guides, and contributes extensively to TechTarget Editorial, The New Stack and CompTIA Blogs.