subnet (subnetwork)
What is a subnet?
A subnet, or subnetwork, is a segmented piece of a larger network. More specifically, subnets are a logical partition of an Internet Protocol (IP) network broken into multiple, smaller network segments. Subnets are often used to divide clients logically or by location to help the network traffic flow better. Each subnet has an assigned range of possible IP addresses.
Organizations use a subnet to subdivide large networks into smaller, more efficient subnetworks. One goal of a subnet is to split a large network into a grouping of smaller, interconnected networks to help minimize traffic. This way, traffic doesn't have to flow through unnecessary routes, increasing network speeds.
The value of subnets can be compared to addressing a letter. The letter's city, state and zip code are used at the post office to determine if the letter is local and can be handled by that sorting office or if it needs to be sent to another office where it can then be delivered from. Without this, each post office would need to know where every street in the country is; with this, each post office only needs to know the addresses it cares for and how to forward other mail based on simple routing rules.
Subnetting, the segmentation of a network address space, improves address allocation efficiency. It is described in the formal document, Request for Comments 950, and is tightly linked to IP addresses, subnet masks and Classless Inter-Domain Routing (CIDR) notation.
How do subnets work?
Each subnet allows its connected devices to communicate directly with each other, while routers are used to facilitate communication between subnets. The size of a subnet is set by the system administrator and depends on the connectivity requirements and the network technology employed. A point-to-point subnet allows two devices to connect, while a data center subnet might be designed to connect many more devices.
Each organization is responsible for determining the number and size of the subnets it creates, within the limits of the address space available for its use. Additionally, the details of subnet segmentation within an organization remain local to that organization.
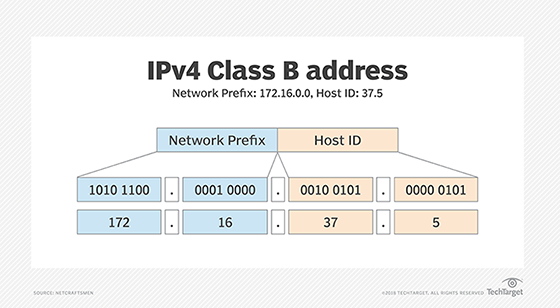
An IP address is divided into two fields: a Network Prefix (also called the Network ID) and a Host ID. What separates the Network Prefix and the Host ID depends on whether the address is a Class A, B or C address. Figure 1 shows an IPv4 Class B address, 172.16.37.5. Its Network Prefix is 172.16.0.0, and the Host ID is 37.5.
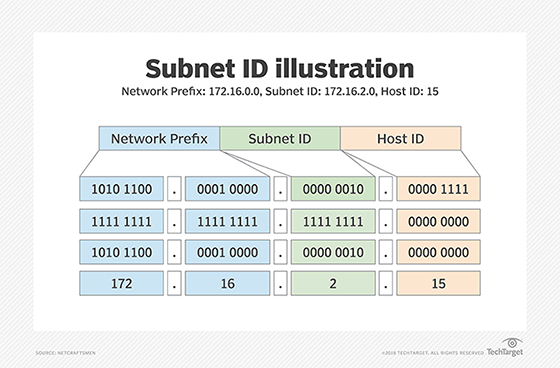
The subnet mechanism uses a portion of the Host ID field to identify individual subnets. Figure 2, for example, shows the third group of the 172.16.0.0 network being used as a Subnet ID. A subnet mask is used to identify the part of the address that should be used as the Subnet ID. The subnet mask is applied to the full network address using a binary AND operation. AND operations operate, assuming an output is "true" only when both inputs are "true." Otherwise, the output is "false." Only when two bits are both 1, this results in the Subnet ID.
Figure 2 shows the AND of the IP address, as well as the mask producing the Subnet ID. Any remaining address bits identify the Host ID. The subnet in Figure 2 is identified as 172.16.2.0, and the Host ID is 5. In practice, network staff will typically refer to a subnet by just the Subnet ID. It would be common to hear someone say, "Subnet 2 is having a problem today," or, "There is a problem with the dot-two subnet."
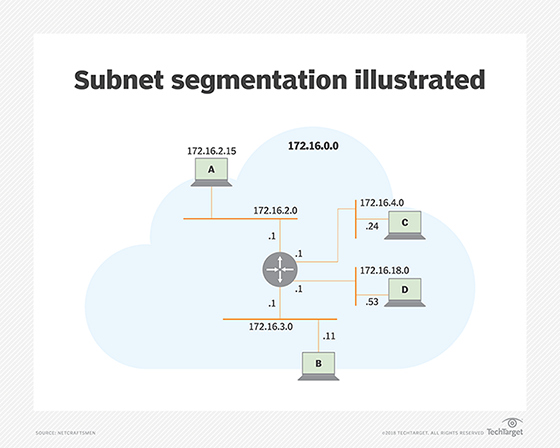
The Subnet ID is used by routers to determine the best route between subnetworks. Figure 3 shows the 172.16.0.0 network, with the third grouping as the Subnet ID. Four of the 256 possible subnets are shown connected to one router. Each subnet is identified either by its Subnet ID or the subnet address with the Host ID set to .0. The router interfaces are assigned the Host ID of .1 -- e.g., 172.16.2.1.
When the router receives a packet addressed to a host on a different subnet than the sender -- host A to host C, for example -- it knows the subnet mask and uses it to determine the Subnet ID of host C. It examines its routing table to find the interface connected to host C's subnet and forwards the packet on that interface.
Subnet segmentation
A subnet itself also may be segmented into smaller subnets, giving organizations the flexibility to create smaller subnets for things like point-to-point links or for subnetworks that support a few devices.
The example below uses an 8-bit Subnet ID. The number of bits in the subnet mask depends on the organization's requirements for subnet size and the number of subnets. Other subnet mask lengths are common. While this adds some complexity to network addressing, it significantly improves the efficiency of network address utilization.
A subnet can be delegated to a suborganization, which itself might apply the subnetting process to create additional subnets, as long as sufficient address space is available. Subnetting performed by a delegated organization is hidden from other organizations. As a result, the Subnet ID field length and where subnets are assigned can be hidden from the parent (delegating) organization, a key characteristic that allows networks to be scaled up to large sizes.
In modern routing architectures, routing protocols distribute the subnet mask with routes and provide mechanisms to summarize groups of subnets as a single routing table entry. Older routing architectures relied on the default Class A, B and C IP address classification to determine the mask to use.
CIDR notation is used to identify Network Prefix and Mask, where the subnet mask is a number that indicates the number of ones in the Mask (e.g., 172.16.2.0/24). This is also known as Variable-Length Subnet Masking and CIDR. Subnets and subnetting are used in both IPv4 and IPv6 networks, based on the same principles.

As an example network, imagine a large organization with many buildings around the world. They use the 172.16.0.0/12 private address subnet. This would give them access to over a million possible internal IP addresses that fall between 172.16.0.0 and 172.31.255.255. This large address space is further divided between countries, the U.S. uses 172.17.0.0/16 and Canada uses 172.18.0.0/16. These can be even further subdivided. So U.S. building A uses 172.17.0.0/18 and building B uses 172.17.64.0/18, and this may be even further divided between floors or departments. Suppose a client at 172.17.2.45 wanted to send data to 172.17.5.86, the router would know that it was a client in the same building and could route it through the local network. If the same client 172.17.2.45 wanted to send a message to 172.18.80.241 the router would know that it needed to forward the packet to the Canada router over the WAN.
What are subnets used for?
Subnets are used for the following:
- Reallocating IP addresses. Each class has a limited number of host allocations. For example, networks with more than 254 devices need a Class B allocation. If a network administrator is working with a Class B or C network and needs to allocate 150 hosts for three physical networks located in three different cities, they would need to either request more address blocks for each network -- or divide a network into subnets that enable administrators to use one block of addresses on multiple physical networks.
- Relieving network congestion. If much of an organization's traffic is meant to be shared regularly between the same cluster of computers, placing them on the same subnet can reduce network traffic. Without a subnet, all computers and servers on the network would see data packets from every other computer.
- Provide routing hints. IP addresses allow any device to communicate with every other device, but in reality, not every device is directly connected together. Routing tables can be used to direct the data traffic to use specific physical links between network equipment.

- Improving network security. Subnetting allows network administrators to reduce network-wide threats to improve network security by quarantining compromised sections of the network and by making it more difficult for trespassers to move around an organization's network.
IP addressing and subnetting are important and basic elements of networks. Learn how to calculate a subnet mask based on the required number of subnets and hosts.