Ethical hacking: How to conduct a Sticky Keys hack
Physical security is often overlooked by cybersecurity teams. Learn about physical cybersecurity attacks in step-by-step instruction on how to conduct a Windows Sticky Keys hack.
How is a physical access attack conducted? You'd see one happen -- right?
"An attacker could walk into an organization, plug a flash drive with an advanced strain of ransomware into a computer and then walk around pretending to be a phone repairman or someone working with pest control," said Bryson Payne, author of Go H*ck Yourself.
Such attacks are not always as easy to detect as one might think -- nor as easy to defend against. Organizations need to converge cybersecurity and physical security to fully protect their assets. But, before trying to improve the relationship between the two, it's important to understand how weak physical security affects cybersecurity and puts an organization's sensitive data at risk.
Physical security, as the name suggests, is the protection of networks, systems or data from physical actions or events. The threat of physical cybersecurity attacks has increased with remote and hybrid work models that have employees working outside the office and on noncompany-sanctioned devices and networks.
"An employee could be working on their laptop in a coffee shop, and a threat actor could be listening for unencrypted traffic on the free Wi-Fi," said Payne, a professor and founding director of the Center for Cyber Operations Education (now the Institute for Cyber Operations) at the University of North Georgia. "The employee could get up to order another coffee, and the hacker could sit down at the employee's computer and, in five seconds, gain access to saved passwords on the device's browser."
To better help readers understand the dangers of physical cybersecurity attacks, Payne teaches readers how to hack their own devices in his book. These ethical hacker techniques give readers greater insight into cybersecurity and enable them to better protect themselves from threat actors.
In this excerpt from Chapter 2, "Physical Access Hacks," Payne explains how to conduct a Sticky Keys hack. This walkthrough demonstrates a hack that involves both cybersecurity and physical security vulnerabilities.
 Click to learn more about
Go H*ck Yourself.
More on Go H*ck Yourself
Click here to read the full chapter and learn about the Mac root hack. Also, read a Q&A with author Bryson Payne to learn more about ethical hacking, including the benefits and what to look for when hiring an ethical hacker.
Physical access hacks may sound scary because they can be used maliciously by attackers on stolen or unattended computers. However, they also have constructive applications. Ethical hackers at home and at IT help desks use techniques like the Sticky Keys hack or the Mac root hack to recover files that would otherwise be lost due to a forgotten password. If you have an old computer in the garage or attic with family photos or other important documents that you can't access because no one remembers the computer's password, these hacks can help.
Warning: Do not perform either of these hacks on your main computer, because they could leave your machine vulnerable to attack. You can usually find an old desktop or laptop if you ask around. Get creative, but stay ethical; be sure to get the owner's permission before trying out these hacks on someone else's computer. If you can't find an extra Windows or Mac computer to practice on, you can still read this chapter to understand the dangers of physical access attacks.
The Sticky Keys Hack
Sticky Keys is a Windows feature that makes it easier to issue certain keyboard commands, like CTRL-C to copy or CTRL-V to paste, by allowing you to press the keys one after another instead of all at once. Sticky Keys is triggered by pressing SHIFT five times and can even be turned on from the Windows login screen, before a username or password has been entered.
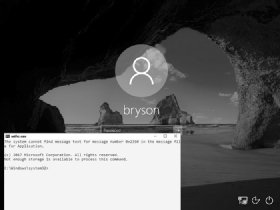
For this hack, we'll replace the Sticky Keys program file with another file, cmd.exe. That way, instead of launching the usual Sticky Keys assistant, pressing SHIFT five times will launch a command prompt. This is a text-based program that lets us enter commands directly into Windows. By launching a command prompt at the login screen (see Figure 2-1), you'll be able to add a new username and password, give yourself administrator-level access to the computer, and access the computer's files, all without knowing the login information on that computer!
Since Windows 10 computers that have been updated in 2019 or later are safe from the Sticky Keys hack, you'll need an older Windows computer to try out the hack for yourself. You'll also need a Windows 10 installation disc or USB drive. To create one, follow the instructions in Appendix A.
Booting from a Windows 10 Installation Disc
To replace the Sticky Keys program with the command prompt program, we need to access the hard drive that contains those program files using a Windows 10 installation disc or USB drive. Once you've created an installation disc, as described in Appendix A, insert the disc and then restart the computer.
We need to tell the computer to load the operating system (OS) from the disc or USB drive instead of from the computer's hard drive. To do this, we'll access either the boot menu or the Basic Input/Output System (BIOS), which contains basic settings that control your computer when it starts up. Different PC manufacturers and different versions of Windows cause the instructions to vary a bit, but the following steps combined with a little web searching will get you into most older Windows computers:
- On Windows computers, you press a special key to access the boot menu or BIOS. If your startup screen doesn't show you which key to press just before the Windows startup logo appears, reboot your computer and quickly press ESC, DELETE, F8, F9, F10, F11, or F12 right as it begins to start up. Search online for "boot menu" and the specific make and model of your computer to find the right key.
- If the boot menu appears, select the Boot from DVD or Boot from USB option to boot from the Windows installation disc you inserted, then move on to step 5.
- If the boot menu doesn't appear after a few restarts, try entering the BIOS menu instead: turn the computer off and on again, and press DELETE, F2, F9, F10, F12, or ESC. Search online for "BIOS" and your computer model to find the right key.
- Once you're inside the BIOS, find the boot options and change the order or priority of your boot devices (often by using your arrow keys) to make the USB or DVD the top option. Then save the changes and exit the BIOS.
- Reboot the computer again. You should briefly see the message Press any key to boot from CD or DVD or Press any key to boot from USB device. Press any key (such as the spacebar) immediately to boot from your DVD or USB.
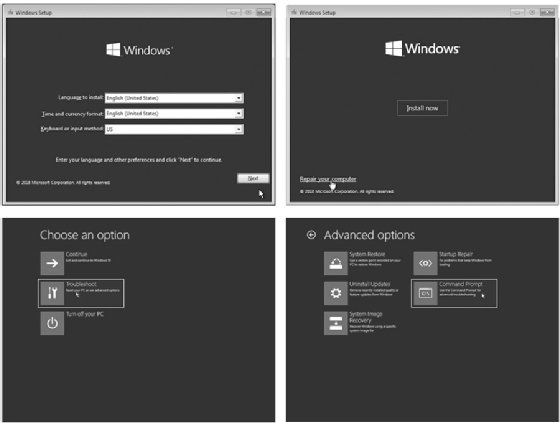
- When the Windows installation disc starts up, click Next>Repair your computer>Troubleshoot>Command Prompt, as shown in Figure 2-2. The menu order or the option names might look different, but look for the Windows command prompt.
Warning: Make sure you don't install Windows 10 -- that would wipe out all the files from the PC you're trying to recover!
- Once you've reached the Windows command prompt (usually a black, text-based window), type c: and press ENTER to change to the C: drive, as shown here:
X:\> c:
- Enter the command dir to see a list of files and folders on the C: drive. Look for a folder called Windows (it will be marked <DIR>, short for directory).
C:\> dir
This folder (*1) contains the operating system files, including the command prompt application and the Sticky Keys program file that we need to swap out to perform this hack.
Volume in drive C is Windows 10
Volume Serial Number is B4EF-FAC7
Directory of C:\
--snip--
03/15/2018 02:51 AM <DIR> Users
05/19/2019 10:09 AM <DIR> Windows *1
--snip--
- If there's no Windows directory on the C: drive, try the same process in the D: drive by entering d: and then dir. If the D: drive doesn't have the Windows directory either, keep going through the alphabet (E:, F:, G:, and so on) until you find a drive containing Windows in its listing.
Gaining Administrator-Level Access
Now to replace the sethc.exe Sticky Keys program with the cmd.exe command prompt program. Then we'll be able to create a new administrator account on the computer.
- Enter the following three commands:
C:\> cd \Windows\System32\
These commands enter the directory where we can find both sethc.exe and cmd.exe, create a backup copy of the Sticky Keys program, and replace the original Sticky Keys program file with a copy of the command prompt program file. This way, whenever the computer runs sethc.exe, it will open a command prompt window in place of the Sticky Keys program.
C:\Windows\System32\> copy sethc.exe sethc.bak
C:\Windows\System32\> copy cmd.exe sethc.exe
- After the third command, Windows will ask you if you want to overwrite exe. Enter Y to proceed.
- Remove the Windows 10 installation DVD or USB and reboot the computer.
- When the PC boots to the login screen, press SHIFT five times. Instead of the usual Sticky Keys program, you should see a command prompt window pop up in front of the login screen, as shown in Figure 2-3.
- Enter the following two commands into the command prompt window:
C:\Windows\System32\> net user ironman Jarvis /add
The first command adds a user account named ironman with the password Jarvis to the Windows computer. The second command adds the ironman user to the list of local administrators. This means that when we log in as ironman, we'll have administrator-level access to all the files on the computer.
C:\Windows\System32\> net localgroup administrators ironman /add
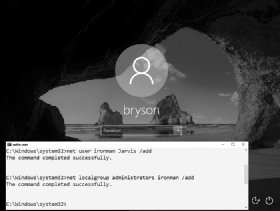
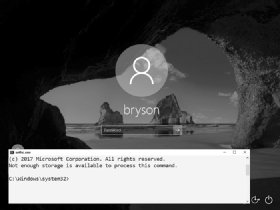
- When you see a success message like the one in Figure 2-4, close the command prompt.
In addition to creating a new user account, you can also reset the password of an existing user from the command prompt window by entering net user followed by the existing username and the new password you want to set -- for example, net user bryson Thisisyournewpassword!. However, you should never reset another person's password without their permission and the permission of the computer's owner.
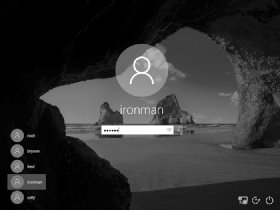
Now You're an Administrator. Log In!
Congratulations! You now have access to the machine as an administrator. Go ahead and log in. Enter .\ironman as the username (or select ironman from the list of accounts, as shown in Figure 2-5). The dot and backslash before ironman tell Windows the account is local to the computer and not stored on a network server. After entering the username, enter the password, Jarvis.
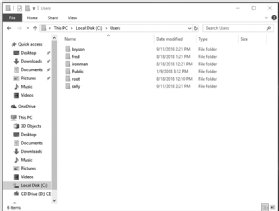
Since we made the ironman user a member of the local administrators group, you should have administrator-level access to all files and folders, including all users and documents in C:\Users\, as shown in Figure 2-6.
When you click into another user's folder for the first time, you'll see a pop-up message saying you need permission to open another user's files, as shown in Figure 2-7. Since you're an administrator, click Continue to grant yourself permanent access!
The Sticky Keys hack works only on Windows machines. However, computers running macOS are vulnerable to physical access hacks as well.

 Bryson Payne
About the author
Bryson Payne is an award-winning cyber coach, author, TEDx speaker and founding director of the Center for Cyber Operations Education (now the Institute for Cyber Operations) at the University of North Georgia (UNG.) He is a tenured professor of computer science at UNG, where he has taught aspiring coders and cyber professionals. In 2017, he received the University System of Georgia Chancellor's Service Excellence Leader of the Year Award. He has also been awarded the Department of the Army Commander's Award for Public Service medal from U.S. Army Cadet Command and the Order of Thor medal from the Military Cyber Professionals Association. Payne holds a Ph.D. in computer science from Georgia State University. He is also the author of Teach Your Kids to Code and Learn Java the Easy Way, published by No Starch Press.