How to test PowerShell code with Pester
PowerShell's Pester troubleshooting tool lets users write and run tests. Learn how to install the tool and examine a step-by-step Pester test example.

If you've ever written a complex PowerShell script, then you've no doubt discovered the need for troubleshooting. As nice as it might be for everything to work perfectly on the first try, complex scripts will almost always contain bugs that need to be fixed. This is where Pester comes into play.
What is Pester?
Pester is a free PowerShell troubleshooting tool available on GitHub. Pester is primarily designed to perform unit and integration tests, but you can use it to troubleshoot nearly any PowerShell script.
Because Pester isn't a native PowerShell component, you'll have to install it. However, Pester is included with some Windows 11 builds. Even so, the installation process is simple. Just enter the following commands into an elevated PowerShell session.
Install-Pester -Force -SkipPublisherCheck
Import-Module Pester -PassThru
The commands shown above only work if your system's execution policy lets you run the code you've downloaded. If you need to change your system's execution policy, you can use the Set-ExecutionPolicy cmdlet. You can see what the Pester installation process looks like in Figure 1. As a side note, you don't have to worry about manually downloading Pester from GitHub. The commands listed above automatically download the code.

Pester commands you need to know
There are a few ways to use Pester, but for the purposes of this article, I'll show you how to perform a basic test. In this example, we'll check a variable to see if it contains the expected value.
Before I show you how to perform such a test, you need to be familiar with the following three commands:
- Describe. The Describe command defines the test being performed and signals to PowerShell that you're about to perform a Pester test. You'll need to assign a value -- a text string that briefly describes what's being tested -- to Describe. Think of the Describe value as a required comment.
- It. The It command tells Pester what you want to test. Typically, the It command refers to a variable.
- Should -Be. Notice that unlike a normal PowerShell cmdlet, there's a space before the hyphen. The Should -Be command tells Pester what the variable referenced by It should equal. You can also insert -Not in front of -Be to tell Pester the variable shouldn't be equal to a particular value.
How to test with Pester
Now that I've explained the basic Pester commands, let's create a Pester test. Here's the script I'll use.
$SumTotal = 2+3
Describe "Check the sum total to see if it equals 4"{
It 'The sum total should be 4' {
$SumTotal | Should -Be 4
}
}
This script creates a variable called $SumTotal that's set to equal 2+3 or 5. The next line contains a Describe statement about what's to be tested. Notice that a curly bracket appears after the description.
Next is a line containing the It statement. The It statement consists of the word "It," a description and a curly bracket. The reason why the It line includes a description when we just provided one via the Describe line is because a Describe section can contain multiple It statements. In that type of situation, the Describe line might list the overall purpose of the group of tests, with each It statement listing the reason for performing that individual test.
Following the It line is another line indicating that the $SumTotal variable should be equal to 4. But since the variable is equal to 5, this test should fail.

A lot of Pester documentation indicates that you need to use the Invoke-Pester command, followed by the name of the script. In my case, the script is named Test.ps1, so the command would be Invoke-Pester Test.ps1. In my experience, however, this method sometimes indicates a test has failed when it should have passed. I've had better luck running the script in the same way that you would run any other PowerShell script (.\Test.ps1).
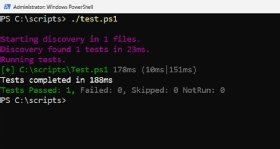
If you look at Figure 2, you can see that the test failed as expected. Pester even goes so far as to say that the $SumTotal variable's value should be 4 but is equal to 5. In contrast, Figure 3 shows what happens when I modify the script to set the $SumTotal variable equal to 4. This time, Pester indicates that the test has passed.
Dig Deeper on Microsoft messaging and collaboration
-
![]()
Using GitHub Copilot to accelerate PowerShell scripting
By: James Bannan
-
![]()
Improve automation skills with the AD Administrative Center
By: Damon Garn
-
![]()
Set up PowerShell script block logging for added security
By: Brien Posey
-
![]()
5 PowerShell tools to help simplify admin tasks and support
By: Stephen Bigelow