
olly - Fotolia
Build a Windows Server 2019 file server cluster for stability
Learn how to use the clustering tools provided by the Microsoft server OS to create a highly available file server to avoid downtime if disaster strikes.

If a Windows file server fails, it shouldn't take the whole organization down with it.
A Windows file server fills a critical infrastructure role as the central storage area for data the users and applications need to function. A file server without the added safety of high availability tempts fate if an outage puts files and application data offline until repairs can be made.
One way to avoid downtime is to create a Windows Server 2019 file server cluster.
Editor's note: This article is tailored for Microsoft's latest server operating system. The servers should be domain joined. A separate server is required to host a cluster shared volume for the file servers in the cluster.
Create an iSCSI Target
The first step is to create a cluster shared volume that will act as shared storage for the file servers within the cluster.
Log onto each of the file servers and launch the iSCSI Initiator, which is found in the Server Manager's Tools menu. When prompted to start the iSCSI Service, choose Yes.
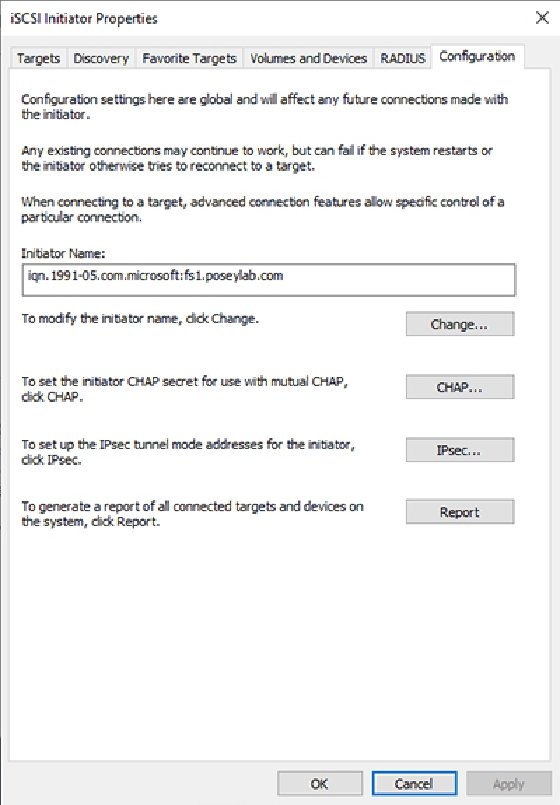
Next, go to the Configuration tab in the iSCSI Initiator Properties and record the initiator's name. Do this for each file server.
Set up the iSCSI Target Server
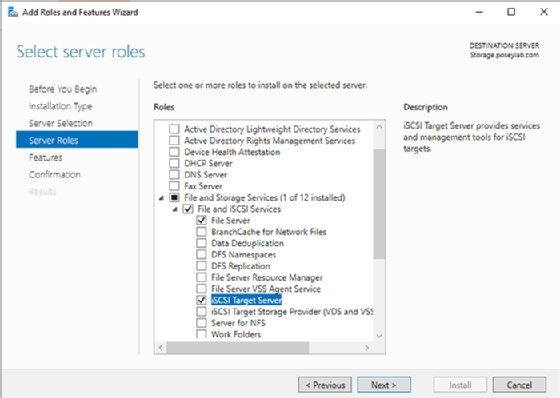
Next, install the iSCSI Target Server onto the server that will host the cluster shared volume.
Open Server Manager and launch the Add Roles and Features Wizard and check the iSCSI Target Server checkbox.
After the installation process completes, click on File and Storage Services, followed by iSCSI.
Next, choose the New iSCSI Virtual Disk option from the Task menu to launch the iSCSI Virtual Disk Wizard. Specify the location to create the iSCSI virtual disk and give the virtual disk a name.
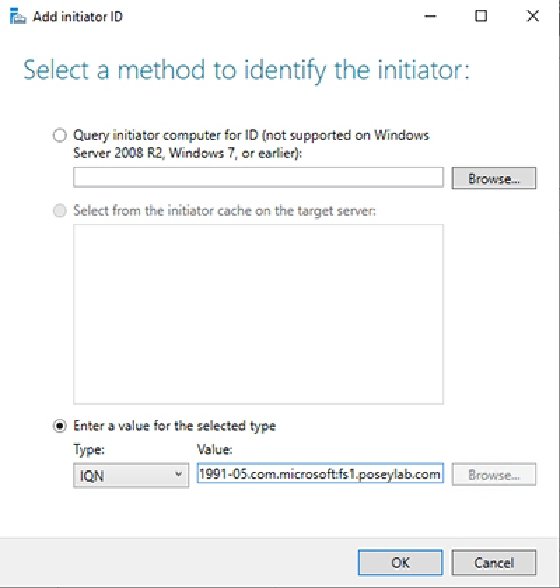
Next, add the access servers. To complete this step, click the Add button and type the initiator name into the Value field. Repeat this step for each initiator.
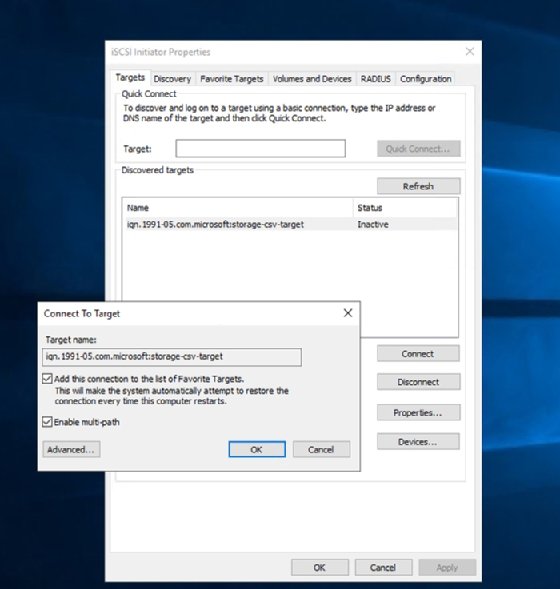
Go back to each file server, open the iSCSI Initiator and go to the Discovery tab. Click the Discover Portal button and enter the iSCSI Target's IP address.
Next, select the Targets tab to see the iSCSI Target listed in the Discovered targets list. Select the target and click the Connect button. When the Connect To Target dialog box appears, select the Enable multi-path checkbox. Click OK and then repeat this procedure for each file server.
Next, open the Disk Management Console (diskmgmt.msc) on one of the cluster nodes to bring the disk online and create a volume.
Create the Windows Server 2019 file server cluster
With the cluster-shared volume attached, the next step is to create the failover cluster. First, install the Failover Clustering feature on each file server. After this installation process, launch the Failover Cluster Manager from Server Manager's Tools menu.
Next, run a validation test to check the hardware and software settings for issues. Click the Validate Configuration option and supply the Validate a Configuration Wizard with the names of the file servers.
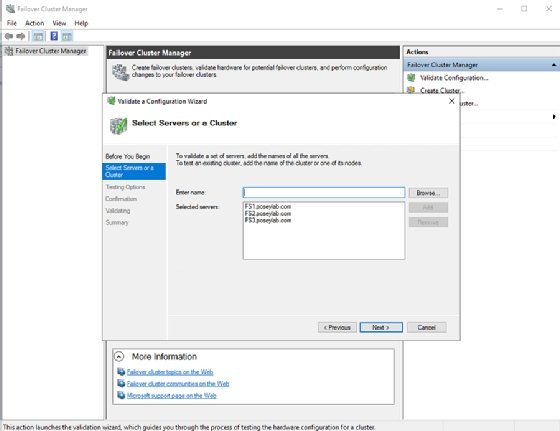
Run all the validation tests. It's normal to get some warnings, but the tests should not return any errors.
Next, click on Create Cluster to launch the wizard. Provide the names of the file servers and the name for the Windows Server 2019 file server cluster. When complete, the cluster should be listed in the Failover Cluster Manager.
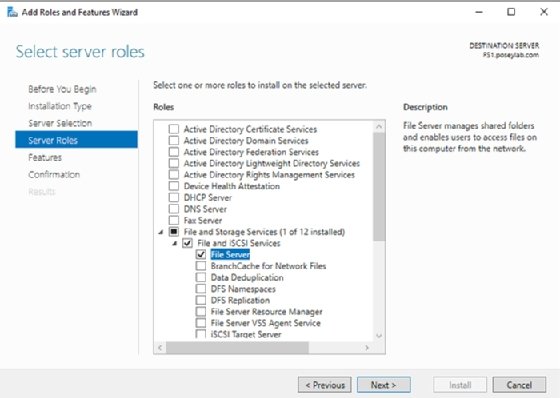
Set up the File Server role
Next, install the File Server role onto each cluster node through the Server Manager Add Roles and Features Wizard.
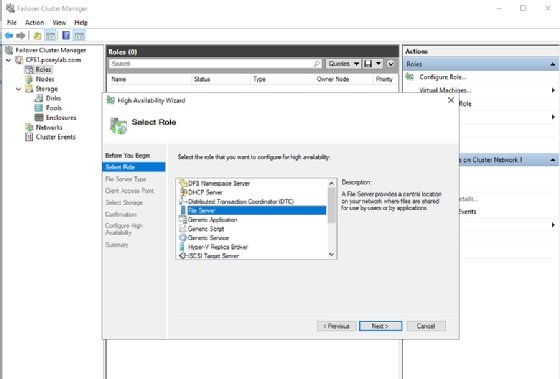
The last step is to make the File Server role highly available.
Go back to the Failover Cluster Manager, expand the cluster and select the Roles container. Click the Configure Role link found in the Actions pane to launch the High Availability Wizard. Choose the File Server option from the list of roles.
One section of the High Availability Wizard requires the selection of a file server type; choose general purpose file server, rather than scale-out file server, which is not ideal for heavy metadata operations, such as opening and closing files.
Assign a name for the client access point and associate the File Server role with the iSCSI volume created earlier.
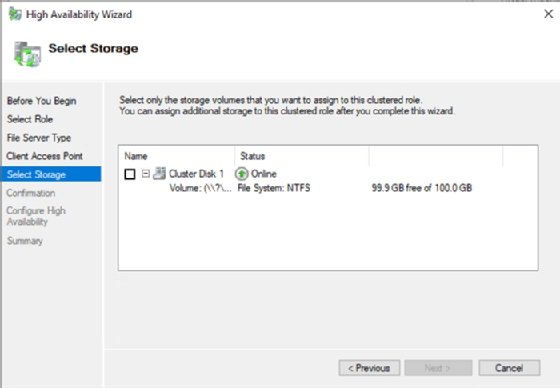
When complete, the File Server role will be highly available.
Dig Deeper on Windows Server OS and management
-
![]()
VMware vSAN file service introduces NFS, SMB file shares
By: Rob Bastiaansen
-
![]()
Explore SCVMM features for VM deployment and management
By: Stefani Muñoz
-
![]()
Meet Hyper-V cluster requirements to maintain high availability
By: Brien Posey
-
![]()
How to create a VDI test deployment with VMware Workstation
By: Stuart Burns