
Getty Images
Tutorial: Use Linux cpio to back up and restore files
There are many ways of backing up files on Linux devices. The cpio utility copies contents out of the file system and into an archive to create reliable backups.

The cpio utility is an archive-based tool, much like tar. It copies files into an archive to back them up and extracts them from an archive to restore them. In fact, when you consider the Linux copy command, cp, the tool's name describes its function: copy-in, copy-out.
The general approach with cpio is to copy files into an archive or extract files from the archive. These are the backup and restore functions, though many additional options exist to modify how cpio works.
Cpio is flexible and quick. You could easily script it to automate backup jobs or bundle files for easy transfers.
This article takes a scenario-based approach to using cpio, enabling you to follow the steps on your own Linux system.
Create the scenario files
Begin by confirming that cpio is installed on your Linux system. It won't be present in all distributions.
Open a terminal console and type the following command.
$ which cpioYou should see output indicating that cpio exists on the system. The output reads /usr/bin/cpio on most systems.
If necessary, install cpio using your distribution's package manager.
On Red Hat and similar distributions, type the following command.
$ sudo dnf install cpioOn Debian and similar distributions, type this command.
$ sudo apt install cpioNext, run the following commands to create a few resources to work with in the backup/restore scenario.
$ cd ~
$ mkdir projects
$ cd projects/
$ touch file1.txt file2.txt file3.txt
$ echo "File 1 Contents" > file1.txt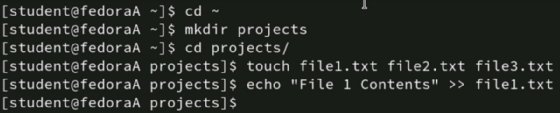
Cpio relies more heavily on redirectors than other Linux commands. Here is a quick review of the three redirectors you'll use frequently with cpio.
| Redirector | Description |
| > | Redirect output to a location. |
| < | Pull input from a location. |
| | | Use the first command's output as the second command's input. |
Using the find command
The find command is the primary tool for directing files into cpio for archiving. The command enables searches based on ownership, permissions, size and a host of other parameters. You'll probably begin with a basic find search specifying all files in a directory.
The syntax for find is as follows.
$ find /where/to/search parametersFor example, to specify files in the /home/student/projects directory, type the following.
$ find /home/student/projects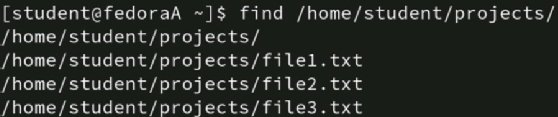
Note that find displays a list of results. This output will become the input for cpio.
Another variation is to find .txt files in the projects directory.
$ find /home/student/projects -iname "*.txt"In this example, /home/student/projects is the location to search; -iname indicates a search by name, ignoring case; and "*.txt" means to find files with the .txt extension.
Back up your files
Users are sometimes confused by cpio's two primary options: -o and -i. Cpio operates from the perspective of the host file system, so you are copying the files out of the file system to create a backup. To restore missing files, you copy them back in.
To begin using cpio, create an archive and copy the text files you created earlier into it.
Here are the necessary cpio options to create an archive:
| Option | Description |
| -o | Creates the file archive and copies files into it. This is the backup command. |
| -v | Verbose mode, displaying the names of files copied out. |
| -p | Preserves permissions and ownership. |
| -A | Appends files to an existing archive. |
Ensure you're in the /projects directory, then type the following command to create an archive named backup.cpio.
$ find /home/student/projects | cpio -o > /home/student/backup.cpioThis command begins with find to specify the directory to be copied out. It then creates the backup.cpio archive in the /home/student directory and copies the selected files into it. You would copy the archive to a safe location, such as a separate storage disk or network location. If your archive is empty, confirm that you specified the files you want to copy correctly.

Use the find command's options or combine the ls command with wildcards if you only need to gather specific files to copy into the archive.
Append files to an archive
Combining directory trees or adding files to an existing archive can be useful. Use the -A option along with -o to append the files.
In this example, the contents of the /old_projects directory are added to the existing backup.cpio archive.
$ find /home/student/old_projects | cpio -oA > /home/student/backup.cpioSimulate lost data to conduct test restore
You have now backed up your text files using cpio. Carefully run the following command in the /projects directory.
$ rm -f *.txt
Imagine now that you've accidentally deleted your files. Use the ls command to confirm that the files are gone.
The cpio restore process copies the files from the archive to the destination location. Like the tar utility, extracting the files is a copy action and does not destroy the archive.
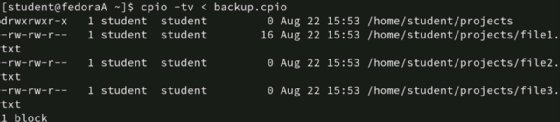
First, display the contents of the backup.cpio archive. List the archive's table of contents using the -t option, as seen below.
$ cpio -tv < backup.cpioBe sure to specify the path to the .cpio file if it's not in your current directory. You might want to view the cpio archive contents to confirm which files you wish to restore.
Here are the cpio restore options:
| Option | Description |
| -i | Copies the files from the archive. This is the restore command. |
| -v | Verbose mode. Displays the names of files copied in. |
| -d | Creates directories as needed. Used to specify a restore location. |
Next, type the command below to restore the files from the archive.
$ cpio -iv < /home/student/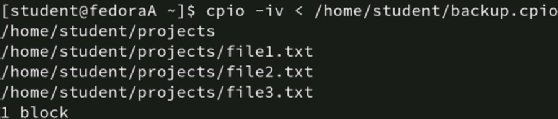
You can list the directory contents using the ls command. You should see the restored text files. If the files don't appear or are not in the correct location, verify the path used with the -d option. Type cat file1.txt to view the file's contents.

The archive is extracted to your current directory if you do not specify a destination location. Use the -d option to define a restore destination. Note that cpio does not overwrite existing files of the same name. Here is an example.
$ cpio -ivd /home/student/restoreditems < /home/student/Other Linux cpio backup features
Many use cases exist for cpio, and it has a lot of flexibility. Here are some alternative examples of cpio's practicality.
Work with tar archives
Cpio can create and extract tar archives. This might be handy if you feel more comfortable with cpio, but receive or download tar files.
To create a tar archive, type the following.
$ ls | cpio -o -H tar > archive.tarExtract a tar archive using this command.
$ cpio -i -F < archive.tarCopy directory trees
One interesting cpio variation is copying directory trees. This is referred to as pass-through mode, and it copies files out of one tree and into another without creating an archive. You might find this useful when duplicating data between drives or even between systems.
This example copies the contents of /home/student/projects to /devteam/projects without creating an archive.
$ find /home/student/projects | cpio -pdv /devteam/projectsFollow symbolic links
By default, cpio won't follow symbolic links to copy the original file. Use the -L option to grab these files and add them to the archive. Here's an example that assumes you know you have symbolic links in the /old_projects directory.
$ find /home/student/old_projects | cpio -oL > /home/student/backup.cpioDon't forget how useful the cpio manual page is for options and examples. To view the manual page, type man cpio.
Damon Garn owns Cogspinner Coaction and provides freelance IT writing and editing services. He has written multiple CompTIA study guides including the Linux+, Cloud Essentials+ and Server+ guides, and contributes extensively to TechTarget Editorial and CompTIA Blogs.