
Getty Images/iStockphoto
Tutorial: Use Linux rsync backup to protect files
Rsync is a file transfer utility designed to move data from one Linux network host to another, which has made it a popular option for backing up critical data.

The Linux rsync utility transfers files between file systems, whether between two drives on a single system or across the network. That alone doesn't differentiate it from tools such as scp or ftp. What's important about rsync is its ability to check timestamps and file sizes to discover changes since the last synchronization process.
The rsync utility has a variety of uses in IT. The below tutorial will use a file management scenario to cover how you can use Linux rsync for backup and restore.
To begin, display the rsync manual page by typing man rsync. It's always a good idea to start with the manual pages when learning any Linux function, as they provide command options and examples.
Create the scenario files
Chances are, rsync is already installed on your Linux system. Confirm that's true by opening a terminal console and typing in the command $ which rsync.
The output should read /usr/bin/rsync on most systems, indicating that rsync is present.
Use your distribution's package manager if you need to install rsync.
On Red Hat and similar distributions, type the following command.
$ sudo dnf install rsyncOn Debian and similar distributions, type this command.
$ sudo apt install rsyncNext, create a few test resources to work with by running the following commands.
$ cd ~
$ mkdir projects
$ cd projects/
$ touch file1.txt file2.txt file3.txt
$ echo "File 1 Contents" > file1.txt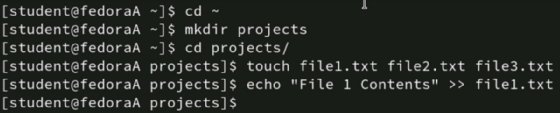
For this exercise, the command creates three text files.
If you intend to copy files across a network in this tutorial, you will need two Linux systems. They should be configured to be on the same network, and Secure Socket Shell (SSH) should be permitted through the firewall.
Back up files
Before beginning, you'll need to confirm a few permissions settings. You'll need read access to the source files and the write permission to the destination directory. Use the ls -l command to display permissions.
Once permissions are established, you can use rsync. The basic syntax for rsync is as follows.
rsync -options [source] [destination]Rsync uses the same syntax structure as commands such as cp (copy) or mv (move): the command, followed by the source, then the destination.
However, because rsync can traverse the network, some additional information might be required, depending on the direction of the transfer. By default, rsync uses SSH, so you might see some familiar language. This has the advantage of avoiding firewall configurations, since most Linux systems permit SSH connections by default. Don't forget to configure key-based authentication for SSH for a seamless rsync experience.
Rsync also displays basic performance information after the transfer.
The following syntax transfers files to a remote location.
rsync -options [source] [user@remoteIP:destination-path]This type of transfer is sometimes called a push action. A pull action transfers files back from a remote location. To pull files, use the following syntax.
rsync -options [user@sourceIP:destination-path] [destination]Here are a few common rsync options:
| Option | Description |
| -a | Syncs directories recursively, preserves owner and permissions attributes, preserves modification timestamps, and maintains symbolic links. |
| -n | Conducts a dry run without synchronizing files. |
| -P | Displays a progress bar. |
| -q | Quiets messages; useful for scripts. |
| -r | Recursively syncs directory contents; unnecessary if using -a. |
| -v | Verbose output; especially useful with the dry run feature. |
| -z | Compresses files before transferring; useful if the network is congested or slow. |
Begin exploring rsync by transferring just one file on a single system. Use the following command.
$ rsync -a /home/student/projects/file1.txt /devteam/projects/backupsList the contents of /devteam/projects/backups to confirm the process worked as expected.
To save the file using a different name at the destination, specify the new name as part of the destination path.
Synchronizing directories is a more common task. This is where rsync excels since it only copies changed files. The syntax is essentially the same.
For example, to back up a directory named /projects in your home folder to another location in the file system, type the following.
$ rsync -a /home/student/projects/ /devteam/projects/backups
Note the trailing / at the end of the source path. When the slash is present, as in the example, then only the directory contents of /projects are copied to the destination. If you don't include the slash, then the parent folder and its contents are copied to the destination. In that case, the resulting path would be /devteam/projects/backups/projects.
Suppose you want to back up your projects to a remote server. For this exercise, all systems will be specified by IP address. If you have name resolution configured in a hosts file or via DNS, then you can use hostnames.
If the destination server is 192.168.1.100 and it recognizes a user named student, type the following.
$ rsync -a /home/student/projects/ [email protected]:/home/student
Connect to the remote system and confirm that the files exist.

Additional options for transfer
One useful rsync trick you can use during this stage is excluding specific directories from a transfer. There are two ways to do this. The first is to use the --exclude parameter followed by the directory to exclude. The other approach is to specify a file that the command can parse to discover the directories you want excluded using the --exclude-from parameter.
For example, to exclude a directory named /personal_data, type the following.
$ rsync -a --exclude=personal_data /home/student/projects /[email protected]:/project-backupsIf it seems like your Linux rsync backup command is getting complex, don't worry. Rsync includes a dry run option using the -n option or --dry-run. Combine this with -v (verbose) and the usual -a (archive) option to see whether your command will work as expected. Here's an example.
$ rsync -anv --exclude=personal_data /home/student/projects /[email protected]:/project-backupsSimulate lost data
You have now copied your files to a remote location. Carefully run the following command in the /projects directory.
$ rm -f *.txt
This command has successfully deleted your project files. Run the ls command to view the directory contents. Your file should be gone. This action simulates data loss, perhaps due to a drive failure or user error.
Restore lost files
Now that your test files have been deleted, it's time to restore them. Since rsync is really just a copy or synchronization tool, it doesn't have a specific restore option. Instead, you simply copy the backed-up files to the system where you're restoring them. As such, the command continues to use the -a option.
If you're sitting at the workstation from which the files were deleted and you want to copy them back to it, then the remote server is the source identity, and your system is the destination location. This is the pull option described earlier. The command looks like the following.
$ rsync -a [email protected]:/home/student/*.txt /home/student/projects
Synchronize changed files and other helpful functions
The real power of rsync is that it only synchronizes changed files based on timestamps and file sizes. The easiest way to demonstrate this is to conduct a file transfer using the above examples, then create a new file in the /projects directory and rerun the command. You can also simulate changes by using the touch command to update a file's timestamp after the initial transfer.
Since rsync is not designed as a disaster recovery tool, it doesn't have discrete backup and restore functions. However, it's easy to create and schedule a script that incrementally transfers changed files from one system to another using rsync and an existing SSH key-based authentication infrastructure. And because rsync identifies changed files, it makes the transfer more efficient.
Another choice is to use rsync as the transfer mechanism for other Linux backup tools, such as cpio or tar. These tools can bundle and compress files, which rsync then transfers across the network.
Pay attention to the results when using -- or not using -- the trailing slash in the source path. If you don't include the / character, the directory and its contents are synchronized. Including the / causes only the directory's contents to be transferred.
Damon Garn owns Cogspinner Coaction and provides freelance IT writing and editing services. He has written multiple CompTIA study guides including the Linux+, Cloud Essentials+ and Server+ guides, and contributes extensively to TechTarget Editorial and CompTIA Blogs.