Getty Images
Tutorial: How to use Linux Deja Dup to back up and restore files
Deja Dup isn't advertised as a backup tool, but that doesn't mean you can't use it for data protection. Find out how to use Linux Deja Dup for backup and restore in this tutorial.

Deja Dup is a Linux backup program aimed at end users, whether in a corporate environment, small business or home. It integrates into the user session, allowing users to manage the backup of personal files. Specifically, Deja Dup does not back up the full system or files to which the current user does not have access.
Deja Dup is part of the GNOME offering. It is open source and runs well on most common Linux distributions. GNOME is a development community responsible for one of the most popular Linux desktop environments and related applications. According to the community's mission statement, GNOME's goal with Deja Dup is to convert users who do not currently back up their files.
As such, Deja Dup is user-friendly and straightforward to use. It's built on duplicity and rsync, which are not as simple. Duplicity is a network backup utility. Rsync manages network file transfers, with the specific feature of only copying files that have changed. Deja Dup offers an easy graphical interface to these two powerful utilities.
This tutorial provides a scenario to demonstrate how to back up and restore files using Linux Deja Dup.
While not a full-scale, enterprise-wide backup tool, Deja Dup is still feature-rich. Here are some of its capabilities:
- Full and incremental backups.
- Automatic -- and configurable -- deletion of old backups.
- Encryption via GNU Privacy Guard.
- Cloud or disk backup destinations.
- Permissions retention.
- Built-in scheduler.
Getting started: Check for Deja Dup and create files
Begin by confirming that Deja Dup is installed on your Linux system. It might not be, so it's worth checking.
Select Backups from the system settings or search for the Backups application. The Deja Dup Overview console appears if it is installed. If no console appears, install Deja Dup using your distribution's package manager. Open a terminal console on your Linux computer and run the commands below to complete the installation, or complete the process using the GUI.
On Red Hat and similar distributions, type the following.
$ sudo dnf install deja-dupOn Debian and similar distributions, type the following.
$ sudo apt install deja-dupTo follow the backup and restore scenario of this tutorial, create some files using the following steps.
- Open your home directory.
- Create a folder named /projects.
- Navigate to the /projects folder.
- Create three text files: file1.txt, file2.txt and file3.txt.
- Add the following information to file1.txt: "File 1 Contents".
Or run the following commands to create the resources using Bash instead.
$ cd ~
$ mkdir projects
$ cd projects/
$ touch file1.txt file2.txt file3.txt
$ echo "File 1 Contents" > file1.txt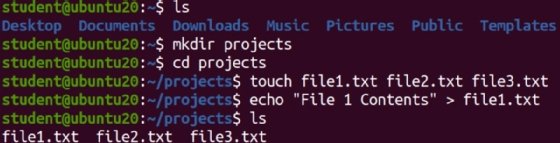
You created a folder named /projects in the home directory and populated it with three text files. These files represent user data you need to back up on the system.
Explore Deja Dup options
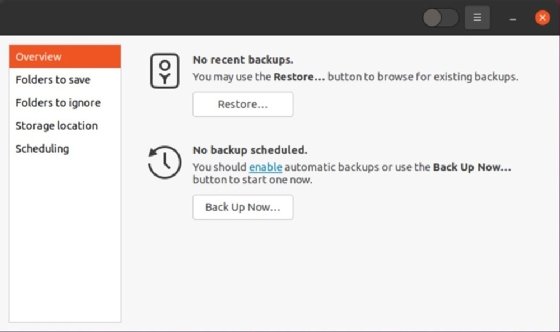
Deja Dup straddles the line between simplicity and functionality. When you first launch the program, it opens an overview window that summarizes current settings and provides a menu with options for additional configuration. Each pane is simple and does what it implies it will.
Enter "backups" in the Search function to find Deja Dup. Select the icon to open the program.

The user interface varies a bit between versions, but it contains the same general categories.
The Overview pane displays the current configuration and offers a few settings:
- Turn automatic backups on or off.
- Get a summary of the backup storage location, included and excluded folders, and information on scheduled backups.
- Restore button to initiate a restore process.
- Back Up Now button to start a backup process manually.
The Folders to save pane enables users to select one or more directories to back up.
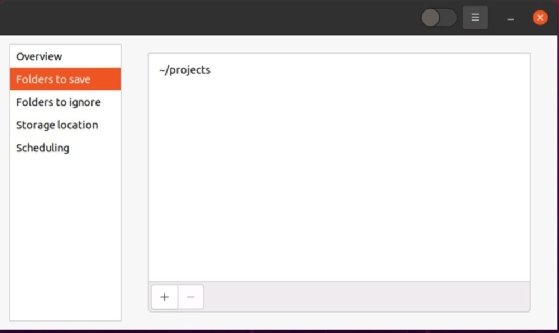
For this tutorial, select only the /projects folder. Otherwise, the backup exercise will consume a lot of time.
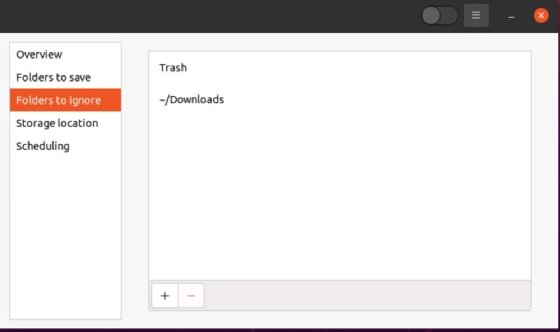
The Folders to ignore pane enables users to select one or more folders the backup job should skip.
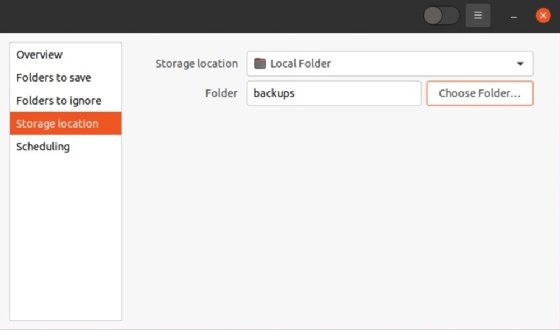
The Storage location pane provides a pull-down menu to select the backup's destination. Choices include your organization's cloud, Network Server and Local Folder. For the tutorial, choose Local Folder and create a folder to store your backups. Actual backups should be stored on a different drive or system from the original data.
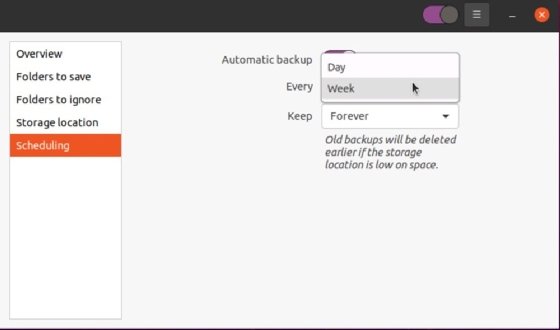
The Scheduling pane contains two pull-down menus to manage how frequently backups are run and deleted. Under How often to back up, choose if you want to back up every day or every week. The Keep pull-down offers various data retention choices, including six months, a year and forever.
Deja Dup automatically deletes older backups if drive space becomes scarce.
Back up your files
Once you've chosen the storage location, folders to save or ignore, and scheduling settings, you can conduct a manual backup or schedule an automated backup.
If you want to walk through the initial backup manually, select the Back Up Now option in the Overview pane. Deja Dup will run a backup of the selected /projects folder with the configured settings.
You'll see a progress bar that tells you the backup status and enables you to pause the backup. Note that the first backup is a full backup of all files, meaning that it will back up everything specified in the Folders to save pane. Once complete, future backups will be incremental. These backup jobs only grab the files that have changed since the last backup, making them far less time-consuming.

Deja Dup will prompt you for a password if you want to encrypt the backup job. You don't have to do this, but it's a good idea if you don't control the storage location, such as with cloud storage. Do not lose or forget this password. Deja Dup adds this information to your keyring if you use the GNOME desktop.

Simulate a data loss
Make sure you have completed a full backup before continuing to the next step. This process shouldn't take long if you only selected the /projects folder for backup.
Next, open the /projects folder and delete the three text files. This task simulates a data loss, similar to accidental deletion, corrupted files or a failed storage disk.
If you prefer using the terminal, carefully run the below command in the /projects directory. The following command will delete all files in the directory with the .txt file extension.
$ rm -f *.txt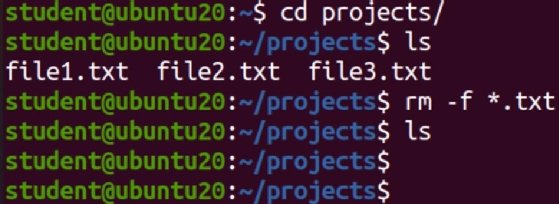
You just deleted your three text files. Browse to the /projects folder or use the ls command in the terminal to confirm that the files are gone.
If Deja Dup ran as it should, you have a backup of the files.
Restore your files
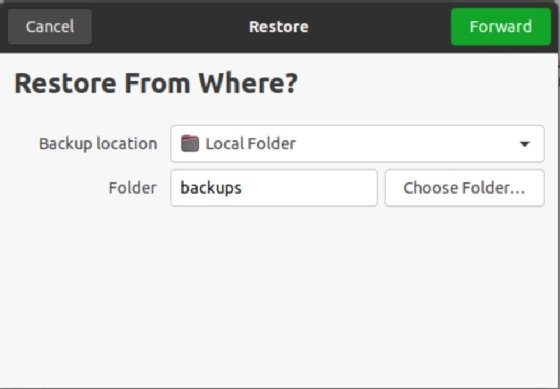
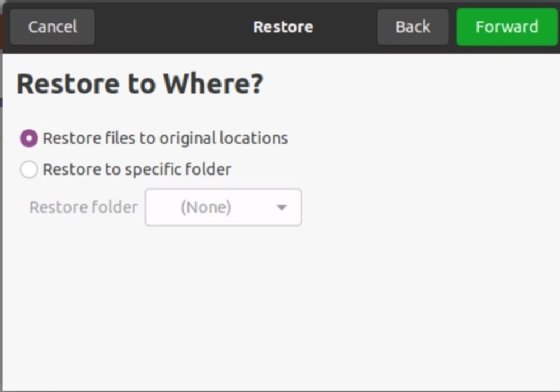
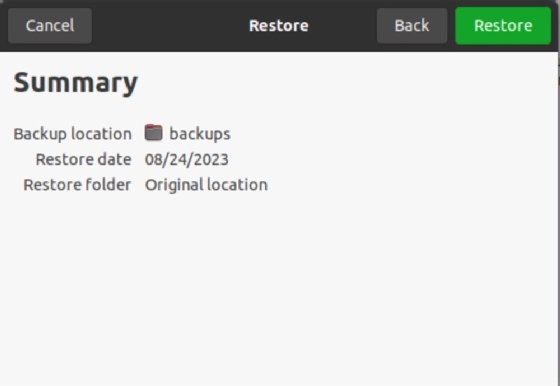
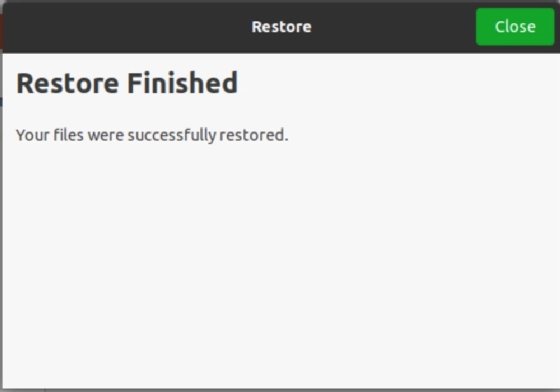
Now it is time to recover your deleted files with Deja Dup. Launch Deja Dup. The Overview pane contains a Restore button. The interface displays the default backup storage location. You can browse to other locations, if necessary. You can also select the date from which the restore process should operate and the destination restore location. Finally, Deja Dup prompts you to enter a password if you protected the backup job with one.
The restore process might take a significant amount of time if there is a lot of data or if the storage media is slow.
The following screenshots show the restore process, including where to restore from, backup dates, restore destination and a summary.

Restore a single file
The process for restoring a single file is different from a complete restore. Select a file in the file explorer, go to the Edit menu and choose Revert to Previous Version. This is a great feature for times when you accidentally delete a file or wish you hadn't made changes to the content.

Another option is to select a directory, and then in the File menu, choose Restore Missing Files. Deja Dup prompts you to select the files to restore to the directory.

Damon Garn owns Cogspinner Coaction and provides freelance IT writing and editing services. He has written multiple CompTIA study guides including the Linux+, Cloud Essentials+ and Server+ guides, and contributes extensively to TechTarget Editorial and CompTIA Blogs.