
Getty Images/iStockphoto
Tutorial: How to use tar to back up and restore files in Linux
This tutorial walks users through using the Linux tar utility. Readers will learn a few commands to create files, then how to back up and restore them.

The tape archiver utility is widely used in the Linux world. Referred to as tar, it is useful for backing up and restoring files quickly and easily.
The tar command is useful for several purposes. These include the following:
- Standard file backup.
- Standard file restoration.
- Bundling files to transfer across a network.
- Bundling files for easier consumer downloads.
Typically, Linux users refer to the latter two -- bundled files that might also be compressed as archives. Tar operates based on two complementary functions: creating archives and extracting files. Creating archives, or tarballs, involves copying files into a group as a backup or for transfer. Extracting involves copying files out of a group to a directory. It can be helpful to think of creating tarballs as the backup function and extracting files as the restore function.
Users can combine tar with various compression utilities to help make tarballs easier to manage.
Create files
Begin by confirming that tar is installed on your Linux system. It almost certainly is, but it's worth checking.
Open a terminal console on your Linux computer -- any distribution. Type the following command.
$ which tarYou should see output indicating that tar exists on the system. The output reads /usr/bin/tar on most systems.
If necessary, use your distribution's package manager to install tar.
On Red Hat and similar distributions, type the following.
$ sudo dnf install tarOn Debian and similar distributions, type the following.
$ sudo apt install tarNext, run the following commands to create a few resources to work with.
$ cd ~
$ mkdir projects
$ cd projects/
$ touch file1.txt file2.txt file3.txt
$ echo "File 1 Contents" > file1.txt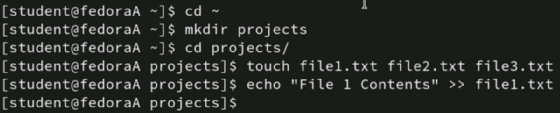
You have now created a directory named projects in the home directory and populated it with three text files. In this example, these resources represent user data that you need to back up on the system.
Back up and archive your files with tar
To begin using tar, create an archive and copy the three text files into it.
Here are the relevant tar options to create an archive.
| Option | Description |
| -c | Creates the file archive. Think of it as the backup command. |
| -v | Returns output when the tar command completes. It is not necessary, but it can be nice to see what files the command copied into the archive. |
| -f | Specifies that the next object in the command is the archive. Required. |
| -r | Appends more files to an existing archive. |
Ensure you're in the projects directory, then type the following command to create an archive named backup.tar.
$ tar -cvf backup.tar *.txt
The above command creates the backup.tar archive, copies any file containing the .txt extension and displays the names of the files copied. The command would have worked fine without the -v option.
The -r option adds files to an existing archive. For example, if you created an archive containing three files and then realized you'd forgotten a fourth file, you could add the fourth file by using the -r option.
$ touch file4.txt
$ tar -rf backup.tar file4.txt
In some cases, you might need to exclude specific files from being included in the archive. The --exclude {filename} option causes tar to avoid the specified file.
At this stage of a typical backup, you might copy those files to another storage disk or cloud to protect them from corruption, deletion or additional changes. For the purpose of this exercise, assume you copied the files over to your preferred secondary storage method.
Simulate a data loss
You now have a backup of your text files. Carefully run the following command in the projects directory.
$ rm -f *.txt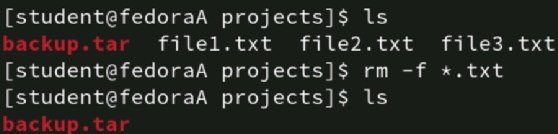
Imagine that you accidentally deleted the three text files. Use the ls command to confirm that the files are gone.
Because you've used the tar command, you have a backup of the files and can restore them. Assume that you've copied the backup.tar archive from your secondary storage location and are ready to extract your text files from it.
Restore your files with tar
Restoring files with tar is straightforward. The process copies the files from the archive to the destination location. Extracting the files does not destroy the archive; it is a copy action.
Begin by displaying the contents of the backup.tar tarball. Use the -t option, as seen below.
$ tar -tf backup.tar
Viewing the contents of the archive is useful when you have multiple backups and aren't sure which archive contains the files you wish to restore.
Once you've determined that you have the right archive, you can restore the files. Here are the two key options to do so.
| Option | Description |
| -x | Extracts the files from the archive to the current directory. |
| -f | Specifies that the next object in the command is the archive. Required. |
You can use the -v option again to display the files extracted.
To restore all files from the tarball, type the following.
$ tar -xf backup.tar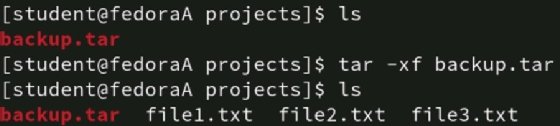
Use the ls command to display the directory contents. You should see the three text files you've archived as shown in Figure 5. Type cat file1.txt to confirm that the file's content exists.
Restore a single file
If you're only trying to restore one file, simply specify the file name in the command.
For example, to restore only the first text file, type the following.
$ tar -xf backup.tar file1.txt
Use the ls command again and observe that the backup.tar file still exists. The extract process copied the text files from the archive. The archive remains a valid backup source.
Use compression with tar
If you're working with just a few files, compression isn't necessary. For larger backup jobs, you can compress the files by adding the -z option to use GNU Zip, or gzip.
For example, to create the archive and compress the files, type the following command.
$ tar -cvzf tarball.tar.gz *.txt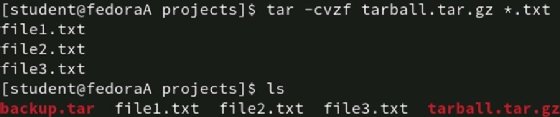
Most administrators append the .gz file extension to the archive name when using gzip.
Note the size differences between the compressed and uncompressed archives in the following screenshot.

Use the same -z option with extract to uncompress the archive during the restore process.
$ tar -xzf tarball.tar.gzTar archives, whether as backup jobs or file bundles, enable more efficient file transfers for Linux users. To get the most out of tar, practice the above situation a few times to ensure you can back up and restore the test files before using it on your own data.
Try backing up your home directory using different compression tools to see which is most efficient. They often vary by file type, such as images or text files. Don't forget to use the Linux manual page, or manpage, to learn about many more powerful tar options.
Home users and sys admins can benefit from scripting tar too. Create a simple Bash script that backs up your home directory and copies it to another location. Don't forget to use cron or systemd timers to schedule backup jobs. Many Linux users find that devices such as Raspberry Pi computers work great as file servers to store backup jobs.
Damon Garn owns Cogspinner Coaction and provides freelance IT writing and editing services. He has written multiple CompTIA study guides including the Linux+, Cloud Essentials+ and Server+ guides, and contributes extensively to TechTarget Editorial and CompTIA Blogs.