
Gajus - Fotolia
Design a custom Hyper-V Integration Services component
The steps for creating a new component of Hyper-V Integration Services include registering an app, creating and binding a Hyper-V socket, and compiling server and client apps.

Designing a custom Hyper-V Integration Services component requires programming knowledge on Windows sockets and binding, but you should familiarize yourself with Integration Services requirements before creating a new component.
Hyper-V Integration Services enables VMs to communicate with other VMs running on local hosts, remote hosts and external devices via a Microsoft Virtual Machine Bus (VMBus) communication channel. A VMBus channel in Hyper-V enables direct communication with target devices, which helps improve overall communication and reduces the time it takes to send and receive network packets.
Hyper-V provides Integration Services for functions such as online backup of VMs, the ability to shut down VMs from the host or tools, and Hyper-V time synchronization services to sync time from the host. However, you might want to extend the Integration Services capability based on your requirements.
For example, you might want to add a few automation tasks for VMs to a recently purchased tool. Starting with Windows 10, Microsoft provides a way to create your own Integration Services component using Windows socket-based programming. In other words, you can create a socket-based connection between the Hyper-V host and VMs and enable VMs to accept commands executed by the application via the socket-based connection.
As to the requirements, there are a few items you must have in place. Designing a custom Integration Services component is only supported on Windows Server 2016 Hyper-V hosts, and the supported guest OSes must run Windows 10 or Windows Server 2016.
Apart from the OS, you must install a C++ compiler and the Windows software developer's kit. You must also have programming knowledge or a developer who can follow the guidelines to design the custom Hyper-V Integration Services component.
Steps to create a Hyper-V Integration Services component
The steps for creating your own Hyper-V Integration Services component include registering a new application with the Hyper-V host, creating a Hyper-V socket, binding the socket, and then compiling both the server and client applications to generate the required executable files.
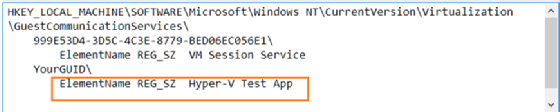
Step 1: Register the application with the Hyper-V host. Running the PowerShell commands below registers a new application with the Hyper-V host.
$AppName = "HyperV Test App"
$AppService = New-Item -Path "HKLM:\SOFTWARE\Microsoft\Windows NT\CurrentVersion\Virtualization\GuestCommunicationServices" -Name ((New-Guid).Guid)
$AppService.SetValue("ElementName", $AppName)
Write-Host "App GUID: " $AppService.PSChildName
The first command above is a variable that stores the user-friendly name of the application. The second command creates a new registry entry on the Hyper-V host and a new global unique identifier (GUID). Note that a Windows application is identified using a GUID, so you need a GUID for the new application you're registering. The last command above shows the application GUID. Copy the application GUID for later use.
Step 2: Create the Hyper-V socket. The next step is to create a Hyper-V socket for the application. When creating a Hyper-V socket, you must provide the address family, connection type and a protocol.
For a Hyper-V socket-based application, the address family is AF_HYPERV, the connection type is SOCK_STREAM and the protocol is HV_PROTOCOL_RAW. Open a C or C++ compiler and enter the code below to create the socket:
SOCKET sock = socket(AF_HYPERV, SOCK_STREAM, HV_PROTOCOL_RAW);
Step 3: Bind the application to the Hyper-V socket. The next step is to bind the application to the Hyper-V socket, which requires you to specify some Hyper-V-related binding information.
For example, when binding to the Hyper-V socket, you must use AF_HYPERV as the socket address, which actually uses the VM ID for communication. The application ID must be specified in the binding function to ensure the application ID can establish a connection with the VMs.
To mention the VM ID in the binding function, use the PowerShell code below:
$ThisVM = Get-VM -Name "TestVM"
$ThisVM.ID
Step 4: Compile and test the application. Assuming you've written code for the server side and client side in the C++ compiler, it's time to compile both programs and generate the necessary executables.
Once you generate the executables, the server side executable runs on the Hyper-V host running Windows Server 2016 or later, and the client side executable runs on the VM for which the ID is specified in the binding function. Every VM that needs to participate in the application must have its ID specified in the binding function.