
Getty Images
Use MicroK8s with Raspberry Pi in this tutorial
Kubernetes is important to tackle, but its resource requirements can balloon dramatically. MicroK8s lets individuals experiment with the platform -- try it on Raspberry Pi 4.

MicroK8s is Kubernetes' baby brother. It is designed for small-scale Kubernetes experimentation on local VMs or machines with scant resources. Raspberry Pi computers can run MicroK8s with a much smaller memory footprint and constrained resources due to its size.
Both MicroK8s and Raspberry Pi are small options, but together they enable IT ops admins to distribute Kubernetes quickly and stand up VMs.
Prerequisites to run MicroK8s with Raspberry Pi
To run MicroK8s with decent performance requires a Raspberry Pi 4 with 8 GB RAM. MicroK8s installs on a Raspberry Pi 3, but performance renders it unusable.
To save time, use a high-quality power adapter for the Raspberry Pi that meets or exceeds the power requirements and a Class 10 SD card. Any swap space will use this card, and MicroK8s on Raspberry Pi will use a lot of swap, so ensure you have a good SD card.
This tutorial uses Ubuntu LTS to run MicroK8s with Raspberry Pi. Download the Ubuntu Server image for Raspberry Pi and write it out to the memory card. Ubuntu also provides an imager tool to download and write the images. The default username and password are ubuntu, and it will prompt users to change the password on first login.
Log in to Raspberry Pi using the SSH command on Linux or Putty with Windows, and update the existing infrastructure with the command below.
sudo apt-get update && sudo apt-get upgrade -y
Before installing MicroK8s, users must tweak the Pi-based systems by editing the cmdline file in the SSH session, as seen below.
sudo vi /boot/firmware/cmdline.txt
Append the following code to the existing line.
cgroup_enable=memory cgroup_memory=1
Reboot -- sudo reboot -- to apply the modified configuration. To install MicroK8s, use the snap install tool.
sudo snap install microk8s --classic --channel=1.21/stable
To assign rights to manage MicroK8s, add the user to the newly created Docker user group.
sudo usermod -a -G microk8s $USER
sudo chown -f -R $USER ~/.kube
Before making any major changes, ensure MicroK8s functions as expected with the following command.
microk8s status
A similar, more in-depth command is microk8s inspect, which checks the system status and certificates, and highlights any issues. If necessary, stop the MicroK8s service by using the command microk8s stop.
One of the key services required to run MicroK8s is DNS resolution. Use the following command to enable the DNS plugin.
microk8s enable dns
Users can also enable the MicroK8s GUI dashboard, but given the resources available, it might not be necessary. To enable it, use the following command.
microk8s enable dashboard
To disable the GUI dashboard, use microk8s disable followed by the service name. At this point, the user should have a single MicroK8s server for deployments. This deployment example creates a simple Nginx server deployment.
microk8s kubectl create deployment nginx --image=nginx
If the user has multiple Pi 4s, the MicroK8s cluster can be made multinode for more flexible options.
How to add additional nodes
Adding additional MicroK8s nodes is straightforward and provides more resources to experiment with. The ideal node count is three. MicroK8s uses a master/agent arrangement. On the master node, perform the following command.
microk8s.add-node
The next command generates a string to join the second node to the cluster being created.
microk8s.join <connection string from previous command>
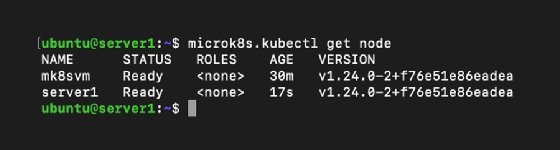
To ensure the nodes are joined correctly, use microk8s.kubectl get node. It should produce something like Figure 1. Repeat this process to add additional nodes.
To avoid manual logins to multiple MicroK8s servers -- for example, to update the software -- use SSH keys so that users can log in securely without a password.
On a local workstation, use the command ssh-keygen to generate a public and private key pair. When prompted for a password to protect the public key, press Enter. This creates a key pair that is not password protected, so anyone with the private key can log in. This is bad practice in general, but safe in this tutorial.
Copy the public SSH key using ssh-copy-id [email protected] or whatever your Pi 4's IP is. Repeat for any other Pi machines. If users log in using SSH, it will no longer prompt for a password.