
Getty Images/iStockphoto
How to install Cockpit for Linux
Linux admins will need to use some of these commands to install Cockpit and configure firewalls. Admins can also connect to one or more servers through Cockpit via these steps.

While many Linux administrators work primarily with the command line interface, not every Linux admin is so confident with commands. Sysadmins with a Windows background or technicians that manage IoT devices may be more comfortable with a GUI such as Cockpit.
Cockpit provides a graphical view of virtually all the monitoring tools admins might need and supports services such as virtualization and containerization. To install Cockpit, there are many installation options and multi-server use cases, including key-based authentication. Red Hat sponsors Cockpit, but it readily supports non-Red Hat-based distributions.
Install options
Cockpit is a basic service, so no installation or distribution-specific concerns exist. Admins can install Cockpit on each Linux server they wish to monitor. The client side of the connection is a web browser.
Admins using distributions such as Red Hat Enterprise Linux, Fedora and CentOS can run the following installation command to install Cockpit.
# dnf install -y cockpit
If using distributions such as Ubuntu or Debian, use this command instead.
# apt install cockpit
Arch Linux admins will need to run the pacman command to install Cockpit.
# pacman -S cockpit
Admins may need to use sudo to run the installation commands. Don't forget to check the status using systemctl. Admins may need to both start and enable Cockpit.
# systemctl start cockpit

# systemctl enable cockpit.socket
Ensure the account you intend to use with Cockpit has sudo privileges.
How to create a Cockpit firewall
Configure the firewall on the remote systems to allow Cockpit connections. Cockpit uses TCP port 9090. Some firewalls will recognize Cockpit as a service by name. For example, to permit Cockpit connections in the public zone using a firewall, type the following.
# firewall-cmd --permanent --zone=public --add-service=cockpit
# firewall-cmd --reload
Browsers Cockpit supports
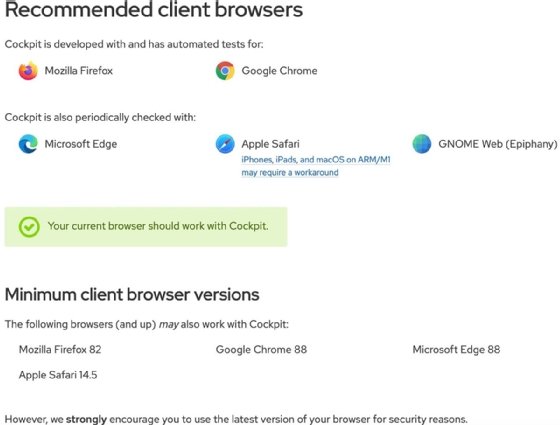
Once admins install Cockpit on their distribution, they can connect to it using virtually any web browser. Specifically, Firefox, Chrome, Edge and Safari all work with Cockpit. In some cases, newer web browser versions may not work well with older versions of Cockpit, so maintain a current version of Cockpit on Linux servers.
The Cockpit Project installation page tracks recommended browser versions.
One particularly interesting use case is Raspberry Pi management via Cockpit. Install Cockpit on admins' Pi devices by issuing the following command.
sudo apt-get install cockpit.
How to connect to one server with Cockpit
To connect to a remote Linux server with Cockpit, open a browser on the device from the device where the user manages the remote server, enter "https://IP address" and specify TCP port 9090.

Cockpit prompts admins to authenticate with an account and password the remote system recognizes.
Once connected, admins have access to the Cockpit interface, including many consoles:
- System.
- Logs.
- Storage.
- Networking.
Cockpit is extensible, so admins can add Cockpit applications to administer containers and virtual machines. Check the Cockpit Applications site for more information.
Users can even access the remote system's terminal. Admins can run Bash commands if the standard consoles don't provide the information or features admins need.

Admins will notice a limited access warning banner the first time they log in. Select this and enter your password to gain administrative access (assuming your account has delegated sudo privileges).

How to connect to multiple servers with Cockpit
There are a couple of ways to set up connections to multiple servers. The easiest way is to install Cockpit on the same Linux system from the device admins want to connect to the remote servers.
For example, suppose you use a laptop with Fedora installed as your day-to-day workstation. It already has a browser, so the client side is covered.
Next, install Cockpit on the local system. Use the browser as the interface to it. Within the main Cockpit page is a dashboard console.
Admins can add multiple remote Cockpit servers to the dashboard, which provides them with an easy tool to connect to the systems.
Here's a summary of the process and the relevant settings on a local admin computer:
- Install Cockpit on the local system, such as the Fedora laptop in the prior example. Be sure Cockpit is enabled and started.
- Open a browser and connect to "http://localhost:9090." You will connect to the local Cockpit instance.
- Install Cockpit on all remote servers, start and enable the service, and configure the firewalls to permit TCP port 9090.
- Ensure the Secure Socket Shell (SSH) service is running on the remote servers. Use systemctl start sshd and systemctl enable sshd if necessary.
- Add the SSH public key for the account you will use to connect.
- Add remote servers to the dashboard.
- Test your remote connections.
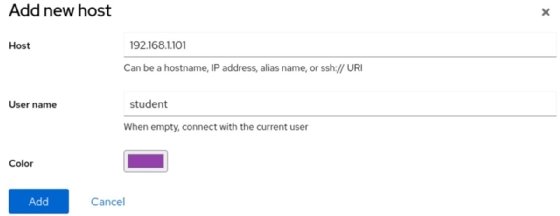
To add remote servers to the dashboard, select the drop-down arrow in the upper left of the Cockpit interface. A menu appears with the option to Add new host.

Select this option and specify the hostname or IP address of the target remote server.
Note that if this process fails with the error "Cockpit could not contact the given host," ensure SSH is running on the remote device.
Cockpit prompts admins to establish credentials for SSH key-based authentication. With modern support for SSH key-based authentication, it fits well within the scope of security policy. Specify an existing key or generate a new one.
There are two steps to this process.
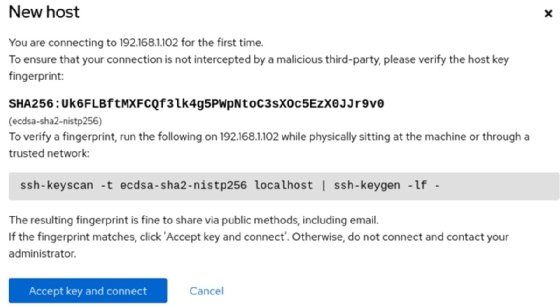
First, admins are notified that this is the first time they have connected, and they are prompted to verify the key fingerprint. Select Accept key and connect.
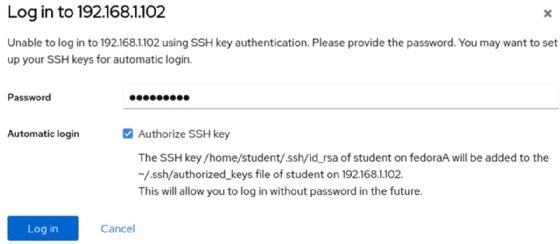
Next, admins are prompted for a password and given the option to create and authorize a new SSH key. Check the box. Admins may set a password for the key if they wish. Choose Log in to complete the process.
Connect to the remote servers directly from the dashboard. Admins won't be prompted for a password when they connect to a remote server. Instead, the system uses key-based authentication to verify the connection.
Cockpit enables admins to assign colors to various connections. This visual cue helps admins know which remote system they are connected to.
Select the Edit hosts button in the dashboard to edit or remove existing connections. Admins can update hostnames, IP addresses and color blocks in this interface.