How to configure and customize Kali Linux settings
Learning how to use Kali Linux for ethical hacking and penetration testing? Read step by step how to configure and customize the distribution.
Penetration tests help determine whether vulnerabilities and weaknesses are present in corporate systems. An array of pen testing tools are available, including the Kali Linux distribution, which provides everything an ethical hacker needs to effectively test a company's systems.
In Mastering Kali Linux for Advanced Penetration Testing, author and security practitioner Vijay Kumar Velu provides in-depth instructions on how to test a network with Kali Linux. Readers will learn how to select the best tools from the distribution to compromise security, while remaining undetected by services or users.
For those starting out with Kali Linux, follow along with the excerpt from Chapter 1 of Mastering Kali Linux to learn how to organize and customize Kali Linux settings for the first time. Download a PDF of Chapter 1 here.
Check out a Q&A where Velu explained how pen testers of all experience levels can use his book, why Kali Linux is worth using for offensive security and more.
Organizing Kali Linux
Installation is just the beginning; organizing Kali Linux is a very important next step. In this section, we will explore the different ways in which our Kali Linux can be organized through customization.
Configuring and customizing Kali Linux
Kali is a framework that is used to perform penetration testing. The tester, however, should never feel tied to the tools that have been installed by default, or by the look and feel of the Kali desktop. By customizing Kali, a tester can increase the security of client data that is being collected and make it easier to perform a penetration test. Common customization options that can be made in Kali include the following:
 Learn more about
Mastering
Learn more about
MasteringKali Linux for Advanced
Penetration Testing here.
- Resetting the Kali password
- Adding a non-root user
- Configuring network services and secure communications
- Adjusting network proxy settings
- Accessing the secure shell
- Speeding up Kali operations
- Sharing folders with Microsoft Windows
- Creating encrypted folders
Let us now take a further look at these options.
Resetting the default password
If you downloaded the preconfigured VMware or VirtualBox image, the default username and password to access Kali Linux is kali. It is recommended to change the default password; to do so, run the following command in the Kali Linux terminal:

You will then be prompted to enter a new password, and then to confirm it.
Configuring network services and secure communications
The first step to ensure that we are able to access the internal network is to make sure that it has connectivity to either a wired or wireless network to support updates and communications. You may need to obtain an IP address through Dynamic Host Configuration Protocol (DHCP) by appending a network configuration file and adding an Ethernet adapter to it, in the form of the following commands from the Kali Linux terminal:

Once the network configuration file is appended, you should be able to bring up the ifup script to automatically assign the IP address, as displayed in Figure 1.28:

In the case of a static IP, you can append the same network configuration file with the following lines and quickly set up a static IP to your version of Kali Linux:
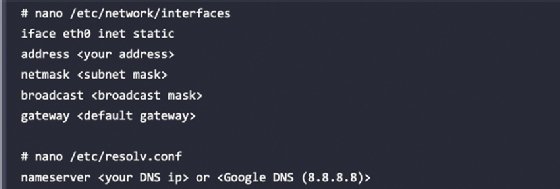
By default, Kali starts with the DHCP service enabled. Doing so announces the new IP address to the network, which may alert administrators to the presence of the tester. For some test cases, this may not be an issue, and it may be advantageous to have certain services start automatically during boot-up. This can be achieved by entering the following commands:

Kali installs with network services that can be started or stopped as required, including DHCP, HTTP, SSH, TFTP, and the VNC server. These services are usually invoked from the command line; however, some are accessible from the Kali menu.
Adjusting network proxy settings
Users located behind an authenticated or unauthenticated proxy connection must modify the bash.bashrc and apt.conf files. Both files are located in the /etc/ directory. Edit the bash.bashrc file, as the following shows, using a text editor to add the following lines to the bottom of the bash.bashrc file:

Replace proxyIP and port with your proxy IP address and port number, respectively, and replace the username and password with your authentication username and password. If there's no need to authenticate, write only the part following the @ symbol. Save and close the file.
Accessing the secure shell remotely
To minimize detection by a target network during testing, Kali does not enable any external listening network services. Some services, such as SSH, are already installed. However, they must be enabled prior to use. Kali comes preconfigured with default SSH keys. Before starting the SSH service, it is a good idea to disable the default keys and generate a unique keyset for use, as the following code shows. Move the default SSH keys to a backup folder, and then generate a new SSH keyset using the following command:

To confirm the SSH service is running, you can verify this by using the command sudo service ssh status.
Note that with the default configuration of SSH, root login will be disabled. If you require access with the root account, you may have to edit /etc/ssh/sshd_config and set PermitRootLogin to yes, save, and then exit. Finally, from any system on the same network, you should be able to access the SSH service and utilize Kali Linux. In this example, we use PuTTY, which is a free and portable SSH client for Windows. Now you should be able to access Kali Linux from another machine, accept the SSH certificate, and enter your credentials.
Speeding up Kali operations
Several tools can be used to optimize and speed up Kali operations:
- When using a VM, install its software drive package, either Guest Additions (VirtualBox) or VMware Tools (VMware).
Note: We have to ensure that we run apt-get update before the installation.
- When creating a VM, select a fixed disk size instead of one that is dynamically allocated. It is faster to add files to a fixed disk, and there is less file fragmentation.
- By default, Kali does not show all applications that are present in the startup menu. Each application that is installed during the boot-up process slows the system data and may impact memory usage and system performance. This can be performed by the following commands in the terminal:
- To list all the startup services at bootup, type sudo systemctl list-unit-files --type=service in the terminal and you can choose to disable the unwanted services by running sudo systemctl disable --now <nameoftheservice>
- Finally, you can list the enabled services by running sudo systemctl list-unit-files --type=service --state=enabled --all in the terminal
Sharing folders with the host operating system
The Kali toolset has the flexibility to share results with applications residing on different operating systems, especially Microsoft Windows. The most effective way to share data is to create a folder that is accessible from the host operating system as well as the Kali Linux VM guest. When data is placed in a shared folder from either the host or the VM, it is immediately available via the shared folder to all systems that access that shared folder. To create a shared folder, perform the following steps:
- Create a folder on the host operating system. In this example, it will be called kali_Share.
- Right-click on the folder and select the Sharing From this menu, select Share.
- Ensure that the file is shared with Everyone and that Permission Level for this share is set to Read/Write.
- If you haven't already done so, install the VMware tools/Virtual Box Guest additions onto Kali Linux, respectively.
- When the installation is complete, go to the VMware player menu and select Manage and click on Virtual Machine Settings. Find the menu that enables Shared Folders and select Always Enabled.
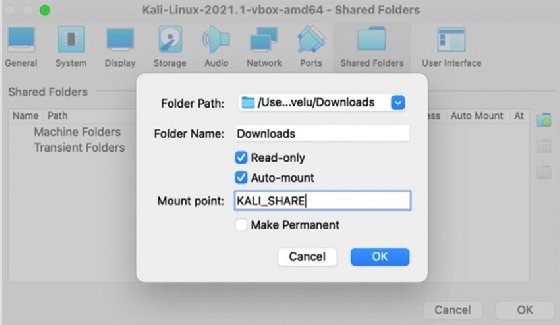
- In the case of Oracle VirtualBox, select the VM and go to Settings and select Shared Folders, as shown in Figure 1.29:
![screenshot of Kali Linux mounting a shared drive]()
Figure 1.29: Mounting a shared drive from the original operating system to the guest operating system
Note: Please note that older versions of VMware Player use a different menu.
- Now the folder should be automatically mounted to the /media/ folder, as shown in Figure 1.30:
![screenshot showing success mounting of shared drive to Kali Linux virtual machine]()
Figure 1.30: Successful mounting of the shared drive to the Kali Linux VM - Everything placed in the folder will be accessible in the folder of the same name on the host operating system, and vice versa.

The shared folder, which will contain sensitive data from a penetration test, must be encrypted to protect the client's network and reduce the tester's liability should the data ever be lost or stolen.
Editor's note: This article was updated to improve the reader experience.
About the book author: Vijay Kumar Velu, author of four IT security books, holds a number of security certifications and is licensed penetration tester with two decades of industry experience.