Getty Images
How to set up kiosk mode for iPad and other OSes
Tablet-based kiosks have become an increasingly popular tool for customer self-service. Organizations managing multiple kiosks need to understand how to set up kiosk mode.
Tablets have shown significant utility as self-service kiosks in recent years, extending MDM to another business use case.
Modern tablets let organizations create kiosks that IT can restrict to one or multiple apps. Self-service tools, such as office visitor sign-ins, have become increasingly important for some businesses, especially retail and other front-office jobs.
Whether an organization is adopting tablet kiosks for the first time or enrolling new devices into an existing workflow, it's important to understand how to set up kiosk mode.
For an efficient and cost-effective kiosk deployment, enterprise decision-makers must find the right setup method. This means finding a method that fits with the size of their organization, the types of devices they plan to use and their IT team's strategy.
How to set up kiosk mode for iPad
To set up kiosk mode for iPad, IT can use the built-in Guided Access feature or Single App Mode, which can lock the device to a single app and restrict access to certain features.
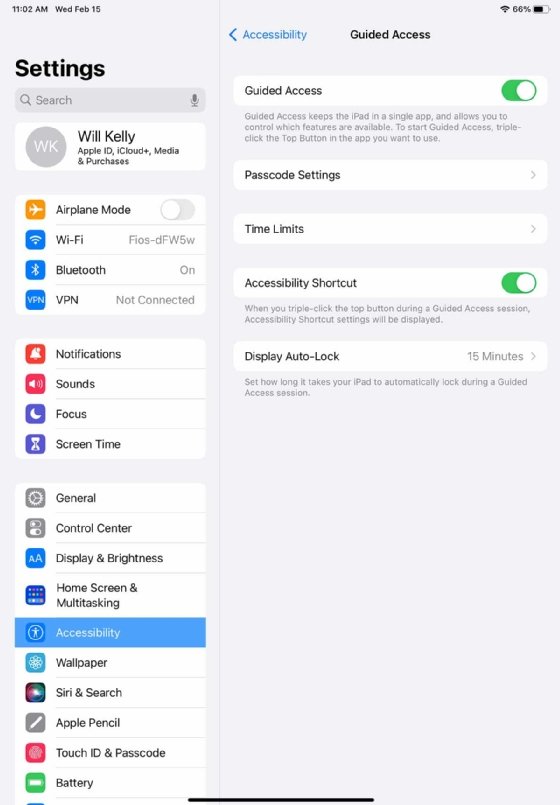
To set up kiosk mode for iPad using Guided Access, use the following steps:
- Open the Settings app.
- Tap Accessibility > Guided Access.
- Flip the switch to turn on Guided Access.
- Enable Passcode Settings and select Guided Access Passcode or Touch ID.
- Optionally, set Time Limits to play a sound and have the time remaining spoken.
- Optionally, toggle Accessibility Shortcut to let users triple-click the Home button during a Guided Access session to display Accessibility Shortcut settings.
- Set Display Auto-Lock to how long before the iPad will lock automatically during a Guided Access session.
- Open the iPad app that the kiosk will be restricted to, such as Safari.
- Triple-tap the Home button to begin Guided Access. Or, on newer devices without a Home button, press the side button three times.
IT can use Single App Mode to set up supervised devices as kiosks. The Apple supervision setting lets IT apply very specific controls on managed devices, helping to ensure security and MDM compliance. Organizations manage these devices through Apple Configurator, Apple Business Manager or Apple School Manager.
Single App Mode is only available for supervised devices, and IT must use an MDM server or Apple Configurator for Mac to set it up and turn it off.
The steps to set up a kiosk on a supervised iPad through Single App Mode vary based on the MDM platform. However, in Apple Configurator, admins can use the following steps:
- Open the Apple Configurator on a Mac computer.
- Select the devices chosen to be kiosks.
- Control-click the selected devices and tap Actions > Advanced > Start Single App Mode.
- Select the app that the kiosk will be restricted to.
- To view and customize the features available in Single App Mode, select Options. After making any customizations, click Apply and Select App.
How to set up kiosk mode on Windows 10 or Windows 11
Windows 11 supports a few different kiosk configurations and setup methods. Assigned Access is a feature that enables IT to set up a device as a single-use kiosk or as a restricted user experience, which is Microsoft's term for a multi-app kiosk.
Admins can set up Assigned Access locally through Settings, through PowerShell, in Windows Configuration Designer, or through Microsoft Intune or another MDM platform. The local Settings option is only available for single-app kiosk mode, however.
Other options to keep in mind include Shell Launcher and Microsoft Edge kiosk mode. With Shell Launcher -- which also only works for single-use kiosk mode -- IT chooses an app to replace the default Windows shell that usually runs when a user signs in. Microsoft Edge kiosk mode is a specialized browser mode for single-purpose devices, such as digital signage stations and self-service terminals. It lets IT restrict a device to show only a website or a specific webpage, such as the patient sign-in at an urgent care office.
To set up Windows 11 kiosk mode locally, use the following steps:
- Create a new local user account for kiosk mode to lock access to other systems.
- Open Settings and navigate to Accounts.
- Select Other Users or Family and other users.
- Navigate to Set up a kiosk and click Get started. Follow the prompts and directions to enter a name for the new account and choose an app that will run when the kiosk account signs in.
- Select Close.
To set up Windows 10 kiosk mode using Windows Configuration Designer, take the following steps:
- Create a new local user account for the kiosk mode to help seal off other parts of the system from users attempting to access the kiosk.
- Assign the new account to the kiosk role.
- Set the kiosk account to auto-login at startup.
- Configure the kiosk account to launch a specific application, such as a web browser or custom application.
- Configure the kiosk account to have limited access to the system. This might mean disabling the taskbar, start menu and keyboard shortcuts, for example.
- Set up a security measure, such as a password or PIN required to exit kiosk mode.
- Test the kiosk mode configuration to ensure it works as expected.
- Deploy the kiosk mode configuration on all devices you want to use in kiosk mode.

How to set up kiosk mode on Android
Setting up kiosk mode on Android devices can be done through MDM or a kiosk management app. Popular kiosk management apps for Android include KioWare, Hexnode Kiosk Browser and SureLock.
To set up Android kiosk mode with a kiosk management app, use the following steps:
- Install the chosen kiosk app on the device. These apps let IT lock the device to a specific app or set of apps and restrict access to other parts of the device.
- Configure the kiosk management app to launch a specific app or set of apps when the device starts up.
- Disable the device's status bar, navigation buttons and notifications to prevent unauthorized users from accessing other parts of the device, such as the OS.
- Set a password or PIN code to let authorized users exit kiosk mode.
- Test the kiosk mode configuration to ensure it works as expected.
- Deploy the kiosk mode configuration on all devices chosen to be kiosks.
The steps might vary depending on the device and kiosk management app an organization uses. Some devices might also require additional configuration, such as setting up a managed profile or device owner mode to lock down the device fully.
Alternatively, IT can set up dedicated devices during Android Enterprise enrollment. This is a better option for enterprise organizations, as it provides more management controls. After selecting Dedicated as the enrollment profile type, admins can select either Single app or Multi-app from the Kiosk mode drop-down menu. From there, they can configure other customizations and security settings.
How to set up the Chromebook kiosk app
Chrome device management in Google Workspace lets IT configure and secure Chromebooks that act as kiosks. Other Chromebook management options include Cisco Meraki, Deep Freeze Cloud from Faronics, Hexnode and Kiosk Pro.
Remotely managing ChromeOS devices requires an organization to run the Chrome Enterprise Upgrade as part of Google Workspace. If an organization isn't running the upgrade, Google Workspace will prompt to start a free trial.
To enroll ChromeOS devices in Google Workspace, IT must use one of the following methods:
- Manual enrollment. This is a well-documented process, but it's the most time-consuming and requires a degree of technical expertise.
- Zero-touch enrollment. This is the most remote/hybrid worker-friendly method, and it requires IT to generate a token to pre-provision devices.
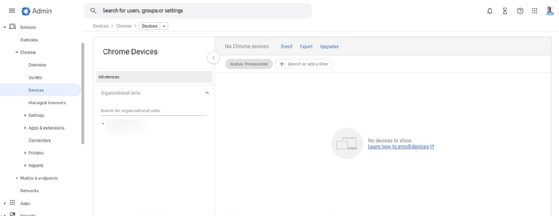
To set up a kiosk on a Chromebook, use the following steps:
- Enroll the Chromebook in ChromeOS device management by signing into the Google Admin console with the administrator account.
- Create a new Chrome device management policy for the kiosk.
- Configure the policy to do the following:
- Launch a specific app or website automatically when the device starts.
- Disable the status bar, keyboard and other features the kiosk doesn't require.
- Disable the Chrome browser and access to other apps and settings on the device.
- Enable a screensaver or lock screen to secure the kiosk when it's not in use.
- Test the kiosk mode configuration to ensure it works as expected.
- Deploy the kiosk mode configuration on all devices designated for kiosk mode.
Editor's note: This article was originally written by Will Kelly in April 2023. Katie Fenton updated and expanded this article in October 2025 to reflect changes in setup options and to improve the reader experience.
Katie Fenton is site editor for Informa TechTarget's SearchEnterpriseDesktop, SearchMobileComputing and SearchVirtualDesktop sites.
Will Kelly is a freelance writer and content strategist who has written about cloud, DevOps, AI and enterprise mobility.