
Getty Images/iStockphoto
How to use tcpdump to capture and analyze traffic
Network administrators use tcpdump to analyze traffic in Linux systems. Learn how to install and use tcpdump, as well as examine the results of captured traffic.

Protocol analyzers, also known as packet sniffers, capture network data for display or use by administrators. The captures include transport layer content, application layer information and header information, such as physical and logical addresses. Network administrators usually find this information more useful than the actual data payload.
The following are three primary reasons network administrators capture packets:
- Security. Captured packets expose insecure data, whether in the context of penetration testing or malicious eavesdropping attacks.
- Troubleshooting. Header information is useful for troubleshooting everything from DNS to packet filters on routers.
- Auditing. Captures display exactly what is on the network and not just what you think might be on the network. Audits verify that the expected types of network traffic are present.
Tcpdump is a common open source Linux tool used to analyze packets. It's fast, straightforward and lightweight. Wireshark is a similar tool often used in conjunction with tcpdump. This article explores how to use tcpdump to capture and view packets. It also covers how to view tcpdump captures in Wireshark.
What is tcpdump?
The tcpdump utility runs on the Linux command line. Tcpdump is a simple application that works well in Linux servers without Linux-based network devices, a GUI or various IoT nodes. These attributes give tcpdump an advantage over more powerful GUI-based analyzers, like Wireshark. Tcpdump is also scriptable, which means it can enable scheduled captures.
How to install tcpdump
Many Linux distributions include tcpdump, especially those used for enterprise networking. If your favorite distribution doesn't have it, use your preferred package manager to install it.
On Red Hat and similar distributions, type the following command:
# dnf install tcpdump
On Debian and similar distributions, type the following command:
# apt install tcpdump
MacOS users can manage tcpdump with the following brew command:
# brew install tcpdump
Because tcpdump is open source, you can also compile it yourself. Check the official website for more information and documentation.
Tcpdump is ready to use immediately after installation.
How to use tcpdump
Tcpdump contains many options and customizations that can help you find exactly what you want. Remember to check the main page for explanations and examples.
1. Start a capture
To get started with tcpdump, type the following command in the Linux terminal:
# tcpdump
Note that you may need sudo privileges.
Tcpdump displays captured packets in real time. This is useful if you know what to look for and if there's not a lot of traffic on the interface. However, it's much more likely that your screen quickly scrolls with nearly incomprehensible information.
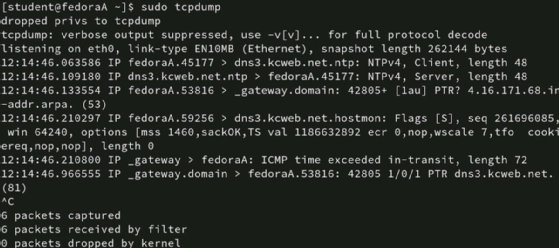
Interrupt the capture with Ctrl+C when this occurs.
You need a way to display only the information that is useful for your given task. The next sections explore options on how to focus tcpdump on what you need.
2. Select an interface
One way to narrow the capture is to specify the local network interface on which the analyzer captures. For example, captures are possible on a laptop's wired and wireless interfaces. Even more interfaces might be on network servers with multiple network interface cards or routers connected to several subnets.
Use the -i option to select the interface. To display the available interfaces, type tcpdump -D.

Once you've identified the interface you want to use, type its name after the -i option:
# tcpdump -i eth0
This filter helps prevent data coming in overwhelming amounts from the capture results. However, you probably want to filter the results even more.
3. Select host information
You probably have a good idea of what to look for in troubleshooting or penetration testing scenarios. You also likely know where the packets you need come from or go. Specify the source or destination IP addresses you want tcpdump to watch for with the following flags.
| Flag | Explanation |
| host | Any packets with this host in the source or destination fields. |
| src | Any packets with this host in the source field. |
| dst | Any packets with this host in the destination field. |
| src and dst | Any packets with this host in both the source and destination fields. |
| src or dst | Any packets with this host either in the source field or destination field. |
To capture packets from a specific host, type the following command:
# tcpdump -i eth0 host 10.1.1.42
If you want traffic that originates only from 10.1.1.42, type the following command:
# tcpdump -i eth0 src host 10.1.1.42
Develop more complex capture parameters with the and or or operators.
4. Filter by port number
You might be more interested in a type of traffic than the hosts involved. In that case, use a filter based on port numbers. If you need Simple Mail Transfer Protocol traffic, type the following command:
# tcpdump -i eth0 dst port 25
If you want to find insecure web traffic, type the following command:
# tcpdump -i eth0 dst port 80
5. Write the capture to a file
One disadvantage of the examples above is tcpdump displays all results on the screen. They might roll by too quickly to analyze or detect patterns. It's usually better to write the capture results to a file instead.
Use the -w option with a file name to specify a destination.
# tcpdump -i eth0 -w capture.pcap
Be sure to use the .pcap file extension. The capture results are not usable as a text file. In addition, Wireshark can open the tcpdump file if it has the .pcap extension.

View capture results
Now that you have a capture file to work with, you can display the results in two ways: with tcpdump or Wireshark. Tcpdump itself can read the file, but you might find it advantageous to use Wireshark.
View the capture file with tcpdump
To view the file with tcpdump, type the following command:
# tcpdump -r capture.pcap

Use commands such as grep or awk to search for the specific information you need.
View the capture file with Wireshark
If you have Wireshark installed on another system, such as Linux, macOS or Windows, Wireshark can open PCAP files. Wireshark's interface is more user-friendly and flexible than tcpdump, especially when dealing with multiple capture files from various machines.
To view the PCAP file, launch Wireshark, select File, click Open and browse to the file's location -- probably a network share or a local directory to which you copied the file from the original system.
Now, you have Wireshark's search, filtering and analysis power at your disposal in a helpful graphical interface.
Consider a scenario where you capture packets on several routers, some IoT devices and two of your servers as part of a network audit or incident troubleshooting. Centralize the capture files on a network share, and then open the files with Wireshark on your local daily-use workstation.
Best practices for tcpdump packet capture
Tcpdump is a useful tool within the boundaries of its use. The initial options are straightforward, and the ability to write to a file is essential. Tcpdump is lightweight and runs at the command line, so it's usable on virtually any Linux-based system.
Common options to get you started with tcpdump include the following.
| Flag | Explanation |
| -D | Display available interfaces. |
| -i | Select an interface. |
| -w | Write to a file (use the .pcap extension). |
| -r | Read from a file with tcpdump. |
The next time you plan to audit or troubleshoot your network, consider the following tcpdump options:
- Filter traffic by interface.
- Filter traffic by source and destination.
- Filter traffic by port number.
- Read and write captures with -r and -w, respectively.
- Write the capture to a file, and analyze it in Wireshark.
- Consider scripting any captures you intend to repeat.