
your123 - stock.adobe.com
How to use Wireshark to sniff and scan network traffic
Wireshark continues to be a critical tool for security practitioners. Learning how to use it to scan network traffic should be on every security pro's to-do list.

In security, the tools that give us the greatest visibility often become the most powerful and the most useful. Chief among those tools for visibility at the network level is Wireshark. It has been -- and continues to be -- one of the most powerful tools in a network security analyst's toolkit, though they're not the only professionals who benefit from Wireshark's use. Security operations personnel, security architects and incident responders who know how to use Wireshark can have a significant boon and a decided advantage.
What is Wireshark?
Wireshark is a network protocol analyzer, sometimes called a packet analyzer, designed to provide visibility into network traffic occurring on a network or between machines. It lets us peer inside network traffic and examine the details of wireless and wired network traffic at a variety of levels, ranging from connection-level information to the bits constituting a given packet to the payload (data) contained within those packets. Wireshark also lets us view the information at multiple levels of the stack so that we can isolate, identify and debug network connections from the lowest levels all the way up the stack to the application layer.
Now, you may be thinking, "Haven't recent architecture paradigms, such as zero trust, resulted in increased use of encryption on the internal network, thereby limiting what network traffic we can see?" Or maybe, "Don't more recent versions of many protocols or methods of access employ encryption -- for example, Remote Desktop Protocol, SSH instead of Telnet or R Services, Secure FTP instead of FTP, etc. – that, in addition to encryption used at lower levels of the stack, also limit what we can see using a protocol analyzer?"
Yes, more network traffic is encrypted than ever. From a practical point of view, though, a lot of relevant information is still available and accessible. Keep in mind that network traffic is purposefully layered. For example, the Open Systems Interconnection and TCP/IP models consist of either seven or four separate and distinct layers, respectively, that can be viewed and understood separately. Even though the higher levels of the stack might be encrypted, the lower levels -- when viewed in isolation -- can still provide clues about problems, including security issues, because the transmission of traffic, including addressing, routing and numerous other elements of getting packets from point A to point B, are still accessible.
Also, bear in mind that exploits often need to execute in a particular way, in a particular order and in a manner subject to particular constraints. If you've ever worked in a red team context or been party to a system-, host- or network-focused penetration test, you know how difficult it can be to make sure a target system is in the appropriate state and conditions and circumstances are right for successful exploitation. The steps in which an attack needs to be conducted to be effective are often clearly visible at the network layer because certain exploits can't work when using maximum evasion or stealth techniques. In other words, there are times when it is difficult from an attacker's point of view to make their activity invisible to someone actively looking.
In short, looking at underlying network traffic is still useful even though modern architectures limit what we can see at the higher levels of the stack. This means the flexibility and depth of inspection available in Wireshark enable us to analyze security events and troubleshoot network security device issues just as effectively today as in years past. This is one of the main reasons why Wireshark has been, and continues to be, one of the most commonly cited, mostly commonly used and most steadily reliable tools in the blue team practitioner's toolbox.
And, as open source software, one of the other reasons is the price -- it's both free as in beer and free as in freedom. You can pick it up and start using it today if you like.
Wireshark use cases
Wireshark has a lot of utility. The specific nature of that utility varies depending on the type of practitioner:
- Network practitioners can use Wireshark to debug connectivity failures and troubleshoot issues.
- Blue team security practitioners can use it to investigate security incidents:
- By helping them examine the specific tools, techniques and procedures used by an adversary.
- To assist with threat hunting by looking in depth at communications.
- To help hone and tune controls such as an intrusion detection system (IDS) or web application firewall.
- With numerous other tasks.
- Red teamers can use Wireshark -- or, more likely, the more minimal and command-line TShark -- to eavesdrop on communications and look for sensitive data being exchanged or to gain intelligence about the network environment they're in.
Use Wireshark responsibly
Note: Wireshark is an important tool for cybersecurity professionals when used ethically and legally. Threat actors, however, also use Wireshark to cause harm or in furtherance of illegal and unethical activities. It's incumbent on you to use it ethically and responsibly. If you're not sure if the way you intend to use it is legal or not, don't do it until you are sure. Take steps to ensure you stay on the right side of ethical guidelines. This includes following the law and organizational policies.
Many organizations have a policy that spells out the rights of individuals using the corporate network, including requirements for obtaining, analyzing and retaining network traffic dumps. The policy could also address the conditions under which monitoring network traffic is acceptable. If the policy requires approval or permission, obtain it. If it requires that executive teams sign off, make that happen.
From a functional standpoint, Wireshark's capabilities are straightforward. It enables practitioners to do the following:
- View data traversing various networks, including wired networks, such as Ethernet; wireless networks; Bluetooth networks; or virtual network interfaces, such as with Docker or a hypervisor.
- Navigate and view the various layers of the stack, including application-level protocols, such as HTTP/HTTPS; mail protocols, such as Post Office Protocol 3 and SMTP; and file-sharing protocols, such as Server Message Block and Common Internet File System. Lower down in the stack, we can view TCP/IP and User Datagram Protocol. Even lower in the stack, we can view artifacts such as Ethernet frames.
- Record and capture traffic for subsequent analysis.
This may not seem like much at first glance, but these capabilities are exceptionally powerful. For example, security professionals have many reasons to sniff network traffic. Examining the contents of network packets can prove invaluable when investigating a network attack or designing countermeasures. When provided with a security alert from an IDS, extended detection and response tool, managed security service provider or any other low-level detection tool, Wireshark helps determine whether the traffic is the result of an error or a malicious attack. In the case of an attack, Wireshark helps identify the specific type of attack through detailed analysis of the underlying traffic.
Wireshark can also help users understand the point of origin for an attack and a target by looking at the IP addresses of the targeted systems and the IP addresses from which the malicious packets originated. This information is useful for not only incident response purposes, but also because it helps defenders craft upstream rules -- for example, firewall rules or other network filtering rules, such as network security groups -- to block, constrain or otherwise prevent future recurrence.
Sniffing network traffic assists with threat hunting as well. If an attacker is moving through your network, that activity is visible if you're watching at the time. It would, of course, be impossible for someone to be viewing all network activity at this level all the time, but if you can narrow down where to look -- for example, in response to an alert or suspicious activity -- it helps you zoom in and gives you the data to draw better conclusions.
Another reason to use Wireshark to sniff networks is for security troubleshooting of network devices or applications. For example, you can use Wireshark to troubleshoot firewall rules. If systems running Wireshark are connected to either side of a firewall or router, you can see which packets can successfully traverse the firewall and which can't. From there, it is easier to determine whether the firewall is causing connectivity problems.
Lastly, professionals sniff traffic to enable them to record traffic. This can help to better tune controls, better understand how applications operate, record activity for further scrutiny, etc. Companion tools are available that let you edit and replay packet capture data for educational purposes, to tune controls, for testing and for numerous other reasons.
1. Download and install Wireshark
First, obtain and install the software:
- Download installation packages for Windows or Mac.
- Build your own Wireshark executable from source.
- Install the default package manager for many popular Linux distributions.
- Employ a specialized security Linux distribution, such as Kali, that has Wireshark installed by default.
- Add a portable copy of Wireshark on a USB drive to your incident response toolkit.
- Use a "live CD" or other bootable media as a portable network analyzer device.
In a Windows context, the supported installer employs a wizard-style installation that includes selecting which optional features to install. Choosing the default options should be suitable for most beginners. In a Linux context, the package manager dictates what information is shown or what configuration options, if any, are presented during the installation. This varies by package manager and distribution, so read the instructions for your distribution and package manager configuration of choice.
On most platforms, Wireshark depends on a corresponding packet capture library: libpcap in Linux/Unix and WinPcap on Windows. Under Linux -- and assuming you're using a modern package manager -- this is handled and installed by the package manager. Those running Windows are prompted to install WinPcap if it is not already on the system.
2. Run a simple packet capture
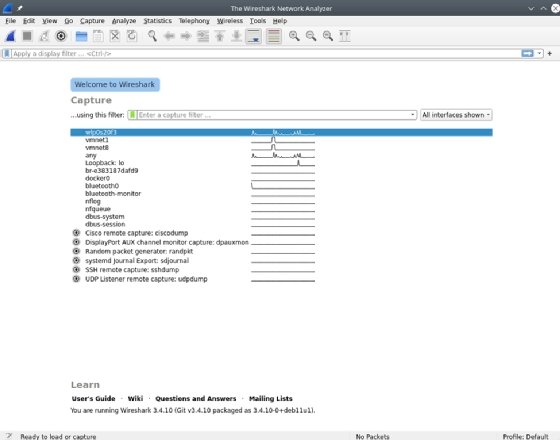
Once installed, launch Wireshark. One of the first things you see is a screen displaying the different network interfaces on the system, as well as a graph that indicates network activity on each network interface. Note that, in a Linux context specifically, low-level packet capture generally requires root access. Therefore, it may prompt you to elevate permissions to root on Linux.
The following screenshot shows quite a few network interfaces. Many are wired and internal interfaces that have no activity, as indicated by the flat lines. The top network interface -- a Wi-Fi interface -- shows activity, as indicated by the squiggly line.
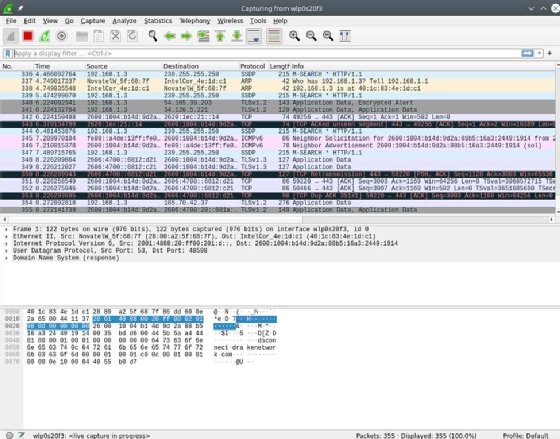
Double-click on the network interface that connects to the network you want to capture. Wireshark opens a window to show the packets being transmitted on the network. Wireshark offers many options for managing the display filters.
In the top pane, shown in the screenshot below, Wireshark displays information from the headers of each packet, including, by default, a time index showing the elapsed time between the start of the capture and when the packet was scanned. You can adjust the time format and save the timer data with the capture to recover the actual time a scanned packet was sent. The packet's source and destination IP addresses, the protocol in use, the length of the packet and information about the packet are also displayed. You can drill down and obtain more information by clicking on a row to display details of the packet in question.
The middle pane contains drill-down details about the packet selected in the top frame. Select the > icons displayed on the left to reveal varying levels of detail about each layer of information contained within the packet. For example, here is the Ethernet header for an individual packet.

This header tells us the source and destination MAC addresses, as well as the identity of the next protocol in the stack: IPv6. We can then drill into the IPv6 header.

Here, we find the source and destination IP addresses, as well as IP-specific information. Like the layers of an onion, we can navigate up and down the stack observing detailed information about each layer along the way. Likewise, we can navigate into overlapping protocols. Pictured above is IPv6; here is a view of IPv4.
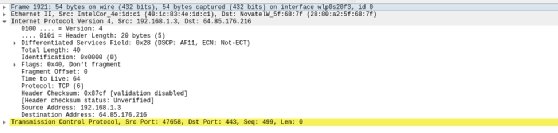
We can also view information about higher-level protocols, such as TCP.
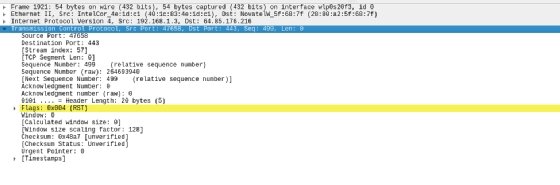
This header includes information about the source and destination TCP ports, the flags set on the packet and other helpful troubleshooting details.
The bottom pane is a hexadecimal display that shows the digital contents of the packet itself. Highlighting any of the data displays the protocol details in the middle pane, as shown in the screenshot below.

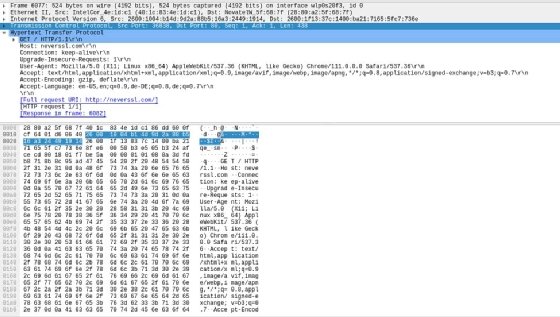
One useful Wireshark feature is it helps point you to the most relevant information in the various protocols you examine using the tool. For example, the following screenshot illustrates the -- less common nowadays -- scenario of accessing an HTTP-only site, in this case neverssl.com, and the raw application-level traffic information presented in that case.
Modifying capture options
While it is simple to run a basic packet capture in Wireshark, the tool also enables users to modify several options to adjust their capture. You can access these options by clicking the gear-shaped Capture Options icon in the toolbar, as seen below.

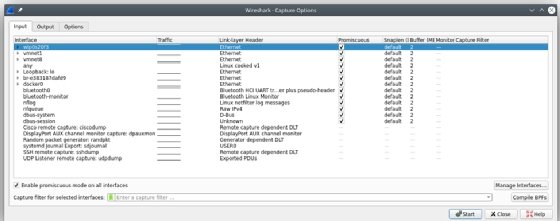
Clicking this button opens the Capture Interfaces window, which has three tabs. The Input tab lets you modify Wireshark interfaces and enable promiscuous mode. This mode is what enables the interface to capture network traffic that is not directed specifically to your capture system.
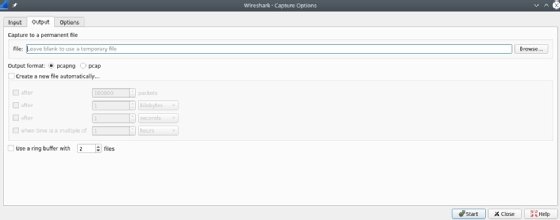
The Output tab controls where Wireshark stores the packets it captures. You can automatically store captured packets in a file and modify the format of that file, or you can create a file based on the amount of data captured or the amount of time elapsed.
The Options tab offers choices for how to display the packets and options for MAC and DNS names, as well to limit the size of packet captures. Some of these options can help improve the performance of Wireshark. For example, you can adjust settings to prevent name issues, as they otherwise slow down your capture system and generate many name queries. Time and size limits can also place limitations on unattended captures.

3. Interpret and analyze packet contents
The single most useful analysis feature of Wireshark, in my opinion, is filters. Every day, more and more data traverses the network. This makes the proverbial haystack (data) much larger and the proverbial needles (information germane to what we're trying to discover) much harder to find.
Getting the right data without the right filters is nearly impossible on a network of even moderate size, let alone a busy or large one.
How to set up a Wireshark display filter
Wireshark has multiple types of filters. You can sort through captured data using a display filter. As the name suggests, this filter limits what is shown on the screen. This small, innocuous-seeming edit box is arguably the most powerful control in the entire tool. The purpose of a display filter is to assist with analysis.

You can specify what you want to see -- no more and no less. The simplest filter is to limit the protocol(s) shown. For example, putting the statement "tls" into the filter bar limits results to only TLS traffic.
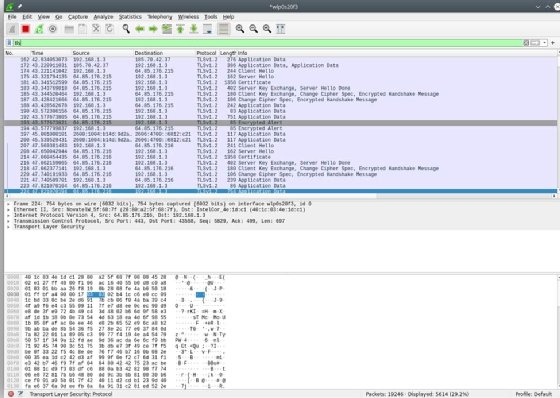
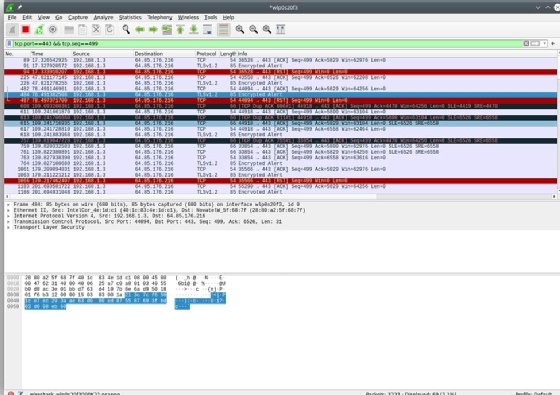
Filters can be much more complicated than this. The example below limits the display to results where the TCP port is 443 and the TCP sequence number is 499.

Why is this useful? Beats me. But the important thing is that you can filter for it if you need to. The results of the filter are below.
There's a bit of an art to setting up a filter. Wireshark attempts to help you find what you're looking for by suggesting how to complete your filter expression. For example, if you type "ip" into the filter bar, Wireshark pre-populates possible properties or subelements of IP that could be relevant. Likewise, typing "tcp" causes Wireshark to pre-populate the subelements of TCP.
The display filter control changes based on the validity of what is asked. In the above examples, the background color of the filter box changed from white (empty) to green once set. Green signifies the filter is syntactically correct. If you specify something Wireshark cannot interpret, the background changes to red, as seen in this purposefully nonsensical filter. This means the filter requested is syntactically invalid or the tool cannot parse the request.

The filter box color change feature is particularly important because filters can get complicated depending on what you're looking for. You commonly see filters created using a concise C-like syntax, where expressions are not required. In creating filters, you can use logical operations, such as AND (&&), OR (||), NOT (!) and even XOR (^^). You can do comparisons, such as equals (==), not equals (!=), greater than (>), greater than or equal to (>=) and so on. While many practitioners prefer to use the C-style syntax for accuracy, brevity and clarity reasons, an alternative English-like syntax is available, similar to conditional statements in bash, with "ne" indicating "not equals," "eq" indicating "equals," "le" indicating "less than or equal to" and so on.
Consider the filter below that uses ne (not equal) in English-like syntax.

Also, notice that, in this example, the background color changed to yellow. This means the filter is functional, but Wireshark is warning us that it is ambiguous in some way and, therefore, might not perform as expected. Carefully consider -- and potentially tweak -- yellow filters. Sometimes, it is that you intend to do what you specified, but it can also mean there is a typo or other syntactical issue.
This is a high-level summary of the functionality associated with Wireshark filters. Given the level of complexity involved in some filters -- particularly when sorting through large volumes of data -- and the versatility of the syntax, I recommend reading the manual section on filters as you become more familiar with Wireshark. Filters can do many things, so learning how to use this feature is valuable and, in my opinion, critical to being able to use the tool effectively.
How to set up a Wireshark capture filter
A capture filter limits what the tool captures in the first place. This is useful when you want to limit the size of the data captured to the specific traffic you are interested in. It is especially helpful for long-running captures of specific traffic over a longer period of time.
To access these, select Capture Filters from the Capture menu item.
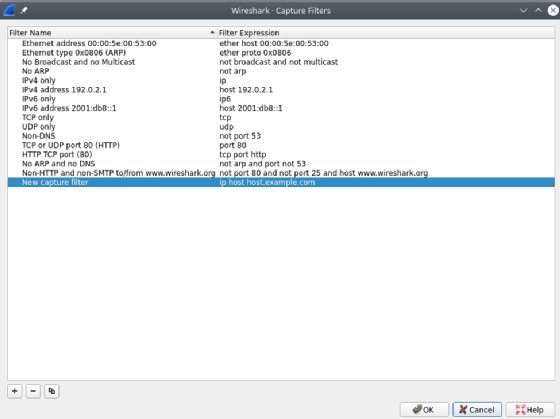
Where a display filter's purpose is to assist with analysis -- and is, therefore, versatile and flexible -- the purpose of a capture filter is not the same. Its purpose is to limit the storage used in recording captures. As such, the syntax and level of complexity are not the same. Capture filters use a different syntax -- one that is much more lightweight than what is involved in setting display filters.
It's useful to know the difference between display and capture filters. You can get a lot done by fully mastering either, but knowing when and how to use each is key to mastery of the Wireshark tool and a huge benefit in the long run.
Wireshark network scan basics
This sums up the basics of using Wireshark to capture and analyze network traffic. The best way to become a Wireshark expert quickly is to get your hands dirty and start capturing network traffic. You'll find it can also be a helpful tool for everything from configuring firewall rules to spotting an intrusion. Remember, however, that you must always have permission from the network owner before capturing traffic on any network.