
Using the Windows Admin Center Azure services feature
Microsoft wants you to add more of its Azure cloud services to your data center by using its new administrative tool to streamline the setup process.

To drive adoption of its cloud platform, Microsoft is lowering the technical barrier to Azure through the Windows Admin Center management tool.
Microsoft increasingly blurs the lines between on-premises Windows Server operating systems and its cloud platform.
One way the company has done this is by exposing Azure services alongside Windows Server services in the Windows Admin Center. Organizations that might have been reluctant to go through a lengthy deployment process that required PowerShell expertise can use the Windows Admin Center Azure functionality to set up a hybrid arrangement with just a few clicks in some instances.
Azure Backup
One of the Azure services that Windows Server 2019 can use natively is Azure Backup. This cloud service backs up on-premises resources to Azure. This service offers 9,999 recovery points for each instance and is capable of triple redundant storage within a single Azure region by creating three replicas.
Azure Backup can also provide geo-redundant storage, which insulates protected resources against regional disasters.
You access Azure Backup through the Windows Admin Center, as shown in Figure 1. After you register Windows Server with Azure, setting up Azure Backup takes four steps.
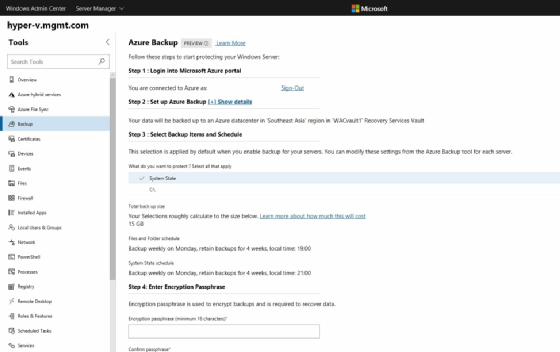
Microsoft designed Azure Backup to replace on-premises backup products. Organizations may find that Azure Backup is less expensive than their existing backup system, but the opposite may also be true. The costs vary widely depending on the volume of data, the type of replication and the data retention policy.
Azure Active Directory
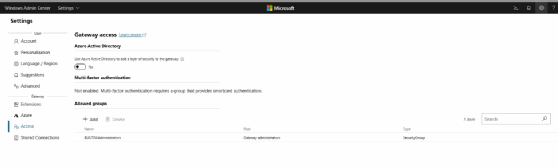
Microsoft positions the Windows Admin Center as a one of the primary management tools for Windows Server. Because sensitive resources are exposed within the Windows Admin Center console, Microsoft offers a way to add an extra layer of security through Azure Active Directory.
When you enable the requirement for Azure Active Directory security, you will be required to authenticate into both the local machine and into Azure Active Directory.
To use Azure Active Directory, you must register the Windows Server with Azure, then you can require Azure Active Directory authentication to be used by opening the Windows Admin Center and then clicking on the Settings icon, followed by the Access tab. Figure 2 shows a simple toggle switch to turn Azure Active Directory authentication on or off.
Azure Site Recovery
Azure Site Recovery replicates machines running on-premises to the Microsoft Azure cloud. If a disaster occurs, you can fail over mission-critical workloads to use the replica VMs in the cloud. Once on-premises functionality returns, you can fail back workloads to your data center. Using the Azure cloud as a recovery site is far more cost-effective than building your own recovery data center, or even using a co-location facility.
Like other Azure services, Azure Site Recovery is exposed through the Windows Admin Center. To use it, the server must be registered with Azure. Although Hyper-V is the preferred hosting platform for use with Azure Site Recovery, the service also supports the replication of VMware VMs. The service also replicates between Azure VMs.
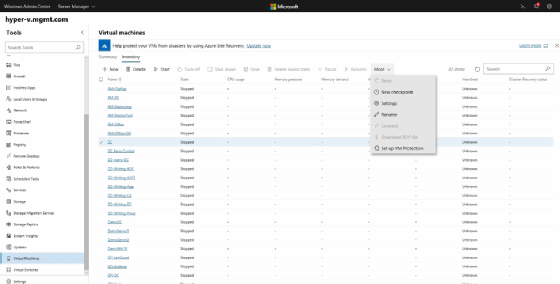
To enable a VM for use with the Azure Site Recovery services, open the Windows Admin Center and click on the Virtual Machines tab. This portion of the console is divided into two separate tabs. A Summary tab details the host's hardware resource consumption, while the Inventory tab lists the individual VMs on the host.
Click on the Inventory tab and then select the checkbox for the VM you want to replicate to the Azure cloud. You can select multiple VMs and there is also a checkbox above the Name column to select all the VMs on the list. After selecting one or more VMs, click on More, and then choose the Set Up VM Protection option from the drop-down list, shown in Figure 3.
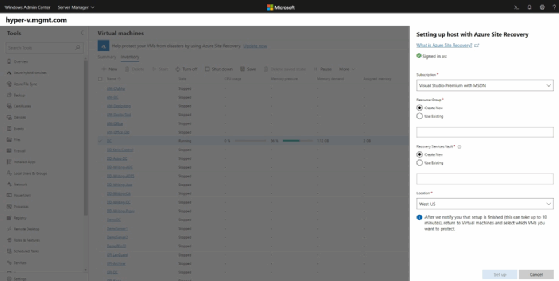
The console will open a window to set up the host with Azure Site Recovery. Select the Azure subscription to use, and to create or select a resource group and a recovery vault. You will also need to select a location, as shown in Figure 4.
Storage Migration Service
The Storage Migration Service migrates the contents of existing servers to new physical servers, VMs or to the Azure cloud. This can help organizations reduce costs through workload consolidation.
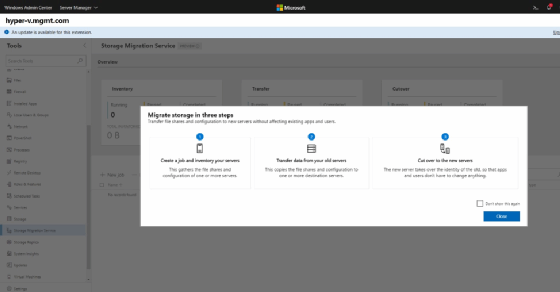
You access the Storage Migration Service by selecting the Storage Migration Service tab in the Windows Admin Center, which opens a dialog box outlining the storage migration process as shown in Figure 5. The migration involves getting an inventory of your servers, transferring the data from those servers to the new location, and then cutting over to the new server.
As time goes on, it seems almost inevitable that Microsoft will update the Windows Admin Center to expose even more Azure services. Eventually, this console will likely provide access to all of the native Windows Server services and all services running in Azure.