
Completing a migration to Windows 11 with Microsoft Intune
When IT administrators plan the switch to Windows 11, they may notice how similar the process can be to a Windows 10 update if they use Microsoft Endpoint Manager and Intune.

Although operating system migrations are always a lot of work, migrating from Windows 10 to Windows 11 tends to be relatively painless with the proper planning and tools.
The preferred tool for upgrading to Windows 11 en masse is Microsoft Endpoint Manager, but there are other options available such as using Microsoft System Center Configuration Manager or third-party migration tools.
This example uses Microsoft Intune -- a key part of Microsoft Endpoint Manager -- while assuming that all managed devices in the fleet are set to migrate and enrolled within Intune.
Verifying Windows 11 readiness
There are two main options for determining whether or not endpoint devices are ready for Windows 11. The first is to use the Microsoft Endpoint Manager. Open the Microsoft Endpoint Manager admin center and select the Reports tab as a Windows administrator. Next, click on the Endpoint analytics option. If this is the first time you have used Endpoint analytics, you will need to enable it for your cloud-managed devices (Figure 1).
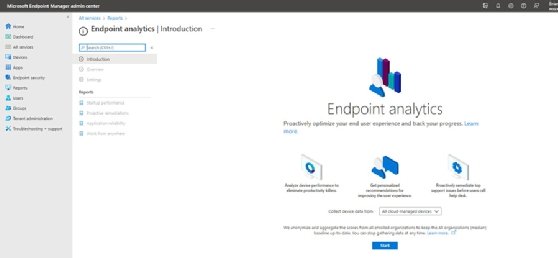
Otherwise, click on the Work from anywhere option (Figure 1). This report provides information about managed devices' Windows 11 compatibility.
The other option for assessing Windows 11 readiness is to use the Hardware Readiness PowerShell script. This PowerShell script is available for download via a Google search. This script analyzes your managed systems and provides detailed information on their Windows 11 readiness. The script outputs compatibility data in a delimited format which you can ingest into Azure Log Analytics, an Excel spreadsheet, or any other tool that you might decide to use (Figure 2).
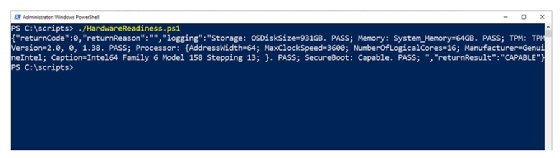
The Hardware Readiness PowerShell script is designed to run locally, so you will likely have to modify it so the logging results automatically go to a centralized location. You will also need to create a policy to force your target systems to run the script.
Windows 11 as a feature update
Organizations that use Microsoft Intune to manage their Windows devices will likely find the Windows 11 migration process very familiar. This is because Microsoft Intune treats Windows 10 to Windows 11 migrations essentially as Windows 10 feature updates. Administrators who have used Microsoft Intune to apply feature updates to Windows 10 in the past will find that the migration process largely the same.
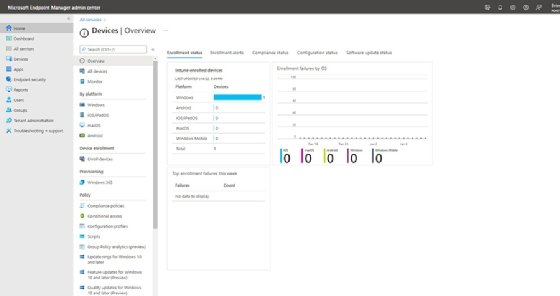
To get started, open the Microsoft Endpoint Manager admin center and then click on the Devices tab. This will display the Enrollment Status dashboard (Figure 3).
There are a series of tabs displayed just beneath the Search box. Select the Feature Updates for the Windows 10 and Later tab, located in the Policy section. This will take you to the Feature Updates screen.
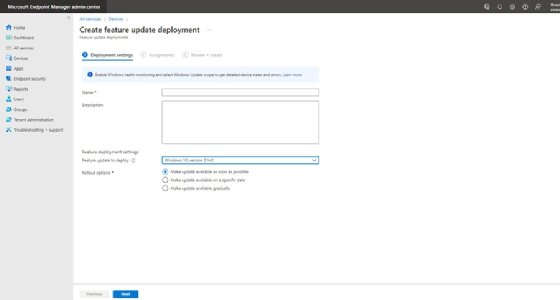
Click on the Create Profile button and the console will take you to the Deployment Settings screen. The first thing you will need to do on this screen is enter a name and an optional description for the Windows feature update you are defining.
Although this step is optional, it's strongly recommended to enter a detailed description outlining what the feature update deployment does, who it applies to, when it will be made available and any other pertinent details (Figure 4).
After all, you can accumulate several feature update deployments over time, especially in a large organization, so it's important to tell those updates apart.
Once you have entered a name and a description for the feature update, the next step is to specify the feature update you want to deploy. Be sure to choose the Windows 11 option (Figure 5).
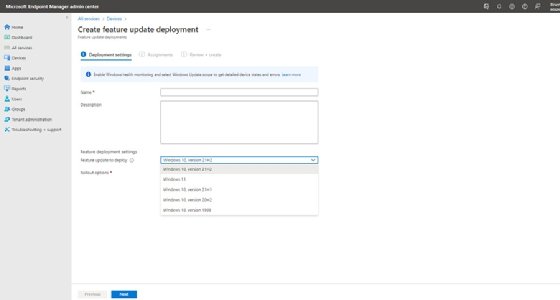
Upon choosing the Windows 11 option, the console will present you with a warning message, stating that when you choose the Windows 11 feature update option, you either already have a Windows license through volume licensing or are authorized to accept the Microsoft licensing terms for Windows 11. You don't have to do anything with this warning message, but it is important to ensure that you have the necessary licenses.
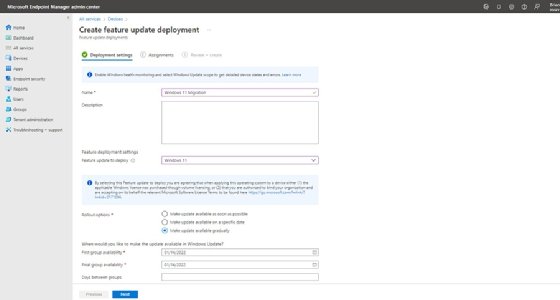
The next step is to choose your rollout option. Specifically, this means telling Intune when you want to deploy Windows 11. The software gives you three options (Figure 4).
- Make the update available as soon as possible.
- Make the update available on a specific date.
- Make the update available gradually.
The third option is useful in organizations with limited bandwidth or limited ability to support users. If you choose to roll out Windows 11 gradually, Intune will allow you to set the start and end dates for the rollout process and stagger deployments between those dates as evenly as possible. You can even specify the number of days between groups (Figure 6).
Once you have made your selections, click Next, and the Assignments screen will display (Figure 7). This is where you can specify which users and devices will receive the upgrade. Assignments are made on a group basis, which lends a lot of flexibility to the migration process.
For example, some organizations opt to migrate one department at a time. Similarly, an organization might perform a pilot deployment, in which you assign Windows 11 to a group of power users before making Windows 11 available to the entire organization. You will want to plan your Windows 11 migration before getting to this step.
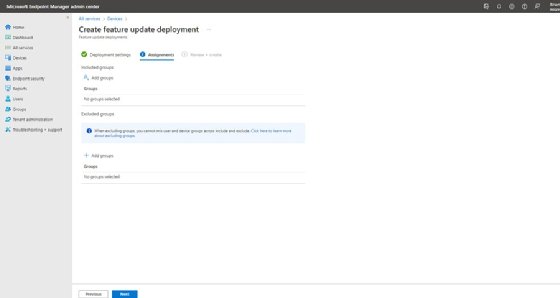
Although Intune allows you to include and exclude groups from the migration, you must be careful about which groups you specify. You can assign updates to user groups or device groups with static and dynamic group support. However, if you choose to exclude groups, you cannot mix and match group types across included and excluded groups. For example, you cannot include a user group and exclude a device group.
When you are done, click Next, and Intune will take you to the Review + Create screen. This screen displays a summary of the options that you have chosen. Take a moment and make sure that everything appears to be correct. When you are satisfied with everything, click the Create button. Intune will then create the new feature update.
Dig Deeper on Windows OS and management
-
![]()
What to do when device settings don't migrate to Windows 11
By: Robert Sheldon
-
![]()
How to add and enroll devices to Microsoft Intune
By: Peter van der Woude
-
![]()
Setting up Windows 11 kiosk mode with 4 different methods
By: Will Kelly
-
![]()
What to do when a Windows 11 Remote Desktop keeps freezing
By: Chris Twiest