
Rymden - stock.adobe.com
How Windows 11 Print Management can fix printer issues
IT admins can use Print Management in Windows 11 to manage all printers connected to a device, troubleshoot problems and restart devices and servers.
Windows Print Management is a Microsoft Management Console (MMC) snap-in that desktop administrators can use to manage and troubleshoot print servers and printers on Windows 11 systems.
The centralized Print Management interface enables IT to configure print drivers, forms, ports and the printers themselves from a single location. However, it's possible that this tool is not accessible at all, either because it has not been installed or because there is a problem with the installation. Fortunately, as an administrator, you have multiple options for getting Print Management up and running on Windows 11 systems.
Accessing Print Management in Windows 11
As handy as Print Management is, it's not always apparent how to launch it. For example, it's not listed as one of the apps in the Start menu, and it might or might not be listed with the other Windows tools in Control Panel. For reference, these are the tools that are referred to as Administrative Tools in Windows 10. In any case, there are a number of different options for launching the Windows Print Management console.
1. Use the Run Prompt
One of the simplest ways to launch Print Management is to open a Run command window, type printmanagement.msc, and click OK. PrintManagement.msc is the name of the Print Management file, which is located in the %windir%\Windows\system32 folder.
You must type the entire Print Management file name -- printmanagement.msc -- in the Run command window. Typing printmanagement or Print Management will not work.
2. Use Windows Search
Another way to launch Print Management is to perform a Windows search for printmanagement.msc, once again making sure to use the entire file name.
3. Use a Command Line Interface
Still another option for opening Print Management is to use a Command Prompt window or a PowerShell session, in which case, you need only enter printmanagement.msc at the command prompt -- again, avoiding printmanagement and Print Management.
4. Use the Microsoft Management Console
If you plan to use Print Management regularly, along with other MMC tools, you might consider creating a custom MMC console and adding Print Management as one of the snap-ins.
To do so, enter the MMC command at the run prompt. This will cause Windows to open an empty console. Next, choose the Add or Remove Snap-ins command from the console's file menu. Select the Print Management option from the list of available snap-ins and click Add (Figure 1).
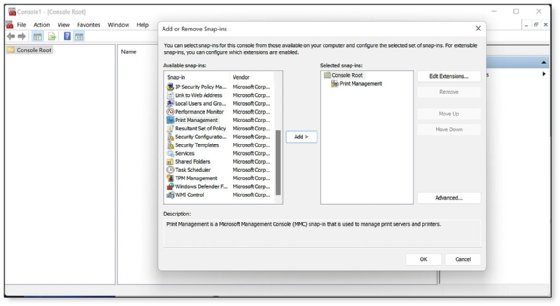
When you add the Print Management snap-in, you'll be prompted to specify one or more print servers. If all you need is the local server, you can simply click the Add the Local Server button. Click Finish, followed by OK to return to the console. You can use the console as it is, but if you want to save the console's configuration for future use, you can do so by using the Save As option found on the File menu.
Introducing Print Management in Windows 11
The Print Management interface provides a hierarchical view of the local print server and any connected network print servers. For each print server, you can access information about print drivers, forms, ports and printers. You can also carry out multiple tasks specific to each category. For instance, you can uninstall printer drivers, add print forms, delete ports or configure printer settings. In this example, the Canon MF260 printer is selected in the main window. If you right-click the printer, a context menu appears, providing several options for working with the printer (Figure 2).
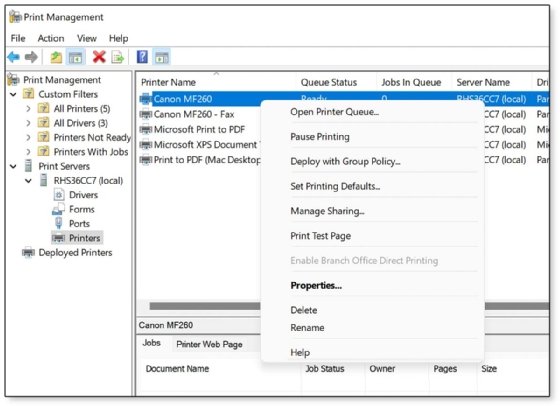
You can open the printer queue, pause printing, set printing defaults, print a test page or share the printer. You can also delete the printer, rename it or deploy it with group policy if the computer is connected to a domain.
You can access the printer's properties through the context menu or by double-clicking the printer. From the Properties dialog box, you can view additional information about the printer and carry out a variety of other tasks. For example, the General tab lets you change the printer's name, add a location or comment, and view information about the printer's features (Figure 3).
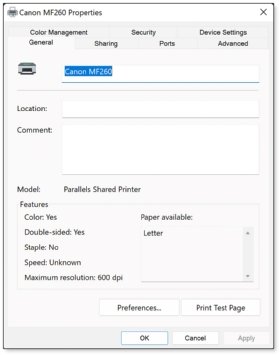
You can also print a test page or access print preferences.
The General tab is just one of multiple tabs in the Properties dialog box, most of which are self-explanatory. For instance, you can use the Security tab to manage the printer's permissions, the Sharing tab to share the printer and the Device Settings tab to configure printer settings.
In addition, you can use the Advanced tab to configure availability, spooling and other settings (Figure 4). You can also set the printing defaults, select the print processor and specify a separator page from this tab.

Print Management in Windows 11 also lets you perform tasks at the server level, such as add a printer, export printers to a file, import printers from a file, set notifications and carry out other tasks. In addition, you can access the server's properties and configure security at the server level, specify the spool folder and perform additional operations.
There are many other printer-related tasks you can perform in Print Management, and there are often multiple methods to access different features. The best way to learn about Print Management is to open it up and start exploring the utility. You'll find that the interface is simple to navigate and easy to understand. It provides a valuable tool for print management in Windows 11.
What to do if you can't access Print Management
Once you figure out how to launch Print Management, you should be able to use the tool with little problem. However, you might encounter a situation where you cannot access or find the Print Management snap-in. For example, when you try to launch it from a Run command window, Windows 11 might instead return the error that includes the following message: "Windows cannot find 'printmanagement.msc'. Make sure you typed the name correctly, and then try again."
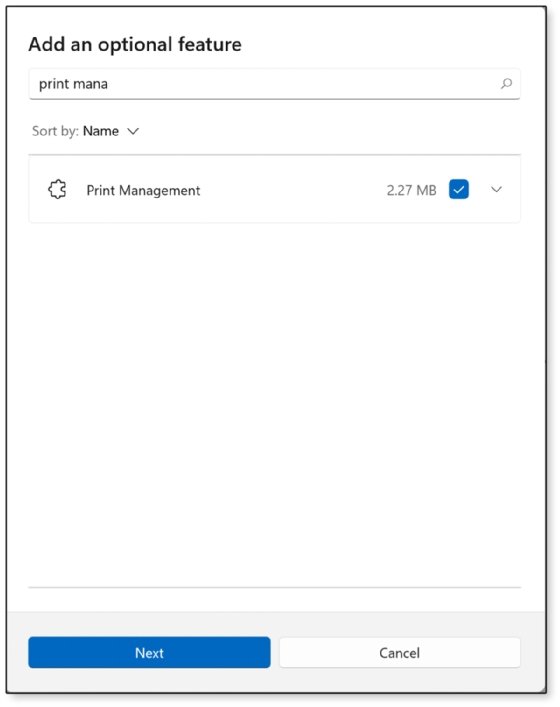
Often, the reason that Print Management is not available is that it hasn't been installed on the local Windows 11 computer. In fact, it's considered an optional feature in Windows 11 and sometimes needs to be manually added to the system (although installing a printer driver can automatically add the feature). It's worth noting that Print Management is available only to the Windows 11 Professional and Enterprise editions, not to the Home editions.
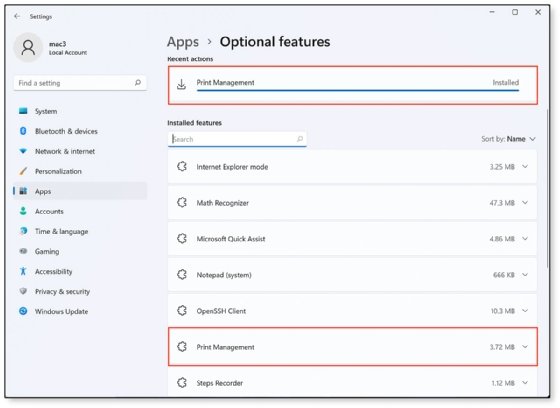
To add Print Management, open the Settings app and click System. Next, click Optional features. Check the list of installed features to see whether or not Print Management is installed. If not, click View Features and then start typing print management into the search box. When you find the app, click the associated check box and select Next (Figure 5).
After you click Next, a second screen will appear, verifying the installation. On the second screen, click Install. This will return you to the Optional features screen, where you can confirm that Print Management was recently installed (Figure 6). You can also confirm that it is listed as an installed feature. You can then close the Settings app and start up Print Management as you normally would.
In some cases, you might run into problems trying to start Print Management even if it seems to be installed. Before taking any other steps, you should confirm whether the printmanagement.msc file is listed in the %windir%\Windows\system32 folder. If it isn't, you should try to install it again. If it is installed, there might be an issue with the Print Management installation, perhaps caused by an update, a new driver or malware. It might be possible to fix the problem by copying the printmanagement.msc file from another computer that is running the same version of Windows 11.
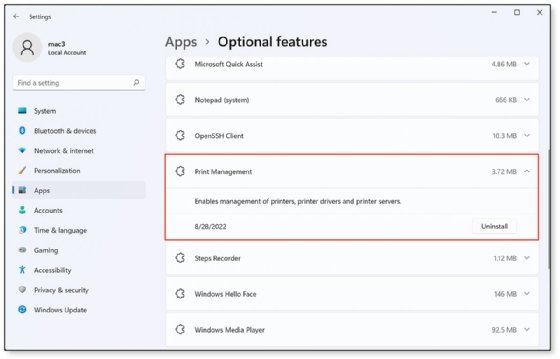
As an alternative, you can remove and reinstall the Print Management tool. To do so, open the Settings app and go to the Optional features screen. Expand the Print Management listing (Figure 7). Then, click Uninstall. Once this is complete, try to reinstall Print Management following the previous instructions.
If you're still unable to access Print Management, you can try using the Windows Deployment Image Servicing and Management (DISM) utility to verify whether Print Management is installed or to remove the app or add it back in. Because DISM is a command-line utility, you can run it in a Command Prompt window, although you must launch Command Prompt as an administrator.
To view whether Print Management is installed, run the following command at the command prompt:
dism /Online /get-capabilityinfo /capabilityname:Print.Management.Console~~~~0.0.1.0
If Print Management is installed, the State property will read Installed. If you think there's a problem with Print Management and you want to uninstall it, you can run the following command:
dism /Online /Remove-Capability /CapabilityName:Print.Management.Console~~~~0.0.1.0
To install or reinstall Print Management, run the following command:
dism /Online /add-Capability /CapabilityName:Print.Management.Console~~~~0.0.1.0
If you still can't access Print Management after trying all these options, you might need to resort to other measures. While these additional measures won't fix the console, they might fix print issues that are indirectly contributing to console problems.
You might begin by restarting the Printer Spooler service. The easiest way to do so is to enter the Services.msc command at the Windows Run prompt to start the Service Control Manager. Next, scroll through the list of services until you locate the Print Spooler. Right-click on the Print Spooler and select the Restart command from the shortcut menu.
If you are still having trouble, you might consider cleaning out the spool folder -- for example, running %windir%\Windows\system32\spool\PRINTERS. This folder should normally be empty unless there is an active print job or a print job that is stuck.
Another option is to run a System File Checker scan. This will locate and repair missing or corrupted files. To do so, open a Command Prompt window and enter sfc /scannow.
If nothing else fixes the problem, you could reset Windows as a last resort. Before doing so, however, it's important to create a system backup, since resetting Windows is akin to reinstalling the OS.
Editor's note: This article was originally written by Robert Sheldon in September 2022. Brien Posey updated the article in February 2026 to reflect product changes and improve the reader experience.
Brien Posey is a former 22-time Microsoft MVP and a commercial astronaut candidate. In his more than 30 years in IT, he has served as a lead network engineer for the U.S. Department of Defense and a network administrator for some of the largest insurance companies in America.
Robert Sheldon is a freelance technology writer. He has written numerous books, articles and training materials on a wide range of topics, including big data, generative AI, 5D memory crystals, the dark web and the 11th dimension.