
Getty Images/iStockphoto
Troubleshooting the most common issues with Windows 11
When Windows 11 administrators encounter an issue with a desktop without a clear fix, they should perform general troubleshooting steps in a specific order to minimize risk.

When users experience problems with Windows 11, administrators must quickly and effectively troubleshoot the issues so productivity isn't hindered.
But what should they do if their organization recently migrated to Windows 11 and there isn't sufficient internal knowledge on troubleshooting the specific issue?
In this situation, the best option for Windows 11 troubleshooting is to take a problem-agnostic approach. There are sequential troubleshooting steps that you can use as a desktop administrator for nearly any Windows 11 problem. While these steps are not guaranteed to solve every possible problem, they tend to resolve many of the most common Windows 11 issues.
Step 1. Run Windows Update
Your first step is to run Windows Update. In recent years, Windows Update has gained a reputation as a tool for applying security patches to Windows systems. While Windows Update addresses security problems, that isn't its only purpose. Microsoft frequently releases bug fixes that can be applied using this utility. It's entirely possible that applying all the available updates resolves the problem.
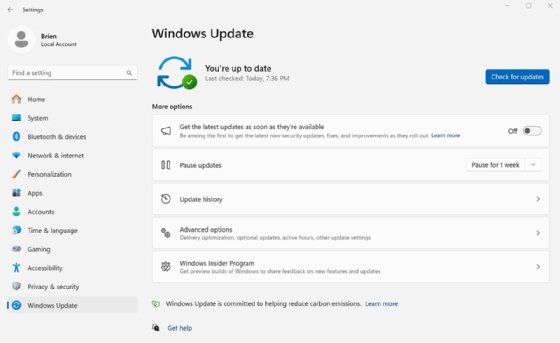
To check for available updates, click on Settings, and select the Windows Update tab (Figure 1). Then, click the Check for Updates button.
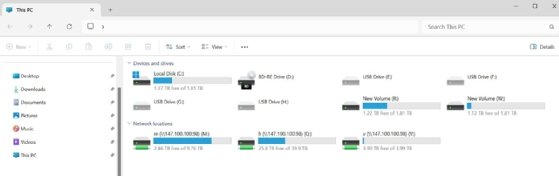
Step 2. Make sure that the PC has sufficient storage space
If running Windows Update fails to correct the problem, your next step should be to verify that the PC has sufficient disk space. In the past, Windows couldn't install updates if the machine ran low on disk space. More recently, however, Microsoft began reserving disk space specifically for use by Windows Update. Therefore, a Windows 11 PC could theoretically be low on disk space even if it allows you to install updates without issue.
Fortunately, it's easy to see how much disk space is available by opening File Explorer and clicking on This PC. Windows shows you how much disk space is available on the system's C: drive and other drives (Figure 2).
There is no hard rule regarding how much free disk space you must have for Windows 11 to function properly, but as a rule of thumb, you need to have at least a few gigabytes free. If the PC doesn't have at least 10 GB free, it may be worthwhile to free up additional disk space or upgrade to a larger hard disk.
At one time, Microsoft provided a Disk Cleanup tool that was accessible through File Explorer. Although this tool still exists, Microsoft has moved it to the legacy Control Panel. You can access the Disk Cleanup tool by right-clicking the Start button and clicking Run. When prompted, enter the word Control at the Run prompt to open Control Panel. Click on System and Security and then Free Up Disk Space in the Windows Tools section.
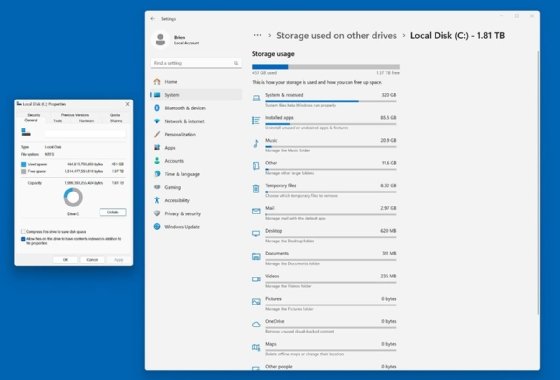
Once you select a hard disk, you are taken to a screen showing you how much space you can reclaim by removing unnecessary files (Figure 3). The interface also enables you to delete these files with a single click rather than requiring you to remove each file and folder manually.

You can also find a detailed description of how your system's storage space is used by opening File Explorer and clicking This PC. Next, right-click on your hard disk, and select the Properties command from the shortcut menu. When the disk's properties sheet is displayed, select the General tab. Finally, click the Details button to see a breakdown of how your disk space is being used (Figure 4).
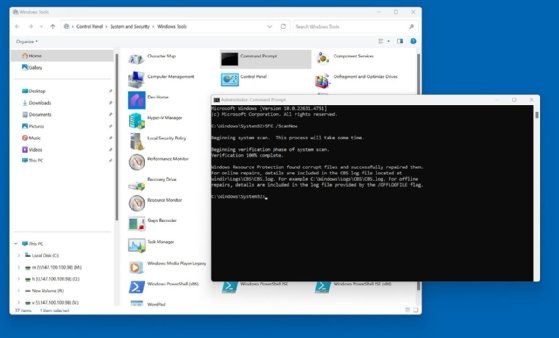
Step 3. Run System File Checker
The next thing to do if the problem persists is to run System File Checker. This command-line tool verifies the integrity of all the Windows system files. If one or more system files have become corrupted or if some of the files are from the wrong version of Windows, then it can cause many problems.
To run System File Checker, click the Start button and then the All button. Next, click on Windows Tools. When the Windows Tools screen opens, right-click the Command Prompt icon, and select the Run as Administrator option from the shortcut menu. This opens an elevated Command Prompt window. You can run System File Checker by entering the following command.
SFC /ScanNow
If problems are found, System File Checker shows you the compromised files and corrects them (Figure 5).
Step 4. Verify network functionality
Because Windows 11 is designed to be connected to the internet, various problems can occur without network connectivity. You can usually tell if Windows 11 has an internet connection by looking at the network icon in the taskbar.
If you suspect Windows 11 may have lost its internet connectivity, start troubleshooting by verifying that physical connectivity exists. If you are using a wired connection, then make sure that the network cable is securely attached to the PC. If the PC uses a Wi-Fi connection, then take a moment to verify that it is connected to the correct access point.
The next step in troubleshooting network issues is to open a Command Prompt window and use some command-line tools to validate the machine's network connection. To get started, right-click on the Start button, and then click Run. When you arrive at the Windows Run prompt, enter CMD. This opens a Windows Command Prompt window.
Now, enter the ping command, followed by a favorite website. This confirms whether the PC can communicate with the site. It's worth noting that some websites block ping traffic, but Google.com and ESPN.com are known to allow ping tests.
If the ping test fails, enter the following command.
ipconfig /all
This command shows you the machine's IP address configuration. Check that the IP address is not missing and does not fall into an unexpected subnet range. These could be indications that the PC is failing to connect to a Dynamic Host Configuration Protocol server, it is connecting to the wrong DHCP server or the DHCP server has run out of IP addresses to lease. While you are at it, check to make sure that the DNS server configuration is correct.
If the IP address configuration is correct but connectivity is still not working, you might try resetting the network connection. To do so, enter these commands.
ipconfig /Release
ipconfig /Renew
The first command releases the current IP address lease, while the second command attempts to lease an address -- the same address is often used.
Step 5. Run a troubleshooter
If nothing done so far has corrected the problem, you should try running a troubleshooter. Windows 11 contains numerous built-in troubleshooters that can automatically correct various system problems. While it's true that these troubleshooters have a reputation for being ineffective, they can still often detect and fix various issues.
To access the Windows troubleshooters, click on the Settings icon. When the Settings page opens, select the System tab. Then, scroll through the list of options until you locate the Troubleshoot option. Click on Troubleshoot to open the Troubleshoot page. Ignore the options presented on this page, and instead click on Other Troubleshooters. This takes you to a screen containing a long list of automated troubleshooters (Figure 6).
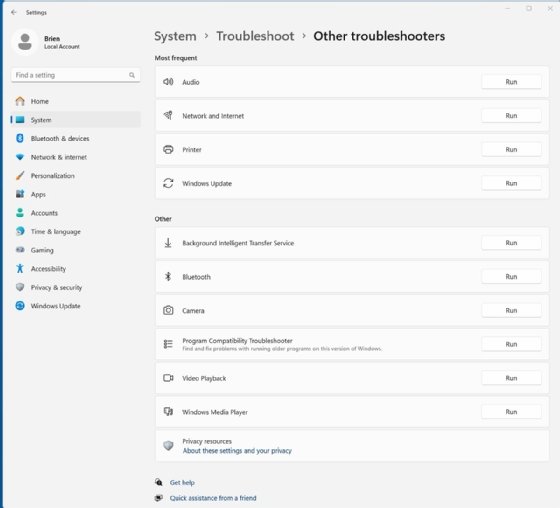
Now, you need to scroll through the list of troubleshooters to locate the one that most closely matches the problem the PC is experiencing. Once you find a troubleshooter that seems like a good fit, click the corresponding Run button to launch the troubleshooter. Each troubleshooter works slightly differently, but typically, the troubleshooters use a wizard-style interface to guide you through a mostly automated diagnostic and repair process. At the end of this, the troubleshooter usually gives you a diagnosis and tells you how it fixed the problem.
Step 6. Roll back the system
If the Windows troubleshooters do not correct the problem, another possible option is to roll the entire system back to a previous point in time. While this option does work well, you can only use it if System Protection is already enabled.
To determine if System Protection is turned on, right-click the Start button, and click System. When the System window appears, click on Advanced System Settings. This opens the System Properties sheet. Select the System Protection tab, and ensure System Protection is set to On (Figure 7). It's turned off by default, so someone would have had to enable it. It's also worth noting that System Protection is enabled or disabled for each drive individually. However, rolling back the system to an earlier time usually only involves the C: drive.

The System Protection tab has a System Restore button near the top of the window. This button is grayed out if System Protection is currently disabled. However, if System Protection is enabled and at least one restore point exists, you can use the System Restore button to revert your system to an earlier point in time. Of course, you need this restore point to be at a time when the PC was working properly. The System Restore feature is not intended to act as a true backup substitute, but it enables you to perform point-in-time recovery for Windows 11.
If you have both a point-in-time backup and a system restore point, it's usually better to restore the backup rather than rely on System Restore. If the problems you are having are related to malware, restoring a backup has a better chance of fixing the problem, assuming that the backup was created before the infection.
Step 7. Fully reset or reinstall Windows
One final option to fix the problem is to reset the PC. Although this option is almost always successful, it should be used as a last resort because it is destructive. When you reset your PC, the PC reinstalls Windows from scratch. At a minimum, this means reinstalling all the applications. This action can also erase data from the PC, so you should back up your data first.
To reset Windows 11, click Settings, and select the System tab. Now, click the Recovery option and the Reset PC button (Figure 8).
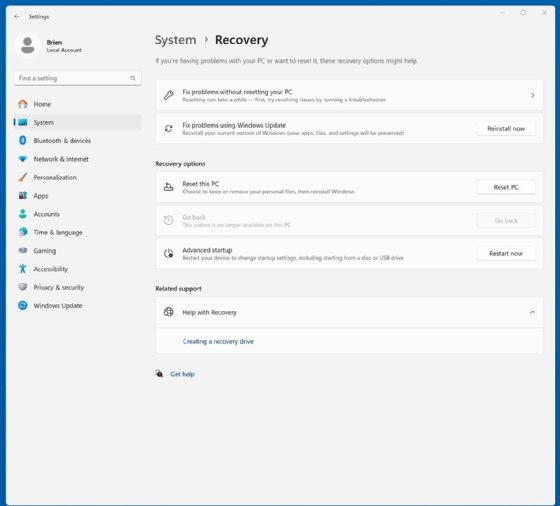
Upon clicking the Reset PC button, you see a screen asking if you want to keep your files but lose everything else or if you want to remove absolutely everything from the PC.
If you prefer not to perform a destructive update, click the Reinstall Now button. While the reinstall option might not fix every problem, it is designed to preserve your apps, files and settings rather than forcing you to reinstall everything from scratch. Even though the reinstall option is meant to be nondestructive, it's always a good idea to make a backup first.
Editor's note: This article was originally published on Jan. 20, 2023, and has been updated to include details on network functionality and ensure the information is up to date.
Brien Posey is a former 22-time Microsoft MVP and a commercial astronaut candidate. In his more than 30 years in IT, he has served as a lead network engineer for the U.S. Department of Defense and a network administrator for some of the largest insurance companies in America.