
Getty Images/iStockphoto
4 steps to troubleshoot Windows 11 network issues
When IT administrators encounter problems with a Windows 11 network connection, they have plenty of options to fix the issue. Learn the steps to troubleshoot these issues.

For administrators who handle Windows desktops, the occasional network glitch is inevitable.
With a deliberate and systematic approach, it should be easy to address network issues on a Windows 11 desktop. Following a step-by-step troubleshooting will often fix any Windows 11 network issues outright or at least guide you in the correct direction.
As a Windows administrator, you should learn this troubleshooting process and apply it to any network issues you encounter.
Step 1. Use the Windows 11 Network Troubleshooter
There are numerous specific native troubleshooters that can help with target issues; in this case you'll want to use the Network Troubleshooter. To find this utility, navigate as follows: Start > Settings > System > Troubleshoot > Other troubleshooters > Network Troubleshooter. This step can fix many common issues on its own without much hands-on action required.
Click the Run button to the right side of Internet Connections to run this troubleshooter. After it completes a brief set of built-in diagnostics, a dialog will appear showing two choices (Figure 1).
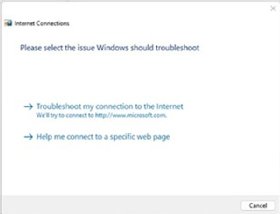
For network-specific issues, select the first option: Troubleshoot my connection to the internet.
Troubleshooting internet access
Because accessing the internet means accessing a local network of some kind -- either Wi-Fi or some form of wired Ethernet -- the troubleshooter runs the Windows Network Diagnostics first and foremost. Next, the troubleshooter runs a set of internet connectivity tests. This part of the troubleshooter is called Internet Connections. Both items will show their results if you click Publisher details in the Troubleshooting report that this tool produces (Figure 2).
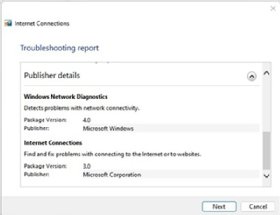
As you can see from the explanation for Internet Connections, the tool checks internet connectivity in general. It performs website related checks as well.
When Windows checks network and internet connectivity, it determines and reports on a wide range of potential issues. These include the following problems, each of which have a different fix:
- Interface status. You can't access the network if no network interface is available or functioning properly. Windows will tell you if it can't access the local network. If that happens, you need to troubleshoot the interface itself, as demonstrated in Step 2 of this article.
- Network addressing problems. If your network software can't interact with the network, it may indicate an issue with network addressing. This can prevent local network access as well as internet access. While the troubleshooter can handle many issues related to addressing, you may need to troubleshoot your TCP/IP configuration if addressing issues persist. This is covered in Step 3 of the article.
- Internet access issues. Even if the local network is accessible, there may still be no internet access available. Try resetting the network gateway -- a device that forwards outbound local traffic onto an internet connection and inbound internet traffic onto the local network. You many need to contact your Internet Service Provider (ISP) to determine if the problem is on their end of your internet connection. The steps to this process are covered in Step 4 of this article.
If the troubleshooter doesn't fix your Windows 11 networking issues, continue to follow the steps in this article, depending on what the initial report tells you.
Step 2. What to do if the network interface is not working
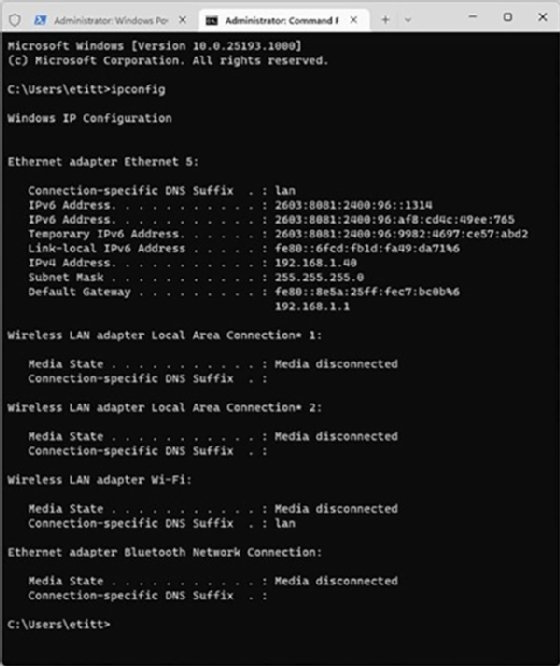
The first thing to do when the network interface isn't working is to identify the network interface in use on the affected PC. If you run the ipconfig command as a command prompt, it should tell you whether you're using a wired or wireless network connection. In this example, the Windows 11 PC is on wired ethernet, because it provides connection and address information under the heading Ethernet adapter Ethernet 5 (Figure 3).
If you unplug the wired connection into that PC's connected dock, it switches over to Wi-Fi. In that case, the interface named Wireless LAN Adapter Wi-Fi shows up with a different IP address. This tells you what to look for in Device Manager should one or the other adapter go missing or stop working. In this example, both networks are present, even if only one or the other is in use (Figure 4).
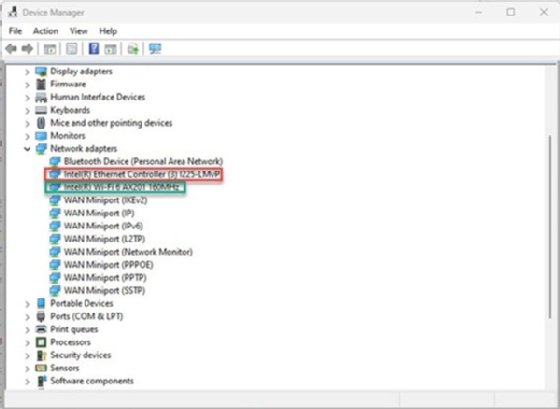
If an interface shows up but is unavailable, the most likely cause is a damaged or inoperative device driver. First thing to try is disable and then reenable that device. To do this, right-click on the target device and select Disable device in the pop-up menu. In this case, it's either Ethernet Controller for the wired connection or Wi-Fi for wireless. Wait about 30 seconds, then right-click again and select Enable device from the same pop-up menu. This may be enough to fix some problems.
If that doesn't work, replace the existing device driver. The easiest way to do that is to uninstall the current problem driver, then let Windows find and reinstall the driver it thinks should be in place. To do that, right-click the problem driver in Device Manager, then select Uninstall device. A quick restart after that should get Windows to install the proper driver upon reboot.
If that doesn't do the trick, you'll need to find a replacement driver elsewhere online. The best sources are the Microsoft Update Catalog, or the preferred device OEM's website.
Alternatively, you could try a replacement USB device instead. You can purchase a plugin USB 3 GbE Ethernet adapter or an equivalent Wi-Fi adapter for about $30 U.S. dollars these days. It's a good idea to keep at least one of each in your toolkit as an administrator to have quick fixes for persistent network issues. If a plugin device works but you can't use the built-in device, you must either switch over or replace the inoperative network adapter.
Step 3. Fixing problems with network addressing
Most problems with network addressing occur when some kind of Dynamic Host Configuration Protocol (DHCP) issues occur. If the Windows troubleshooter can't fix them, you may need to check the router or gateway device, which deliver the proper address info to the interface. The biggest clue that such a problem is present is if ipconfig shows a network address that starts with the numbers 169.254.0.x through 169.254.255.254. This is known as an Automatic Private Address. It tells you that Windows isn't obtaining an IP address from an external source and is improvising to provide one automatically on your behalf. The first thing to try at the command line is to reset your IP address.
Without the proper addresses for the affected PC, DHCP and DNS servers, local network and internet access become impossible. If resetting the IP address doesn't work, you can try resetting the network adapters.
If that doesn't work either, you'll want to check the router and gateway to make sure your PC is able to access and obtain the correct information. Check the documentation for your router -- readily available at vendor or ISP sites, depending on whether it's your router or the provider's -- for the rest of those details.
Step 4. Fixing issues with the network itself
At times, your PC may be working just fine. The best way to verify that this is the case is if the Windows 11 desktop is able to access the local network, but unable to access the internet. If so, you may see the ominous globe icon at the lower right of the screen in the taskbar notifications area. It will appear in place of the typical Wi-Fi or wired network symbols.
When this happens, the first thing to try is to simply reboot the PC. If that doesn't bring the internet connection back, the problems not in the PC. The next thing to try is to reset your router -- or whatever device connects your local network to the internet. If that doesn't work, you'll need to call your ISP to see if they're having issues or an outage event. Their tech support team can help you troubleshoot your connection if all is well on their end, or you will find out when they expect to set things back to rights.