Getty Images/iStockphoto
Learn how to bootstrap Kubernetes clusters with kubeadm
In this guide, learn to create, configure and run a Kubernetes cluster from scratch with kubeadm, a command-line tool that simplifies and automates cluster setup and management.

Container orchestration is the process of deploying and managing containers throughout their lifecycles. Kubernetes is an open source platform for container orchestration that automates container management and deployment, and applies container-related policies.
Kubernetes automates deployment, scaling and administration of containerized applications on a single host or across multiple hosts, making it a popular choice for organizations of all sizes. You can install and configure Kubernetes on bare metal or a VM.
What is bootstrapping a Kubernetes cluster?
Bootstrapping is the process of creating a new Kubernetes cluster from scratch and getting it up and running.
Bootstrapping a Kubernetes cluster involves setting up the control plane and worker nodes and determining which node has the correct information with which all the other nodes should synchronize. You can do this manually, programmatically or with kubeadm, a Kubernetes tool to set up and manage clusters.
When should I bootstrap a Kubernetes cluster?
Bootstrapping a cluster can be helpful when starting from scratch or changing an existing Kubernetes deployment's configuration. Bootstrapping is also useful when creating an isolated environment to test new features or work around known bugs, an approach known as canary releasing.
You might also want to create a new cluster from scratch if you're building a custom Kubernetes installation and don't want the default software that comes with distributions like Debian or RHEL. For example, you might want to include more recent versions of container runtimes than those included in RHEL version 7 or Debian version 9.
What is kubeadm and what does it do?
Kubeadm is a command-line tool that simplifies the process of setting up and managing Kubernetes clusters. With kubeadm, you can create and set up Kubernetes infrastructure without other orchestrators or tools. Kubeadm is well suited for both beginners starting to explore Kubernetes and experienced users who want to set up a new cluster quickly.
Kubeadm automates the creation and configuration of the necessary components for a Kubernetes cluster, including setting up the control plane and worker nodes with the basic networking and security configuration required to run Kubernetes on bare-metal systems. Kubeadm sets up the underlying machinery needed for Kubernetes, downloads and installs the necessary software, configures networking and sets up authorization. It also facilitates joining nodes to a cluster.
Prerequisites for bootstrapping a Kubernetes cluster using kubeadm
At least two nodes are necessary for a Kubernetes cluster to operate: a control plane and worker node. Kubernetes permits only one control plane node but any number of worker nodes. Control plane nodes require a minimum of 2 GB RAM and one virtual CPU; worker nodes require a minimum of 2 GB RAM and one vCPU.
In addition to kubeadm, you need the following packages to bootstrap a Kubernetes cluster:
- Kubelet. This component registers nodes with a cluster and starts containers and pods. It runs on each node in the cluster and manages tasks, such as scheduling pods and starting containers.
- Kubectl. This command-line utility manages clusters, nodes and pods.
To install Kubernetes on Windows, install Docker for Windows, and then select Enable Kubernetes in the Docker desktop UI. This also installs kubectl automatically.
Bootstrap a Kubernetes cluster using kubeadm
After installing Kubernetes, the next step is to configure it.
To set up kubeadm, create a configuration file called kubeadm.yaml. This file contains all the information kubeadm needs to set up your cluster. Kubeadm automates the process of creating a cluster by running the kubeadm init command on a set of nodes, which uses a YAML file to specify the desired settings for the new cluster.
Install kubectl on Windows, or install kubectl via the command line using the following shell command:
curl -LO
https://dl.k8s.io/release/v1.24.0/bin/windows/amd64/kubectl.exe
To bootstrap a Kubernetes cluster, ensure that the latest version of kubeadm is installed using the following command:
curl -sSL
https://github.com/kubernetes/kubeadm/releases/download/v1.0.1/kubeadm-1.0.1-linux-amd64 | bash
After installing kubeadm on your server, create a configuration file for the new cluster. The configuration file contains information about the desired settings for the new cluster.
Create the config file using the following command:
kubeadm init --config-file = config.yaml
The config file is located in the current working directory. Save it to a disk for future use by running the following command:
kubeadm init --save > config.yaml
Now, initiate the cluster:
kubeadm up
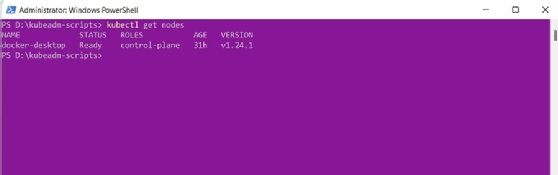
Finally, execute the following command to verify that the cluster is operational:
kubectl get nodes
Figure 1 shows the expected output.
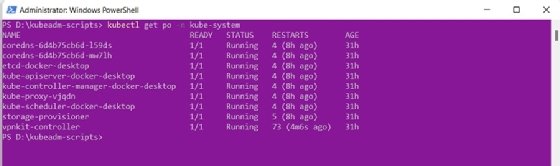
The following command lists all pods present in the kube-system namespace:
kubectl get po -n kube-system
Running this command should result in the output shown in Figure 2.